background image

6

INSTALLING AND 

CHARGING THE BATTERY

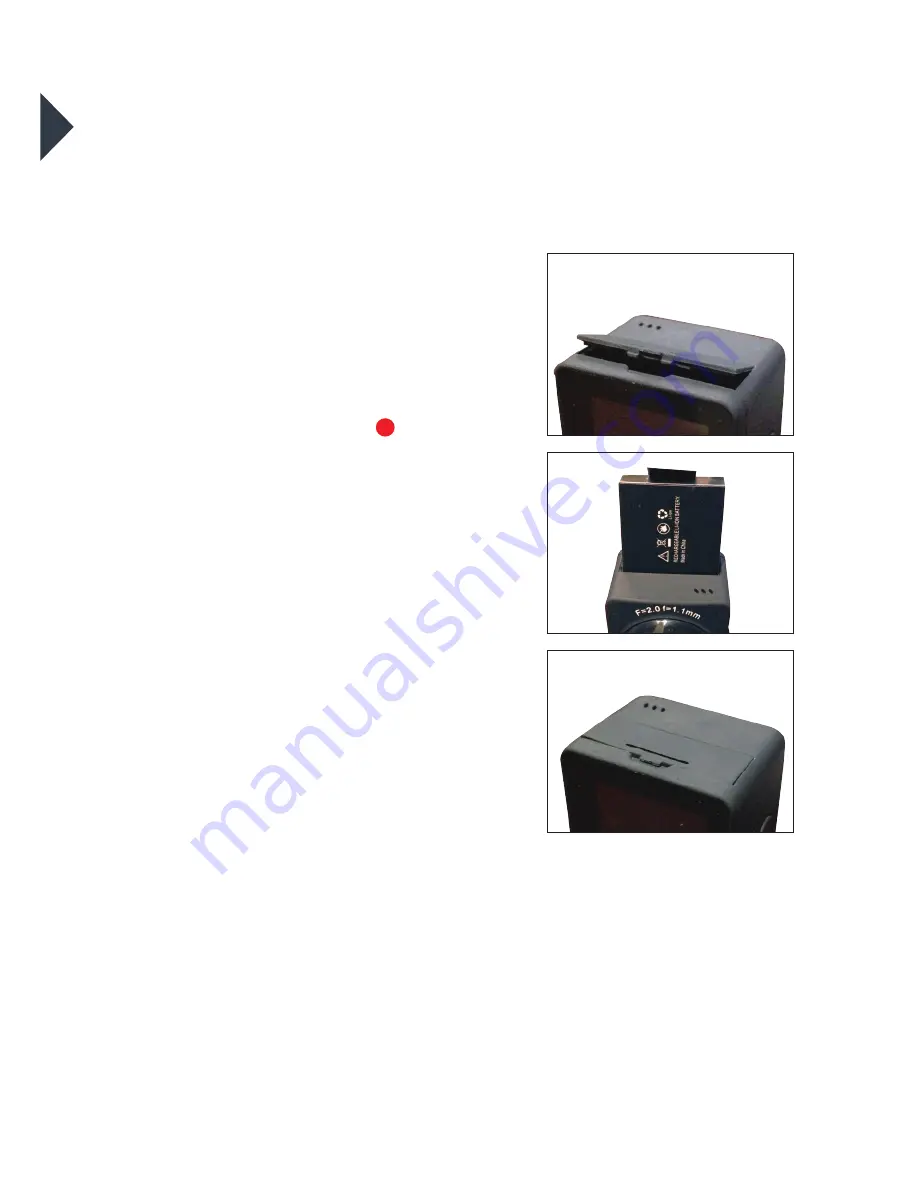
INSTALLING THE BATTERY

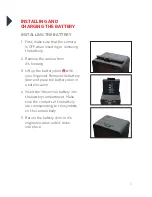
1.  First, make sure that the camera 

is OFF when inserting or removing 
the battery.

2.  Remove the camera from  

it’s housing.

3.  Lift up the battery door   with 

your fingernail. Remove the battery 
door and place the battery door in 
a safe location.

4.  Insert the lithium-ion battery into 

the battery compartment. Make 
sure the contacts of the battery 
are corresponding to the symbols 
on the camera body.

5.  Return the battery door in it’s 

original location until it clicks  
into place.

9

Summary of Contents for 3S-0686

Page 1: ...360o FULL HD SPORTS ACTION CAMERA with Wi Fi 3S 0686 USER GUIDE...

Page 2: ...event water or sand particles from entering the housing when it is used on the beach or in water Water sand particles dust or composites containing salt may cause damage Keep the camera free of dust a...

Page 3: ...9 Capture Playback Modes 10 Camera Settings Menu 14 Downloading the APP 18 Connecting to the APP 19 Transferring Video and Images to PC or Mac 20 Playback Video and Images on a TV with a HDMI port 20...

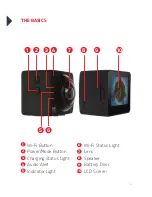
Page 4: ...4 THE BASICS 1 6 3 8 9 10 2 7 4 5 Wi Fi Button Power Mode Button Charging Status Light Audio Alert Indicator Light Wi Fi Status Light Lens Speaker Battery Door LCD Screen 1 2 3 4 7 5 6 10 8 9...

Page 5: ...5 Shutter Select Button Micro USB Port microSD Slot Micro HDMI Port 11 12 13 14 11 12 14 13...

Page 6: ...it s housing 3 Lift up the battery door with your fingernail Remove the battery door and place the battery door in a safe location 4 Insert the lithium ion battery into the battery compartment Make s...

Page 7: ...a PC MAC or wall adaptor s USB 2 0 port 1A only The Charging Status Light will be lit red while charging and will disappear when charging is completed WARNING Using a wall car charger other than a 5V...

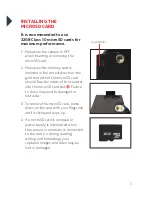
Page 8: ...of the microSD card should face the inside of the camera into the microSD card slot Failure to do so may lead to damaged or lost data 3 To remove the microSD card press down on the card with your fin...

Page 9: ...nd hold the Power Mode Button for 2 seconds until the LCD Screen displays ON and a sound is heard TURNING OFF THE CAMERA Press and hold the Power Mode Button for 2 seconds until the LCD Screen display...

Page 10: ...OTO I PLAYBACK Turn camera ON and repeatedly long press the Shutter Select Button to cycle through camera modes and settings The modes will appear in the following order Mode Description Video Record...

Page 11: ...e red recording icon on the LCD Screen will appear and flash red and the Indicator Light will flash blue which indicates that a recording is in progress The elapsed recording time will be displayed at...

Page 12: ...take a photo make sure the camera is in Photo mode which should be displayed on the LCD Screen If not long press the Shutter Select Button repeatedly until appears TO TAKE A PHOTO Press the Shutter S...

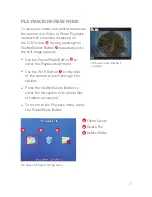
Page 13: ...LCD Screen by long pressing the Shutter Select Button repeatedly until the still image appears Use the Power Mode Button to enter the Playback sub menu Use the Wi Fi Button on the side of the camera t...

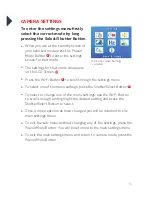
Page 14: ...ct one of the menu settings press the Shutter Select Button To select or change one of the menu settings use the Wi Fi Button to scroll through and highlight the desired setting and press the Shutter...

Page 15: ...15 r v y t s w u x r v t x y s w u Date Time Power Save Key Sound Screen Setting Light Frequency Format Default Setting System Information...

Page 16: ...or ON OFF ON OFF OFF Time Stamp Turn the Time Stamp function ON OFF OFF Date and Time Date OFF MIC Turn the Microphone ON OFF ON OFF ON Snapshot Image Mode Set the Image mode Round Panorama 180 Panora...

Page 17: ...g Sub Menu Screen Save Turn the Screen Save function ON OFF and set the delay OFF 1 min 3 mins 5 mins 1 min Rotate the Screen Turn the Screen Rotation ON OFF ON OFF OFF Language Set the language EN SC...

Page 18: ...by the developer Compatibility varies by device Content playback sharing and access to the camera s memory card might be not available on some devices DOWNLOADING THE APP The OTCam App lets you contr...

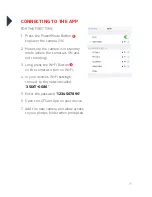
Page 19: ...by mode where the camera is ON and not recording 3 Long press the Wi Fi Button on the camera to turn on Wi Fi 4 In your device s Wi Fi settings connect to the network called 3SIXT 0686 5 Enter the pas...

Page 20: ...located in the desktop item No Name PLAYBACK VIDEO AND IMAGES ON A TV WITH A HDMI PORT 1 Before connecting a micro HDMI cable not supplied stop any recording and disconnect the Wi Fi connection 2 Con...

Page 21: ...21 INCLUDED ACCESSORIES HANDLEBAR POLE MOUNT HELMET STRAPS HANDLEBAR HELMET MOUNT ADAPTER ADHESIVE CLIP BASE SPARE ADHESIVES WATERPROOF HOUSING MOUNT SUCTION MOUNT WATERPROOF HOUSING...

Page 22: ...re it s in good condition 3 Test the integrity of the seal by closing the Waterproof Housing without inserting the camera Submerse the Waterproof Housing completely in a bowl of water for about a minu...

Page 23: ...23 WATERPROOF HOUSING ACCESSORY ASSEMBLY Option 1 Option 2 HANDLE BAR MOUNT...

Page 24: ...24 HELMET MOUNT Option 1 Option 2...

Page 25: ...b g n Power Source 1150mAh rechargeable Lithium ion battery System requirements iOS 9 0 or newer for app Android 3 2 or newer for app Windows XP or newer Mac OSX 10 5x or above Recording time 90 mins...

Page 26: ...ate output work delays or lost profits resulting from the use of the materials You agree to indemnify hold harmless and defend 3SIXT together with its affiliates parent and subsidiary entities success...

Page 27: ...ights and remedies of the consumer under Australian and New Zealand laws in relation to the goods to which the warranty relates Our goods come with guarantees that cannot be excluded under the Austral...

Page 28: ...For more information visit www 3sixtgear com or visit www 3sixtgear com support...

Reviews: