background image

Fig. 45.3 TD-500 Analog Mode

Fig. 45.4 TD-150 Analog Mode

TD-150 have Analog mode always ON, you dont need to change to that mode in

the configurator.

Sensor FW update

TD-150 and TD-600 sensors’ FW update manual:

https://docs.google.com/document/d/16KhS0ZV5Hrb44J66LmGOy7Gy2TKcuEqU

TD-100 and TD-500 sensors’ FW update manual:

https://docs.google.com/document/d/1KZYZBx8zbcA7TRlT8QX4W5yt2mHhz334fVjsXdTpS4c

38

Summary of Contents for TD-150

Page 1: ...d click the slider Calibration without fuel and after filling the sensor with fuel press Full 18 2 Setting the Empty calibration value 19 3 Setting operating mode 21 4 Measurement ranges 23 Sensor ins...

Page 2: ...ssport_TD 500 pdf fmeter ru Basic terms and concepts Fuel level sensor FLS a device designed to measure the fuel level Serial number a code consisting of a series of letters or numbers assigned to a p...

Page 3: ...on the basis of CNT in the approximate range of 0 2 5V TD 500 or 0 2 9V TD 150 Frequency the mode in which the corresponding frequency in Hz is formed on the basis of CNT 301 1323 Hz with a range of...

Page 4: ...S TD 150 and TD 500 fuel level sensors installation and configuration procedure includes the following steps 1 Preparation of the tank selecting installation spot removing fuel vapors and fumes drilli...

Page 5: ...y 6 Connecting the sensor to a GPS tracker ATTENTION The one above is the only right order of steps You cannot calibrate the sensor before changing its length You cannot set Empty calibration value th...

Page 6: ...6...

Page 7: ...cipient and administer the vapor from that recipient into the tank so it could push the fuel vapors and fumes out be sure to keep the fire used to boil the water far enough from the fuel tank Fig 1 Fi...

Page 8: ...of wire If the space around the selected spot is clear drill a bigger hole with a 30 35 mm bimetallic hole saw be sure to tilt the saw a little bit to prevent the cut piece from falling into the tank...

Page 9: ...eometric center of the tank try to pick a spot as close to the geometric center as possible that spot also must coincide with the point where the tank s height is at its maximum This way you minimize...

Page 10: ...s should be calculated based on the following formula L H 15 mm where L is the length of the tubes after they were cut or extended and H is the height of the tank at the installation spot ATTENTION Th...

Page 11: ...the sensor s circuit inside its head Fig 8 Cutting the tubes Do not let any metal shavings end up stuck inside the tubes that could provoke a short circuit in the sensor and then you would need to blo...

Page 12: ...fixed The collet nuts the gold yellow ones shown on the Fig 10 connect the parts of the inner tube Once inserted into the parts of the inner tubes and screwed onto the stud bolt they don t have to to...

Page 13: ...put of the sensor the white wire is the line B of the RS485 output the black wire is the GND and the red wire is the PWR We recommend using the USB RS485 converter C200M manufactured by our company si...

Page 14: ...r Windows from the same Downloads section Additional files tab Fig 16 and 17 While installing them be sure to wait until the message informing of the installation being complete appears on your screen...

Page 15: ...Fig 13 Additional files Fig 14 Windows components and libraries Fig 15 RuntimePack is installed 15...

Page 16: ...se the right installation exe file Fig 16 Fig 16 Drivers version If the drivers were installed properly after you connect the C200M to your PC laptop a STMicroelectronics Virtual COM Port COM X must a...

Page 17: ...via the 6 pin MOLEX connector Fig 19 or via the clamps and wires if the extension cable is already connected to the sensor The orange wire is the line A of the RS485 output of the sensor the white wir...

Page 18: ...Then click on the FLS button or you can click this button before powering on the sensor Fig 21 You need to do that within the 15 seconds after the sensor was powered up if you changed its operating mo...

Page 19: ...connection 4 Status message with the sensor s current status 5 Current readings of the sensor 6 Current mode of the sensor range of the output data 1 1023 or 1 4095 and filtration type and level Sens...

Page 20: ...ig 23 Entering sensor calibration menu Make sure the sensor is physically not in the fuel and dry and click Calibrate Fig 24 Sensor calibration menu After that you can close this menu by pressing OK 2...

Page 21: ...upside down 2 cover its drainage holes with an insulation tape or something similar insert the centrator into the tubes Fig 25 Turning the sensor Blocking the drainage holes Inserting centrator 3 the...

Page 22: ...y calibration value Empty the tubes or take the sensor out of fuel completely wait for 2 3 minutes until the last drops of fuel trickle down the tubes and then click on the EMPTY button Fig 26 Calibra...

Page 23: ...ure to unblock the drainage holes after the calibration is over Otherwise when you put the sensor into the tank the fuel will not be able to go up the tubes because of the air trapped inside and the l...

Page 24: ...ust be able to poll the sensor i e request the data from it The tracker must be able to communicate with the sensor in accordance with the LLS communication protocol Analog mode is used to connect the...

Page 25: ...iodic Active RS485 mode should be used if the tracker has the RS485 interface but cannot poll the sensor i e request the data from it the sensor will be transmitting its data by itself every 2 seconds...

Page 26: ...Save the parameters to device The 1024 range is usually recommended for the sensors that are shorter than 1 meter However if dealing with a stationary tank whose height is low while the width and leng...

Page 27: ...k The centralizer from the sensor s installation kit must be already inserted into the tubes even before the sensor FULL and EMPTY calibration to securely separate them from touching each other and pr...

Page 28: ...reviously Make sure that the gasket is still there between the sensor s flange and the tank s top surface Then screw in the self tapping screws from the sensor s installation kit into the 3mm holes yo...

Page 29: ...on table of 20 lines in total Normally the platform s capacity is a lot higher TD 150 don t have this feature Besides it is easier to adjust or correct any mistakes in the table if it is uploaded onto...

Page 30: ...ons If you cannot empty the tank completely you need to somehow find out how many liters or gallons are already there in the tank After that you can add the second line manually Let s imagine that in...

Page 31: ...and empty or some surplus of the sealer got stuck in them If this happens the air inside the tubes gets trapped and doesn t allow the fuel go up the tubes Fig 37 First portion in Next you add another...

Page 32: ...tank calibration with portions of 10 liters just like before The level gets to some peculiarity of the tank s shape Fig 39 Reducing portions volume You reduce the portions volume from 10 to 5 liters A...

Page 33: ...hould have a tank calibration table that looks like the following example Fig 41 Tank is full and table is ready If in your case the level cannot reach the 1023 or 4095 because you cannot fill the tan...

Page 34: ...e table with our recommendations below Table 1 The general rule is the more portions the more precise will be the data in the reports on the platform You can either upload the table onto your platform...

Page 35: ...the level of Filtration and click Save the parameters to device Fig 44 Smoothing Filtration The following are our recommendations on what level of Filtration to choose for a particular type of vehicl...

Page 36: ...the filtration level The rougher is the terrain the higher must be the filtration The filtration reduces the magnitude of level fluctuations that happen because of the fuel s sloshing during trips Co...

Page 37: ...0 RS 485 Mode For explosion proof For Explosion proof connection in any mode of the wired sensors you need to connect with a resistor not a fuse INSTEAD OF THE FUSE NOT WITH THE FUSE Fig 45 2 TD 500 T...

Page 38: ...need to change to that mode in the configurator Sensor FW update TD 150 and TD 600 sensors FW update manual https docs google com document d 16KhS0ZV5Hrb44J66LmGOy7Gy2TKcuEqU TD 100 and TD 500 sensors...

Page 39: ...port has the number 11 or higher you need to change it to any number between 1 and 10 To do so open the Windows Device Manager and right click on the COM port you need to modify Then select the Proper...

Page 40: ...r from 1 to 10 It could be marked as in use you still can select that option as long as there are no real COM ports connected at the moment and listed in the Ports COM LPT section of the Device Manage...

Page 41: ...ge between the devices To do that connect the sensor to the tracker via Rs485 Power both devices up Then take a Rs485 USB converter and connect it between the sensor and the tracker as follows 1 For R...

Page 42: ...ds then everything is fine Fig 50 Sensor responding to tracker via Rs485 If the tracker polls the sensor and the sensor responds then everything is fine If there is no communication between the two de...

Page 43: ...for example then the request will look like this 31 FF 06 29 where FF stands for 255 converted from DEC into HEX and 29 stands for the CRC calculated for this request in particular To calculate the C...

Page 44: ...er in this case you need to connect the Rx of the Rs232 USB converter with the Tx of the sensor green wire and the Rx of the sensor with the Tx violet wire of the converter Common issues and how to re...

Page 45: ...ts readings The current level in such case will be higher than the full calibration value If this happens blow the sensor through its drainage holes with compressed air and flush it with pure fuel Als...

Page 46: ...ice Manager Fig 57 Select COM port on the image the COM port s number doesn t coincide this is only an example connect another USB cable to the C200M ADD PWR port check if there s nothing wrong with t...

Page 47: ...Then the sensor s black wire must be connected to the GND of the power supply One probe of the multimeter has to be connected to the red wire of the sensor and the other one to the PWR wire of the po...

Page 48: ...n to the line B white wire of the sensor Power the sensor up Fig 59 Line A voltage check relative to GND Fig 60 Line B voltage check relative to GND Compare the readings you get on both A and B lines...

Page 49: ...qual to the same length and install them in similar tanks ATTENTION Setting calibration values manually will likely increase the margin of error of the sensor We do not recommend using this option To...

Page 50: ...Fig 61 2 Setting Full and Empty values manually Fig 61 3 Setting Full and Empty values manually 50...

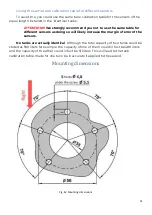
Page 51: ...ent sensors as doing so will likely increase the margin of error of the sensors No tanks are actually identical Although the total capacity of two tanks could be stated as 500 liters for example the c...

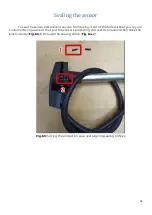
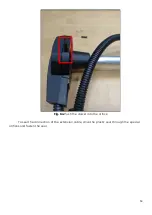
Page 52: ...ing it out of the tank without you or your customer being aware of that put the sensor s protecting cap over its head and then drive the plastic dowel Fig 63 1 through the sealing orifice Fig 64 2 Fig...

Page 53: ...Fig 64 Push the dowel into the orifice To seal the connection of the extension cable drive the plastic seal through the special orifices and fasten the seal 53...

Page 54: ...Fig 65 Sealing cable connection point Fig 66 Sealing sensor old design 54...

Page 55: ...st be used if the sensor is to be powered up by a 12 V power supply The red one must be used if the 24 36 V power supply will be used The idea behind this is that if there is a short circuit or a sudd...

Reviews: