background image


Viewing data and Data Finder Page 


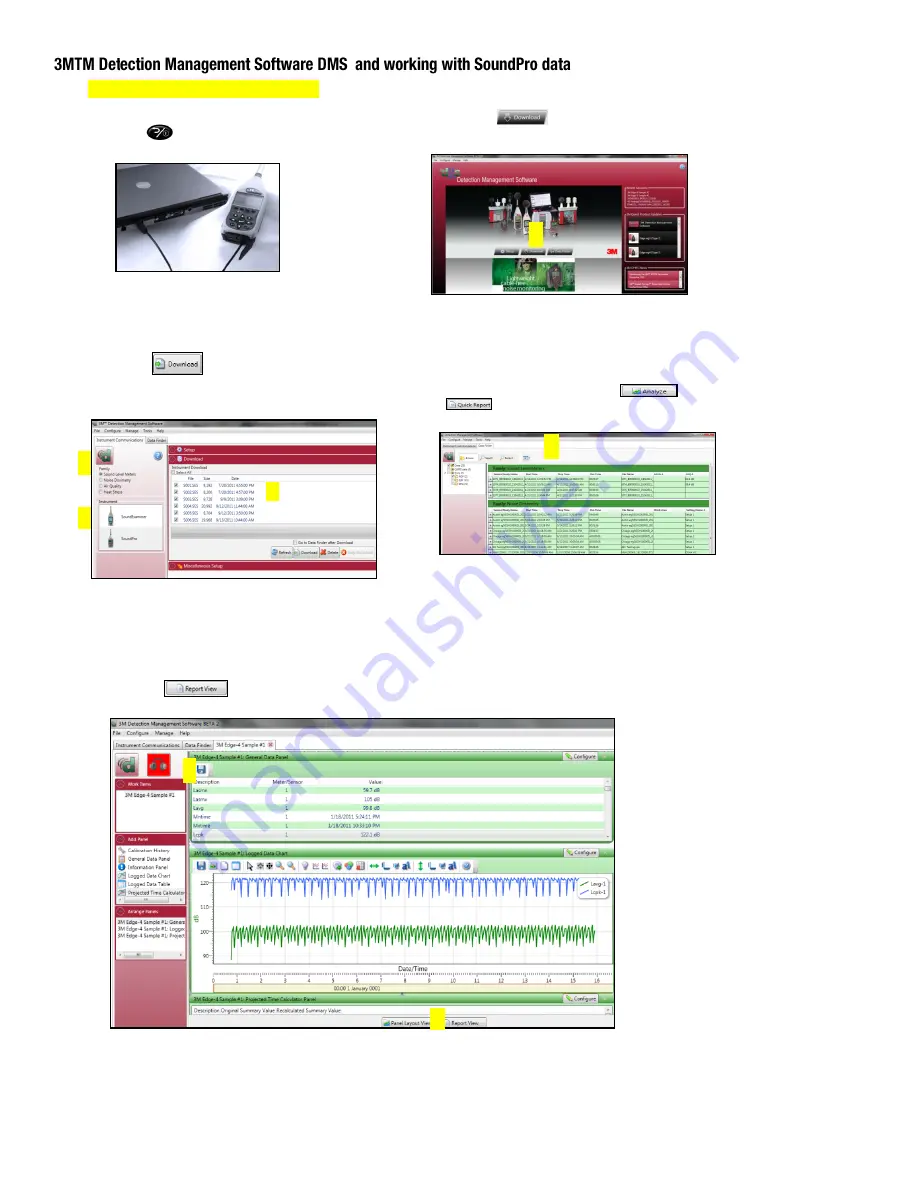
1.  Communicating/connecting the SoundPro to the pc  


A.  Turn On           the Sound Pro. 

B.  Plug in USB cable from SoundPro to pc. 


3.


SoundPro and downloading


  A.   Select the SLM family and the SoundPro mode  from the 

Instrument window (see A).  Click on “

Go to session finder after 

download

” box. 


B.  Click the                     button (See B). 


C.  Once downloaded, click the Data Finder tab (if you did not select 

“go to session finder in step A”.) (See C). 

2.  DMS Welcome page and instrument communication 

A.  Click on                    icon (see A) to access the 
Instrument download panel. 


4.  Selecting and viewing data 


A.  The Data Finder page (see A) is used to view, select, and 

preview reports. Note:  Click Browse to view all data files. 

B.  Select the data by clicking on either the session/study (Note: 

you may need to expand to see the study data. 

C.  To view in Graphs and Tables, click on                         or                     
                         buttons. 

Data Finder page


5.  Viewing Data in graphs & tables  & Report View  

      The graphs and tables page is noted as the panel layout view page. 

A.  The session/study data page displays the data in logged data    
      charts/tables (see A).  


B.   Click on                          to view the panels in a report format  

      (see B). 


Summary of Contents for SoundPro SE Series

Page 1: ...3M Personal Safety Division 3MTM SoundPro SE DL SeriesSound Level Meters SoundProQuick Start Guide ...

Page 2: ... settings to fit the specifications of your sound study To open the Setup menu from the start screen press the arrow keys and press key when selected The setup menu will appear To change the parameters navigate to the appropriate menus and make changes as needed See the user manual for specific details and term explanations for more information 1 Display 8 Softkeys 12 On Off and Esc Escape key 2 B...

Page 3: ...re the Post Calibration information A sample screen is displayed below with post calibration history Position the SoundPro in the field Press the run key to start measuring To pause a study for example lunch breaks press the run pause key To start measuring again press the run pause key Continue this process until your measurements are complete by press the Stop key This will end the session 1 Fro...

Page 4: ... measured value is above the minimum value for the selected measurement range Community Noise screen This screen shows the results of measurements commonly associated with community noise studies Dosimetry screen The Dosimetry screen provides several types of measurements of the accumulated personal exposure to noise Broadband amplitude Amplitude in the band Selected band Broadband Bar Chart view ...

Page 5: ...trument communication A Click on icon see A to access the Instrument download panel 4 Selecting and viewing data A The Data Finder page see A is used to view select and preview reports Note Click Browse to view all data files B Select the data by clicking on either the session study Note you may need to expand to see the study data C To view in Graphs and Tables click on or buttons B A Data Finder...

Page 6: ...ality and select toxic combustible gases The 3M Detection brand of instrumentation is used by safety and industrial hygiene professionals to help comply with applicable occupational standards and regulations About 3M Personal Safety 3M offers a comprehensive diverse portfolio of Personal Safety solutions providing respiratory protection hearing protection fall protection reflective materials for h...

Reviews: