INSPECTING THE RESPIRATOR
16
P/N 595360-01
Rev G
202004
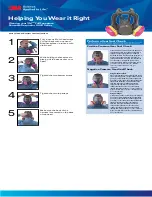
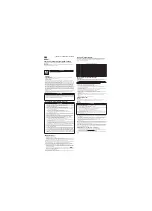
5 Inspect the nose cup.
a Inspect the nose cup for cuts or damage. Look for any signs of damage to the facepiece port side of the nose
cup where the regulator attaches.
b Verify that both inhalation valves in the nose cup are present and properly installed.
c Verify that the nose cup is properly installed. Check that the nose cup is properly seated between the flanges
of the voicemitter ducts and over the chin cup. See
Figure 1-4 Checking the nose cup installation
6 Verify that the facepiece is clean. See
7 Adjust the head straps to the full outward position.
CAUTION
If you remove the nose cup for inspection, be sure to reassemble it correctly.
CAUTION
Always verify that the proper nose cup is installed prior to donning the 3M Scott AV-3000 HT facepiece.
Facepieces equipped with a 3M Scott Sight imaging system assembly (part number 201448-01, 201448-02,
or 201448-03) use an alternate style nose cup to accommodate the In-Mask Display (IMD). Always use a
nose cup with part number 201476 (Small), 201477 (Medium), or 201478 (Large) when using an IMD.
WARNING
Never use the Scott Sight nose cup without the In-Mask Display (IMD) attached.
WARNING
If you find any damage or suspect that the facepiece may have been exposed to conditions that may have
caused damage, remove the facepiece from service and replace it. Failure to do so may result in serious
injury or death.
AV-3000 HT
VISION C5
Summary of Contents for SCOTT AIR-PAK X3 PRO
Page 4: ...4 P N 595360 01 Rev G 202004...
Page 8: ...8 P N 595360 01 Rev G 202004...
Page 40: ...SOFT GOODS ASSEMBLY DISASSEMBLY 40 P N 595360 01 Rev G 202004...
Page 53: ...53 NOTES...
Page 54: ...54 NOTES...
Page 55: ...55...