


3M™ Multimedia Projector X62 Product Safety Guide
© 3M 2006
7
CAUTION
•
To reduce the risk associated with explosion, and/or chemicals from a leaking battery:
-
Use only with battery type AA or equivalent.
Use only with battery type AA or equivalent.
-
Orient the battery's plus (+) and minus (-) terminals of the batteries according to
Orient the battery's plus (+) and minus (-) terminals of the batteries according to
the markings found on the remote control.
-
Do not leave the battery in the remote for an extended period of time.
Do not leave the battery in the remote for an extended period of time.
'R QRW KHDW GLVDVVHPEOH VKRUW UHFKDUJH RU H[SRVH WR ¿UH RU KLJK WHPSHUDWXUH
'RQRWKHDWGLVDVVHPEOHVKRUWUHFKDUJHRUH[SRVHWR¿UHRUKLJKWHPSHUDWXUH
-
Do not carry batteries loose in your pocket or purse.
Do not carry batteries loose in your pocket or purse.
-
Avoid eye and skin contact in the event that battery would leak.
Avoid eye and skin contact in the event that battery would leak.
-
Do not mix used and new batteries.
Do not mix used and new batteries.
•
To reduce the risk associated with the impact of a falling projector:
-
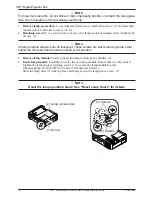
Use only the 3M™ brand wall/ceiling mounting hardware kit if wall or ceiling
Use only the 3M™ brand wall/ceiling mounting hardware kit if wall or ceiling
mounting is desired.
,QVWDOODWLRQ RI WKH 0 ZDOOFHLOLQJ NLW PXVW RQO\ EH SHUIRUPHG E\ TXDOL¿HG SHUVRQQHO
,QVWDOODWLRQRIWKH0ZDOOFHLOLQJNLWPXVWRQO\EHSHUIRUPHGE\TXDOL¿HGSHUVRQQHO
-
Adhere strictly to the proper installation procedure as outlined in the installation
Adhere strictly to the proper installation procedure as outlined in the installation
instructions when installing the 3M™ wall/ceiling kit.
$OZD\V RSHUDWH WKH XQLW RQ D ÀDW VWXUG\ DQG KRUL]RQWDO VXUIDFH
$OZD\VRSHUDWHWKHXQLWRQDÀDWVWXUG\DQGKRUL]RQWDOVXUIDFH
•
To reduce the risk associated with intense visible light:
-
Avoid looking directly into the projector lens while the lamp is on.
Avoid looking directly into the projector lens while the lamp is on.
•
To reduce the risk associated with tripping and/or impact:
-
Position the power cord and data cable so that they cannot be tripped over.
Position the power cord and data cable so that they cannot be tripped over.
3M™ Digital Projector X62


