background image

2

EN

3M™ PELTOR™ LiteCom Pro II Headset

Congratulations and thank you for choosing the 3M™ 

PELTOR™ LiteCom Pro II Headset. The LiteCom Pro II 

headset is a hearing protector with a built-in, programmable 

two-way communication radio, a level dependent function 

for environmental listening, and a port to connect external 

equipment.

The models described in this manual are certified as Intrinsically 

Safe (IS). For further information and instructions on the use 

within IS areas, please refer to the 3M™ PELTOR™ LiteCom 

Pro II Headset IS Technical Data Sheet. 

1. COMPONENTS

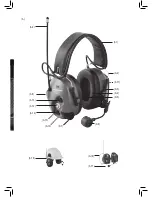
MT7H7F4010-**

(A:1) Headband (Stainless steel, Leather) 

(A:2) Headband wire (stainless steel) 

(A:3) Guide (POM)

(A:4) Ear cushion (PVC foil and PUR foam) 

(A:5) Foam liner (PUR foam) 

(A:6) Cup

(A:7) Environmental microphone

(A:8) Dynamic communications microphone

(A:9) Antenna

(A:10) External input/output

(A:11) Li-ion battery (rechargeable) 

(A:12) On/Off/Mode button

(A:13) [+] button

(A:14) [–] button 

(A:15) PTT button

MT7H7P3E4010-**

(A:16) Cup supporting arm (stainless steel)

MT7H7B4010-**

(A:17) Neckband


wire (stainless steel) (A:18) Neckband cover 

(POX)

2. FITTING AND ADJUSTMENT

The noise reduction may be lower when eyeglasses, goggles 

or respirator straps are worn between the sealing surface of the 

earmuff cushions and the sides of the wearer’s head. For best 

noise reduction, select eyeglasses or goggles that have thin, 

flat temples or straps which will minimize interference with the 

seal of the earmuff cushions. Pull long hair back to the extent 

possible and remove other items that may degrade the earmuff 

seal such as pencils, hats, jewelry or earbuds. 

Do not bend and reshape the headband as this will cause a 

loose fit and allow sound leakage. 

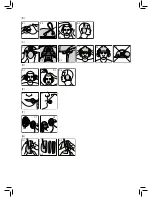
2:1 Headband model (Fig. B)

(B:1) Expand the headband

(B:2) Slide out the cups and make sure that the cable is on the 

outside of the headband.

(B:3) Place headset on top of your head and adjust the height 

of the cups by sliding them up or down while holding the 

headband in place. Each earmuff should be positioned so it 

surrounds the ear entirely. 

(B:4) The headband should be positioned across the top of 

your head.

2:2 Hard hat attachment model (Fig. C)

(C:1) Insert the hard hat attachment in the slot on the hard hat 

and snap it into place (C:2).

(C:3) Make sure that the cable is on the outside of the 

headband. 

(C:4) Usage position: Press the headband wires inwards 

until you hear a click on both sides. Each cushion should be 

positioned so it surrounds the ear entirely. Make sure that the 

cups and the headband wires do not press on the edge of the 

hard hat as this can cause noise leakage.

(C:5) Stand by position: Snap earmuffs out to allow ventilation. 

(C:6) Avoid placing the cups against the hard hat as it will stress 

on the hard hat attachment and prevent the earmuffs from 

drying. When the hard hat is not in use, place the cups in work 

mode. 

Note: In Canada, users of hard hats combined with earmuffs 

must refer to CSA Standard Z94.1 on industrial protective 

headwear.

2:3 Neckband (Fig. D)

(D:1) Place the cups in position over the ears.
(D:2) Keep the headset in position and place the head strap on 
top of your head and lock it tight in position.

(D:3) The head strap should be positioned across the top of your 

head.

2:4 Microphone (Fig. E)

(E:1 & E:2) To maintain optimal audio quality and noise 

cancelling performance, the communications microphone 

should be positioned very close to your mouth (3mm or 1/8in).

2:5 Replacing the hard hat attachment plate (Fig. F)

The P3K hard hat attachment is included and fits a wide 

selection of hard hats. If the P3K attachment does not fit on 

your hard hat, contact 3M Technical Support or an authorized 

dealer for alternative attachment plates. To remove the 

attachment plate:

(F:1) Use a screwdriver to remove the screw holding the plate.

(F:2) Insert the new plate and tighten the screw.

3. USAGE/FUNCTIONS

3:1 Inserting and removing the battery

Insert the rechargeable battery in the battery compartment and 

push down the clamp to lock it into place. The battery level is 

indicated by a voice message in the headset upon startup. A 

“low battery” message indicates only a few minutes of battery 

life remains and the unit will automatically switch off. To remove 

the battery, make sure the unit is powered off. Push the clamp 

upwards to unlock the battery.

3:2 Recharging the battery

Make sure the unit is switched off. The battery can be charged 

on the headset or it can be removed and charged separately.

Summary of Contents for MT7H7B4010-CA-50

Page 1: ...M com patent 1 855 484 3093 peltor comms mmm com peltor comms canada mmm com FP3771 rev a Copyright 3M 2015 All rights reserved 3M PELTOR LiteCom Pro II Headsets are made in Sweden by 3M SvenskaAB SE 331 02 Värnamo Sweden 3M and PELTOR are trademarks of 3M Company St Paul MN 55144 1000 USA Used under license in Canada Please recycle Printed in Sweden ...

Page 2: ...NA 50 MT7H7F4010 CA 50 MT7H7B4010 NA 50 MT7H7B4010 CA 50 MT7H7P3E4010 NA 50 MT7H7P3E4010 CA 50 PELTOR LiteCom Pro II Headset The Sound Solution Two way Radio Headset Orejera con radio de dos vías Headset radio bidirectionnel ...

Page 3: ...on A A 18 A 17 A 16 A 9 A 12 A 13 A 6 A 1 A 2 A 11 A 3 A 4 A 5 A 8 A 14 A 10 A 15 A 7 ...

Page 4: ... E F G E 1 F 1 G 1 E 2 F 2 G 2 G 3 C 1 B C B 1 B 2 C 2 B 3 C 3 B 4 C 4 C 5 C 6 D D 1 D 2 D 3 ...

Page 5: ...MR 2 Yes NotApplicable NotApplicable 25 467 7625 PLMR 3 Yes NotApplicable NotApplicable 26 467 8125 PLMR 4 Yes NotApplicable NotApplicable 27 467 8500 PLMR 5 Yes NotApplicable NotApplicable 28 467 8750 PLMR 6 Yes NotApplicable NotApplicable 29 467 9000 PLMR 7 Yes NotApplicable NotApplicable 30 467 9250 PLMR 8 Yes NotApplicable NotApplicable H ANSI S3 19 1974 per USA EPA I Radio Channel Frequencies...

Page 6: ... 023 53 114 67 174 81 315 95 445 109 631 40 025 54 115 68 205 82 331 96 464 110 632 41 026 55 116 69 223 83 343 97 465 111 654 42 031 56 125 70 226 84 346 98 466 112 662 43 032 57 131 71 243 85 351 99 503 113 664 44 043 58 132 72 244 86 364 100 506 114 703 45 047 59 134 73 245 87 365 101 516 115 712 46 051 60 143 74 251 88 371 102 532 116 723 47 054 61 152 75 261 89 411 103 546 117 731 48 065 62 1...

Page 7: ...PELTOR LiteCom Pro II Headset EN Programmable Built in Two way Communication Headset 1 4 ES Orejera con comunicación de dos vías programable FR Headset de communication bidirectionnel intégré programmable ...

Page 8: ...when exposed to hazardous noise may result in hearing loss or injury CAUTION Hearing protectors should be used in conjunction with a hearing conservation program that also includes monitoring audiometric testing training and recordkeeping Consult an Occupational Health and Safety professional for more information When worn according to the User Instructions this hearing protector helps reduce expo...

Page 9: ...achment model Fig C C 1 Insert the hard hat attachment in the slot on the hard hat and snap it into place C 2 C 3 Make sure that the cable is on the outside of the headband C 4 Usage position Press the headband wires inwards until you hear a click on both sides Each cushion should be positioned so it surrounds the ear entirely Make sure that the cups and the headband wires do not press on the edge...

Page 10: ...use the hearing protector at temperatures below 4 F 20 C or above 122 F 50 C 3 3 Switching the headset on and off Push and hold the On Off Mode button A 12 for two seconds to switch the headset on or off A voice message will confirm that the unit has been switched on or off The On Off Model button will flash when the unit is powered on The current settings are saved when the headset is switched of...

Page 11: ... 100 pairs 3M PELTOR HYM1000 Mike Protector Moisture and wind tight tape Protects the speech microphone Package of 16 4 feet for about 50 replacements 3M PELTOR M995 Wind Shield Wind noise protector for MT53 type speech microphones One per package 3M PELTOR M40 1 Wind Shield for MT7 type speech microphones Wind noise protector for MT7 type speech microphones One per package 3M PELTOR M60 2 Wind Sh...

Page 12: ...o obligation under this warranty with respect to any product that has failed due to inadequate or improper storage handling or maintenance failure to follow product instructions or alteration or damage to the product caused by accident neglect or misuse LIMITATION OF LIABILITY EXCEPT WHERE PROHIBITED BY LAW IN NO EVENT SHALL 3M BE LIABLE FOR ANY DIRECT INDIRECT SPECIAL INCIDENTAL OR CONSEQUENTIAL ...

Page 13: ...ay not cause harmful interference and 2 this device must accept any interference received including interference that may cause undesired operation IC Caution This device complies with Industry Canada licence exempt RSS standard s Operation is subject to the following two conditions 1 this device may not cause interference and 2 this device must accept any interference including interference that ...

Reviews: