background image

8

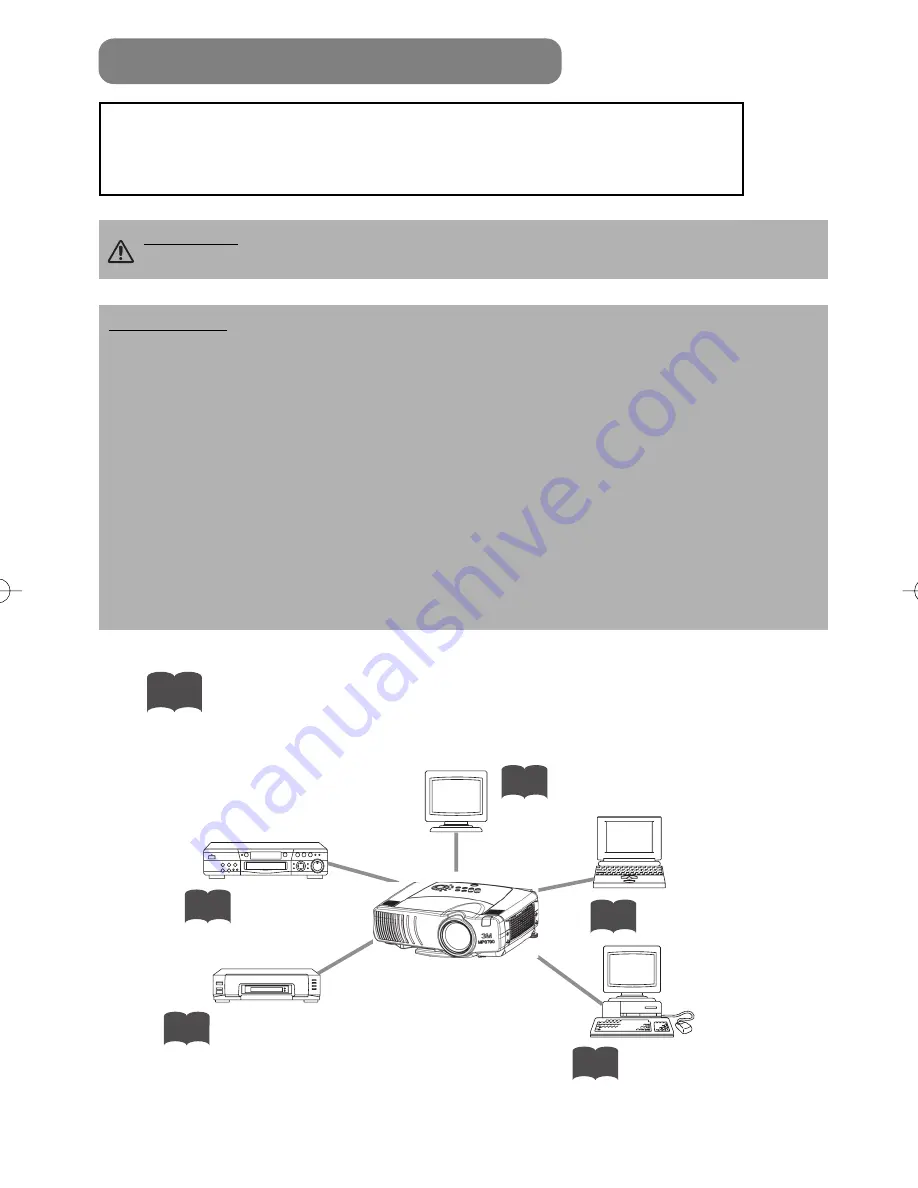
Display monitors

12

DVD players

11

VCRs

11

Laptop computers

10

Desktop computers

10

Indicates the
corresponding
reference page

ATTENTION

Precautions to observe when connecting other devices to the projector

• Whenever attempting to connect other devices to the projector, please thoroughly

read the manual of each device to be connected.

• TURN OFF ALL DEVICES prior to connecting them to the projector. Attempting to

connect a live device to the projector may generate extremely loud noises or other
abnormalities that may result in malfunction and/or damage to the device and/or
projector. Refer to the “Technical” for the pin assignment of connectors and RS-232C
communication data.

• Make sure that you connect devices to the correct port. Incorrect connection may

result in malfunction and/or damage to the device and/or projector.

• Some cables may have to be used with core set. Use the accessory cable or a

designated-type cable for the connection. For cables that have a core only at one
end, connect the core to the projector.

• Secure the screws on the connectors and tighten.

CONNECTING YOUR DEVICES 

Devices You Can Connect to the Projector
(Refer to this section for planning your device
configuration to use for your presentation.)

CAUTION

• Incorrect connecting could result in fire or electrical shock. Please

read the "Product Safety Guide" and this "Operator's guide".

01CP-X885W/Vol1/E-責  02.10.8  9:05 PM  ページ8

Summary of Contents for MP8790CN

Page 1: ...e do not make any claim of copyright The copyright remains the property of their respective owners ABOUT PROJECTOR COM Projector com http www projector com is your review and buying guide resource for DLP and LCD video projectors Visit the site to read the latest projector news and reviews read and comment on projector specifications download user manuals and much more ...

Page 2: ...w n l o a d e d f r o m P r o j e c t o r c o MP8790 Multimedia Projector Operator s Guide ...

Page 3: ...FICATIONS 41 CONTENTS Thank you for purchasing this projector The information in this manual is subject to change without notice The manufacturer assumes no responsibility for any errors that may appear in this manual The reproduction transmission or use of this document or contents is not permitted without express written authority TRADEMARK ACKNOWLEDGEMENT PS 2 VGA and XGA are registered tradema...

Page 4: ...gnals as well as NTSC PAL SECAM video signals onto a screen Little space is required for installation and large images can easily be realized Keep the original packing material for future reshipment NOTE STANDBY ON VIDEO UP DOWN BLANK ASPECT PUSH LASER INDICATOR LASER RGB FOCUS ENTER ON OFF ESC MENU RESET POSITION MAGNIFY VOLUME MUTE WIRELESS KEYSTONE FREEZE ONE TOUCH AUTO PinP ZOOM PAGE MP7650 MP...

Page 5: ...cord s specified voltage range Only use the power cord that came with the projector NEVER ATTEMPT TO DEFEAT THE GROUND CONNECTION OF THE THREE PRONGED PLUG Make sure that you firmly connect the power cord to the projector and wall outlet 1 Connect your devices to the projector Connect your computer VCR and or other devices you will be using to the projector Insert the batteries into the remote con...

Page 6: ...dicator 6 Lens Remote sensor 6 Lens cap Elevator feet Remote sensor S VIDEO IN port VIDEO IN port DVI port RGB port BNC port AUDIO IN R L port AUDIO IN 1 2 port 15 AUDIO OUT port REMOTE CONTROL port 14 CONTROL port WIRELESS NETWORK MODULE port 15 RGB OUT port USB port 6 COMPONENT VIDEO port Power switch 14 Control Panel AC power inlet TEMP indicator 12 Elevator screw 12 11 10 11 12 10 9 14 10 31 1...

Page 7: ...tton 19 AUTO button 20 PinP button 24 VOLUME button 18 MUTE button 18 FREEZE button 22 ONE TOUCH button 23 STANDBY ON VIDEO UP DOWN BLANK ASPECT PUSH LASER INDICATOR LASER RGB FOCUS ENTER ON OFF ESC MENU RESET POSITION MAGNIFY VOLUME MUTE WIRELESS KEYSTONE FREEZE ONE TOUCH AUTO PinP ZOOM PAGE 15 STANDBY ON button For mouse control Mouse cursor movement Left mouse click For mouse control Right mous...

Page 8: ... adjust the projection angle of the main unit The adjustment range of the elevator feet is 0 to 9 degrees CAUTION Install the projector in a suitable environment according to instructions of the Product Safety Guide and Operator s Guide If you press the elevator buttons without holding the projector the projector might crash down overturn smash your fingers and possibly result in malfunction To pr...

Page 9: ...0 48 122 90 2 3 108 2 7 162 4 1 0 0 54 137 100 2 5 120 3 0 181 4 6 0 0 60 152 120 3 0 144 3 7 217 5 5 0 0 72 183 150 3 8 181 4 6 272 6 9 0 0 90 229 200 5 0 243 6 2 364 9 2 0 0 120 305 250 6 3 304 7 7 455 11 6 0 0 150 381 300 7 5 366 9 3 547 13 9 0 0 180 457 Screen Size inch m a inch m b inch cm c inch cm Min Max 30 0 8 37 0 9 57 1 4 2 6 2 17 44 40 1 0 50 1 3 77 2 0 13 32 27 70 50 1 3 64 1 6 97 2 5...

Page 10: ...projector Refer to the Technical for the pin assignment of connectors and RS 232C communication data Make sure that you connect devices to the correct port Incorrect connection may result in malfunction and or damage to the device and or projector Some cables may have to be used with core set Use the accessory cable or a designated type cable for the connection For cables that have a core only at ...

Page 11: ...r NOTE Function Projector Port Connection Cables Analog RGB input RGB RGB cable With D sub 15 pin shrink jack and inch thread screws BNC R CR PR G Y B CB PB H V When BNC RGB is selected BNC cable Analog output RGB OUT RGB cable With D sub 15 pin shrink jack and inch thread screws DVI input DVI DVI cable Audio input from computer AUDIO IN 1 Linked to RGB or DVI port input Audio video cable Stereo m...

Page 12: ...will not be possible with this projector For some RGB input modes the optional Mac adapter is necessary NOTE AUDIO cable Stereo mini B A VIDEO IN R AUDIO IN L S VIDEO IN RGB BNC AUDIO IN USB AUDIOOUT R CR PR G Y B Ca Pa H V Y 1 2 DVI RGB OUT CONTROL CR PR Ca Pa COMPONENT VIIDEO REMOTE CONTROL B A RGB cable Analogue RGB OUT AUDIO OUT CONTROL OUT MOUSE cable RGB cable Analogue RGB OUT B A D C VIDEO ...

Page 13: ...UT R CR PR G Y B Ca Pa H V Y 1 2 DVI RGB OUT CONTROL CR PR Ca Pa COMPONENT VIIDEO REMOTE CONTROL B A A A A A AUDIO cable Stereo mini AUDIO OUT BNC OUT DVI cable A B VIDEO IN R AUDIO IN L S VIDEO IN RGB BNC AUDIO IN USB AUDIOOUT R CR PR G Y B Ca Pa H V Y 1 2 DVI RGB OUT CONTROL CR PR Ca Pa COMPONENT VIIDEO REMOTE CONTROL B A AUDIO cable Stereo mini AUDIO OUT DVI OUT ...

Page 14: ...N USB AUDIOOUT R CR PR G Y B Ca Pa H V Y 1 2 DVI RGB OUT CONTROL CR PR Ca Pa COMPONENT VIIDEO REMOTE CONTROL A A A B B B C If using a component video connection If using an audio video connection COMPONENT OUT AUDIO VIDEO OUT S VIDEO OUT If using a S video connection COMPONENT VIDEO cable AUDIO VIDEO cable S VIDEO cable B A VIDEO IN R AUDIO IN L S VIDEO IN RGB BNC AUDIO IN USB AUDIOOUT R CR PR G Y...

Page 15: ...ards to the batteries Always handle the batteries with care and use them only as directed Improper use may result in battery cracking or leakage which could result in fire injury and or pollution of the surrounding environment Keep the battery away from children and pets Be sure to use only the batteries specified for use with the remote control Do not mix new batteries with used ones When inserti...

Page 16: ...to physical impact Do not get the remote control wet or place it on wet objects Doing so may result in malfunction Do not place the remote control near the projector s lens fan or vents Remove the batteries from the remote control and store them in a safe place if you won t be using the remote control for an extended period Replace the batteries whenever the remote control starts to malfunction Wh...

Page 17: ...d green once the projector s power is completely on 4 Remove the lens cap The picture is projected 3 STANDBY ON VIDEO UP DOWN BLANK LASER INDICATOR LASER RGB FOCUS ZOOM PAGE TURNING ON THE POWER Precautions Connect all devices to be used to the projector prior to turning on the power 12 8 WARNING When the power is ON a strong light is emitted Do not look into the lens Turn the power on off in righ...

Page 18: ... wish to project Using the remote control Turn the INPUT dial Turning the dial cycles through the inputs as shown below Select the terminal to which the signal you want to project is input Using the projector s control panel Selecting an Input Signal 16 TURNING ON THE POWER continued RGB VIDEO VIDEO IN S VIDEO IN COMPONENT VIDEO VIDEO IN S VIDEO IN COMPONENT VIDEO BNC COMPONENT RGB BNC RGB DVI RGB...

Page 19: ...ton again while the Power off message is visible The projector lamp goes off and starts cooling down While cooling the STANDBY ON indicator flashes orange When in this state pressing the STANDBY ON button has no effect When lamp cooling is complete the STANDBY ON indicator stops flashing and turning solid orange Except in cases of emergency do not turn off the power switch while the STANDBY ON ind...

Page 20: ...just the volume Press the VOLUME button again to close the dialog and complete this operation Even if you don t do anything the dialog will automatically disappear after a few seconds Press this to increase the volume Press this to decrease the volume 16 VOLUME 16 VOLUME 16 VOLUME ADJUSTING THE VOLUME TEMPORARILY MUTING THE SOUND 18 STANDBY ON VIDEO UP DOWN BLANK ASPECT PUSH LASER INDICATOR LASER ...

Page 21: ...t Press the POSITION button again to close the dialog and complete this operation Even if you don t do anything the dialog will automatically disappear after a few seconds This function is only available for RGB BNC RGB input ADJUSTING THE POSITION POSITION STANDBY ON VIDEO UP DOWN BLANK ASPECT PUSH LASER INDICATOR LASER RGB FOCUS ENTER ON OFF ESC MENU RESET POSITION MAGNIFY VOLUME MUTE WIRELESS K...

Page 22: ...sure that the application window is set to its maximum size prior to attempting to use this feature Dark pictures may still be incorrectly adjusted Use a bright screen when adjusting The signal type best suited for the respective input signal is selected automatically This feature is available only if VIDEO is set to AUTO in the INPUT menu Automatic Adjustment for RGB Input Automatic Adjustment fo...

Page 23: ...appear on the screen to aid you in correcting the distortion 2 Use the buttons to select the direction of distortion to correct 3 Use the lever switch to correct distortion Press the KEYSTONE button again to close the dialog and complete this operation Even if you don t do anything the dialog will automatically disappear after a few seconds 16 KEYSTONE ASPECT PUSH ENTER ON OFF ESC MENU RESET POSIT...

Page 24: ...he projector enters MAGNIFY mode 2 Press the POSITION button then use the lever switch to select the area to zoom Press the POSITION button again to finalize the zoom area 3 Use the lever switch to adjust the zoom level Press the MAGNIFY OFF button to exit MAGNIFY mode and restore the screen to normal The projector will also automatically exit MAGNIFY mode if there is a change in the input signal ...

Page 25: ... automatically adjust the picture position and size for VIDEO input automatically select the signal mode 3 Automatic keystone distortion correction This is only performed if ONE TOUCH of the AUTO menu is set to TURN ON When performed the unit automatically corrects vertical keystone distortion due to the forward backward setup angle of the main unit When BNC RGB is selected RGB BNC RGB DVI S VIDEO...

Page 26: ...reen and return to the input signal screen ASPECT DOWN BLANK PUSH LASER ENTER ESC MENU RESET POSITION AUTO PinP ASPECT BLANK UP DOWN BLANK ASPECT PUSH LASER FOCUS ENTER ESC MENU RESET ZOOM PAGE DISPLAYING CHILD WINDOW P IN P Picture in Picture 1 ASPECT PUSH ENTER ON OFF ESC MENU RESET POSITION MAGNIFY VOLUME MUTE WIRELESS KEYSTONE FREEZE ONE TOUCH AUTO PinP Press the P in P Button You can display ...

Page 27: ... operation display of the selected item appears To adjust a numerical value press the or ENTER button again to switch to the single menu small display showing only the operation display area ex Adjusting SHARPNESS Use the lever switch to select SHARPNESS then press the or ENTER button 4 Use the lever switch to adjust the level Press the MENU button to hide the menu and finish your operation Altern...

Page 28: ...as follows With the MAIN menu the seven items shown in the Table below can be performed Perform each operation in accordance with the instructions in the Table Menu screen display Press the MENU button Menu selection Use the lever switch to select a menu name then press the or ENTER button Item selection Use the lever switch to select an item then press the or ENTER button Return menu to last prev...

Page 29: ...wn H POSITION Adjust Horizontal Position for RGB Left Right H PHASE Adjust Horizontal Phase for RGB COMPONENT VIDEO Right Left Adjust to eliminate flicker H SIZE Adjust Horizontal Size for RGB Large Small If the horizontal size adjustment is excessive the image may not be displayed correctly In such a case initialize H SIZE with the RESET button OVER SCAN Select Over scan Ratio for VIDEO S VIDEO C...

Page 30: ...unction if the image becomes unstable with VIDEO S VIDEO e g The image becomes irregular or lacks color AUTO mode may not function correctly with a PAL60 signal and certain other signals The AUTO mode operation requires approximately 10 seconds For COMPONENT VIDEO the signal type is identified automatically even if this function is inactive For a HDTV signal refer to the item HDTV below HDTV Selec...

Page 31: ...en is inclined or if the projector is angled downwards it may not be possible to make the correct adjustment when V INVERT or H V INVERT is selected under the MIRROR item of the MAIN menu When the zoom adjustment is set to the TELE side automatic correction may be excessive The automatic correction function should be used with zoom set to WIDE whenever possible POWER OFF Adjust POWER OFF Time Long...

Page 32: ... screen is the MyScreen or ORIGINAL screen it will turn immediately to a solid black screen MyScreen Registration of MyScreen When this item is executed the MyScreen Menu for registration of MyScreen for the BLANK Screen and the START UP Screen is displayed When operations are performed in accordance with this Menu one can cut and register desired screens from among the received images within the ...

Page 33: ...needed light LAMP TIME Refer to LAMP TIME When set this function displays the total time the projector lamp has been used since new Reset LAMP TIME Use this function only when the lamp has been replaced Depress the RESET button for at least 3 seconds while lamp time is being displayed The reset menu will then appear After you replace the lamp with a new lamp select RESET on the menu with the butto...

Page 34: ...tion or displaying the menu screen NOTES PS 2 ADB Serial Mouse Control 1 Turn off the projector and PC power and connect the projector s CONTROL terminal to the computer via the mouse cable 2 If a USB cable is connected disconnect it If a USB cable is connected the USB control function is given priority and mouse control from the CONTROL terminal will not function 3 Turn on the projector power the...

Page 35: ...ition working in high places is dangerous so ask your local dealer to have the lamp replaced even if the bulb is not broken Handle with care jolting or scratching could cause the lamp bulb to burst during use If the replace lamp indicator see Related Messages and Regarding the indicator Lamps comes on replace the lamp as soon as possible Using the lamp for long periods of time or past the replacem...

Page 36: ...tor Then push the point of the lamp cover to fix it as shown in the figure Make sure that the lamp cover doesn t come up 2 After making sure that the projector has cooled adequately slide the knob of a lamp cover lock as shown in the figure Then one side of the lamp cover is raised Pull up the lamp cover and remove it as shown in the figure 3 Unscrew the 3 screws and slowly pull out the lamp by th...

Page 37: ...hen you turn on the unit the filter needs to be cleaned See Related Messages and Regarding the Indicator Lamps for details 1 Turn off the projector and unplug the power cord 2 3 Turn on the projector and use the menu to reset the filter timer To reset the air filter timer from the OPTION menu select FILTER TIME 38 39 Air Filter Cover Apply a vacuum cleaner to the top of the air filter cover to cle...

Page 38: ... Turn on the projector power and using the menu reset the filter timer To reset the lamp timer from the OPTION menu select FILTER TIME 3 Insert the new filter and replace the filter cover ATTENTION Make sure to turn off the power and unplug the power cord before caring for the unit Please carefully read Safety Instructions in order to care for your projector correctly Do not use with air filter co...

Page 39: ...the cabinet and remote control transmitter Wipe lightly with gauze or a soft cloth If soiling is severe dip a soft cloth in water or a neutral cleanser diluted in water and wipe lightly after wringing well Then wipe lightly with a soft dry cloth ATTENTION Make sure to turn off the power and unplug the power cord before caring for the unit Please carefully read Safety Instructions in this manual in...

Page 40: ...he status of the signal source SYNC IS OUT OF RANGE ON kHz Hz The horizontal or vertical wavelength of the inputted signal is outside of the response parameters of this unit Please confirm the specs for this unit or the signal source specs CHECK THE AIR FLOW The internal portion temperature is rising Please turn the power OFF and allow the unit to cool down for approximately 20 minutes After havin...

Page 41: ...nce turn the power ON again if the same display is displayed then please contact a sales store or a service company The red lamp is lighted or blinks Turned OFF Blinking of the red lamp The cooling fan is not operating Turn the power OFF and wait approximately 20 minutes After the main unit has cooled down please make confirmation that no foreign matter has become caught in the fan etc After perfo...

Page 42: ...not correctly connected Correctly connect the connection cord 8 12 The volume setting has been set at or adjusted to an extremely low level Adjust the VOLUME setting to a higher level 18 The MUTE mode is the current setting Press the MUTE button to release change the MUTE mode setting 18 Sounds are heard but no pictures are displayed The electrical wiring to this unit is not correctly connected Co...

Page 43: ...ply AC100 120V 4 7A AC220 240V 2 0A Power consumption 430W Temperature range 0 35 C Operating Size 380 W x 120 H x 303 D mm Not including protruding parts Weight mass 5 8 kg Ports RGB Input Ports RGB 1 BNC when RGB selected R G B H V 1 DVI 1 VIDEO Input Ports VIDEO IN 1 S VIDEO IN 1 COMPONENT VIDEO CR PR CB PB Y 1 BNC when COMPONENT selected CR PR Y CB PB 1 AUDIO Ports AUDIO IN 1 1 AUDIO IN 2 1 AU...

Page 44: ...pension 78 6969 9564 2 Shipping Case 78 6969 8925 6 Wireless Module 78 6969 9600 4 Mouse Cable PS 2 78 8118 8105 7 Mouse Cable Serial 78 8118 8107 3 Mouse Cable ADB 78 8118 8106 5 Mac Adapter 78 8118 3308 2 S Video Cable 78 8118 3238 1 Stereo Mini Cable 78 8118 8846 6 USB cable 78 8118 9057 9 How to Order Please order these parts through your dealer or contact 3M Customer Service at the following ...

Page 45: ...ernet Website DN00351 QR55141_OG_ENG Intended Use Before operating this machine please read this entire manual thoroughly The 3MTM Multimedia Projectors are designed built and tested for use indoors using 3M lamps 3M ceiling mount hardware and nominal local voltages The use of other replacement lamps outdoor operation or different voltages has not been tested and could damage the projector periphe...

Page 46: ...e do not make any claim of copyright The copyright remains the property of their respective owners ABOUT PROJECTOR COM Projector com http www projector com is your review and buying guide resource for DLP and LCD video projectors Visit the site to read the latest projector news and reviews read and comment on projector specifications download user manuals and much more ...

Reviews: