background image

11

Cleaning the water tank

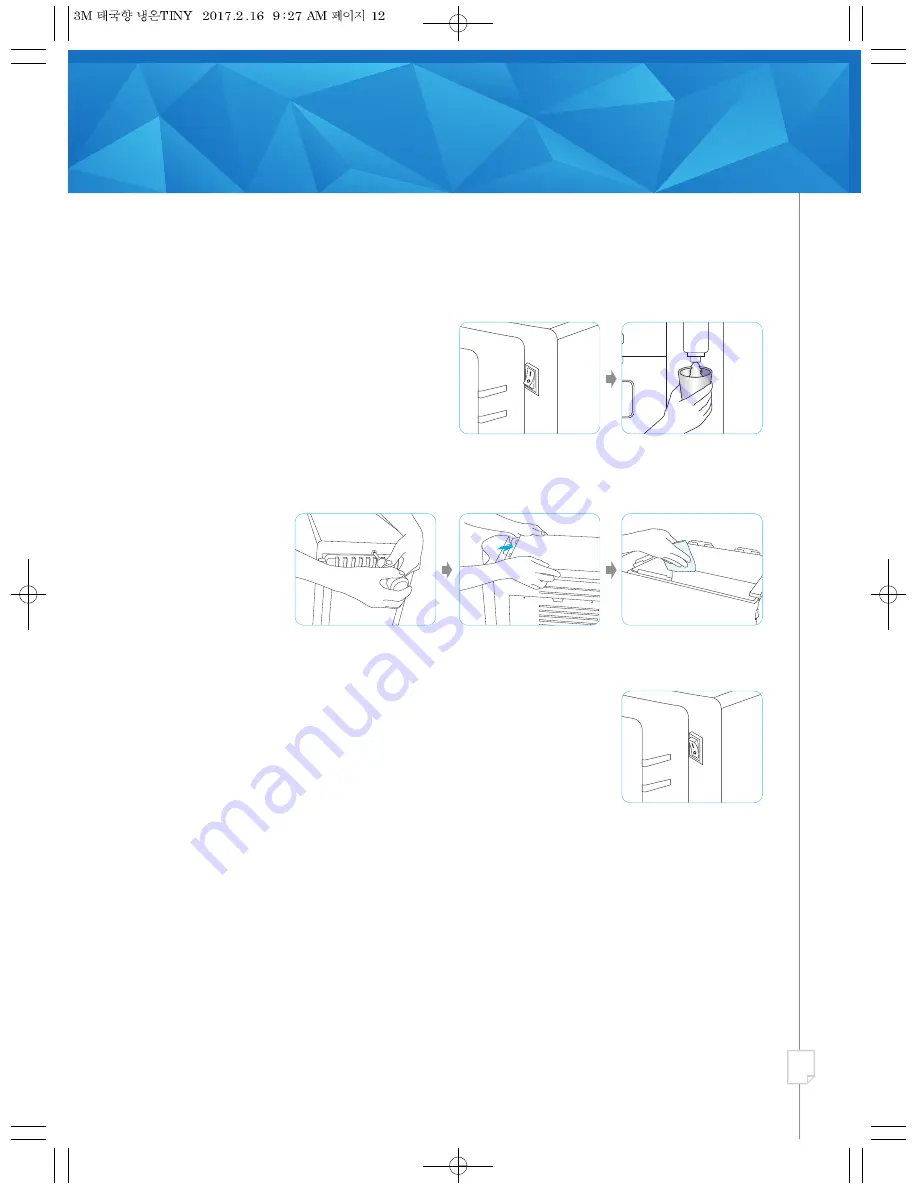
1. Shut off source water valve.
2. Turn drain switch to I at the rear of the unit to drain the ambient/cold tank water.

Beeping sound will start, drain the cold/ambient tanks manually. 

3. Remove the screw on the back of the unit and detach the water tank cover. Use a soft cloth to clean

the water tank. Place back the water tank cover and then secure the screw back.

4. Turn on the source water valve and turn the drain switch to 

O

at the rear of the unit. 

5. Check if cold/ambient water is served after 40 minutes. If it is, drain to flush the tank with filtered

water completely and the dispenser can be used again after the tank is full.

When cleaning the tank, please take note of the following:

1. Wash your hands before commencing the cleaning. Put on sanitary gloves and clean the tank with a

soft cloth or dry cleaner.

2. Do not use any chemicals or detergent.
3. Discard any used cleaner and soft cloth after cleaning.
4. Ensure that the tank cover is closed properly and the water filter is installed properly after cleaning.
5. Clean the tank at least once a month.

Summary of Contents for HCD-2

Page 1: ... differ from the picture Unit appearance specification etc are subject to change without prior notice if necessary for improving unit performance The rated voltage of this unit is AC 220V 50Hz only 3M Water Purifier Solutions Operating Instructions 3MTM Filtered Water Dispenser HCD 2 ...

Page 2: ...ES Water flow schematic diagram Panel functions and control Display settings and functions How to use panel functions Cleaning the water dispenser Maintenance of water dispenser Troubleshooting guide Technical specifications 3 3 4 5 6 7 8 10 12 13 14 02 ...

Page 3: ...tiple devices into the same power outlet or extension cord simultaneously Plug the power cord into a 220V outlet with at least a rating of 10A and power surge protection Please ensure the power plug and power outlet is clean and dry Damaged parts or machine malfunction are only to be repaired or replaced by 3M authorized professionals To reduce the risks associated with hazardous voltage Do not op...

Page 4: ...o ensure equipment can automatically drain to allow stagnant water to be flushed out of system The disposable filter cartridge must be replaced every 6 month or if any noticeable reduction in flow rate occurs whichever sooner to ensure filter effectiveness It is connected to water mains by detachable tubing hose When you relocate and reinstall the appliance please do not use the old tubing hose Us...

Page 5: ...05 Water flow schematic diagram ...

Page 6: ...d Water LED Indicator Hot LED Indicator Hot Stand by LED Indicator Hot Selection Button Hot Water Dispenser Valve Hot Water Dispenser Button Cold Ambient Selection Button with LED indicator Cold Ambient Water Dispenser Valve Cold Ambient Water Dispenser Button ...

Page 7: ...ton To select hot water Tap to select between heating modes Tank Heating Mode Instant Heating Mode or to turn heating OFF 6 Cold Ambi Selection Button with LED indicator Tap to select cold or ambient water Green LED Ambient water Blue LED Cold water 7 Water Dispensing Button Tap to dispense water into containers or cups after selecting the desired type of water temperature hot ambient or cold 8 Dr...

Page 8: ...o water is dispensed within 10 seconds this function will cease to exist until the next time it is set up again Hot water is not available for constant water function 4 Press either COLD AMBI or WATER DISPENSING to stop dispensing water Thereafter cold water will be selected for future dispense unless Step 1 and 2 is repeated again A sound Ding dong Ding dong will be played Turning On Cold Water S...

Page 9: ...see if HOT LED is Green If it is Green Instant Heating Mode is selected A setting sound Ding dong occurs and LED blinks 3 times 2 During Instant Heating Mode HOT LED changes colour to indicate the temperature of water dispensed Approximately 1 3minutes are required to complete Instant Heating cycle to achieve 85 C 3 After Instant Heating is completed HOT LED turns Green and HOT STAND BY LED turns ...

Page 10: ...entre of water tray until you hear the clattering sound The water tray is now in place Cleaning the water dispensing spout 1 Turn faucet deco to the left and disconnect it from the body of the dispenser 2 After cleaning turn the faucet deco to the right to place it back ...

Page 11: ...switch to O at the rear of the unit 5 Check if cold ambient water is served after 40 minutes If it is drain to flush the tank with filtered water completely and the dispenser can be used again after the tank is full When cleaning the tank please take note of the following 1 Wash your hands before commencing the cleaning Put on sanitary gloves and clean the tank with a soft cloth or dry cleaner 2 D...

Page 12: ...or utensils to come into contact with the spout Do not install the unit in the following places Anywhere that will expose the unit to direct sunlight Anywhere near toilets Anywhere with fluctuating temperatures devices Maintenance Do not pour any other liquids into the gutter other than water from the unit Ensure that the gutter is cleaned at least once a week and pour away excess water in the gut...

Page 13: ... desired temperature The unit was just connected to a power source Water is still in the process of cooling down and being produced Wait for 2 hours for initial start up Cold water had been dispensed in large amounts previously or had been dispensed frequently There is insufficient cold water in the unit and new water from the source is being cooled down This process takes approximately 80 minutes...

Page 14: ...Benzene Toxaphene P Dichlorobenzene Tested in accordance to NSF Standard 53 Chlorine Taste and Odor Tested in accordance to NSF Standard 42 Ambient Water 4 6 liters Cold Water 3 0 liters Hot Water 0 57 liters Total Storage Tank Capacity 8 17 liters Storage Tank Capacity Cold Water 100 W Hot Water 450 W Instant Heating 1500 W Power Consumption 0 5 micron 4 000 liters 2 liters per minute Dimensions ...

Page 15: ...ied including but not limited to any implied warranty or condition of merchantability or fitness for a particular purpose or any implied warranty or condition arising out of a course of dealing customer or usage of trade The remedy stated in this paragraph is Customer s sole remedy and 3M Thailand Limited exclusive obligation This warranty gives you specific legal rights and you may have other rig...

Page 16: ...s Division 3M Thailand Limited 12th Floor Serm Mit Tower 159 Asoke Montri Road Klongtoey Nua Wattana Bangkok 10110 Tel 0 2260 8577 Fax 0 2261 7535 3M Authorized Distributor Dealer 3M is a trademark of 3M Company 3M Company All rights reserved ...

Reviews: