3Disc Heron IOS Quick Start Manual Download Page 3

2

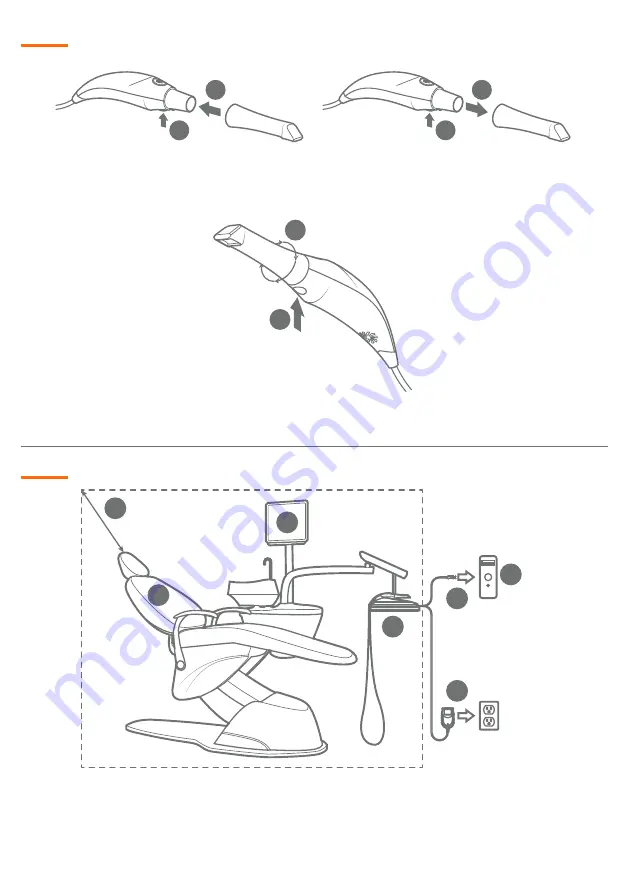
Attaching, Detaching & Rotating the Tip:

Patient Environment:

1

2

6

7

3

4

5

1. 

Heron IOS System

2. 

USB 3.0 Connector

3. 

Patient Chair

4. 

PC 

5. 

Monitor 

6. 

AC/DC Power Adapter

7. 

Environment represented 

by dotted line, extending 

1.8 meter (6 feet) around 

patient and system

Depress bottom button (1) and rotate tip at 90° increments (2).  Tip should be 

locked into position prior to scanning.

1

2

1

2

Attach

 the tip to the handpiece by 

pressing the bottom button (1), and 

sliding the tip (2) firmly onto the end, 

making sure the tip is secure.

Detach

 by depressing the bottom 

button (1), and pulling the tip away 

from the handpiece (2).

1

2

Summary of Contents for Heron IOS

Page 1: ...g the Tip 2 Patient Environment 2 Tip Cleaning Sterilization 3 Scanning Step 1 Creating a Case 5 Scanning Step 2 Scanning Preparation 5 Scanning Step 3 Basic Scanning Procedure 6 Scanning Step 4 Final...

Page 2: ...ng station on a flat stable surface and place the Heron IOS hand piece securely in its docking station Step 2 Connect the AC DC power adapter cable to the docking station the connector socket is locat...

Page 3: ...ine extending 1 8 meter 6 feet around patient and system Depress bottom button 1 and rotate tip at 90 increments 2 Tip should be locked into position prior to scanning 1 2 1 2 Attach the tip to the ha...

Page 4: ...following procedure Step 1 Clean the tip with soap water ensuring that the mirror is clean and free of smudges stains or any milky haze Do not use an abrasive surface to clean the mirror Step 2 After...

Page 5: ...Insert and seal the tip into a sterilization pouch Step 2 Sterilize the wrapped tip in a steam autoclave at a temperature of 132 C 270 F and 210kPa 30 46 psi for 6 minutes 132 C 270 F 210kPa 30 46psi...

Page 6: ...Click the yellow SCAN icon in top right corner of screen 7 A B E Quantor3D will auto launch taking you to the scan window Scanning Step 2 Scanning Preparation Prepare the patient for the scan by ensur...

Page 7: ...ns are obtained at a closer range and it is okay if the tip touches the teeth During scanning you should continue to hear a rapid clicking sound and observe a green rectangle indicating the last scann...

Page 8: ...Rescan any area that is missing critical data for the success of the final restoration Save and proceed to the next step in the scan strategy Scanning Step 5 Exporting Files with Dentalshare STL After...

Page 9: ...can scanning is a skill that requires practice Prior to use on a patient practice should be conducted using a dental typodont model Lower Upper Jaw Scans 1 Start the scan path on the working arch jaw...

Page 10: ...g the buccal surface of the posterior teeth and the facial surface of the anterior teeth to complete your scan strategy 5 You can turn the scanner off at any point during the scan make sure you restar...

Page 11: ...will ring and a green check mark will appear on the upper jaw image in the upper right corner of the application 2 Once the upper jaw is aligned move the handpiece down to the lower jaw Again move th...

Page 12: ...d do not throw it away The box is optimal for any necessary transportation or shipping of the Heron IOS 3D Imaging and Simulation Corp Americas 22560 Glenn Drive Suite 116 Sterling VA 20164 USA Phone...

Reviews: