


NextDent
®
5100 Setup
Please see the NextDent 5100 User Guide, found at support.3dsystems.com/nextdent-5100, for safety informa-
tion and comprehensive operating instructions.
Save all foam and packing material for future use. Shipping without the original packing material may
cause damage to the printer.
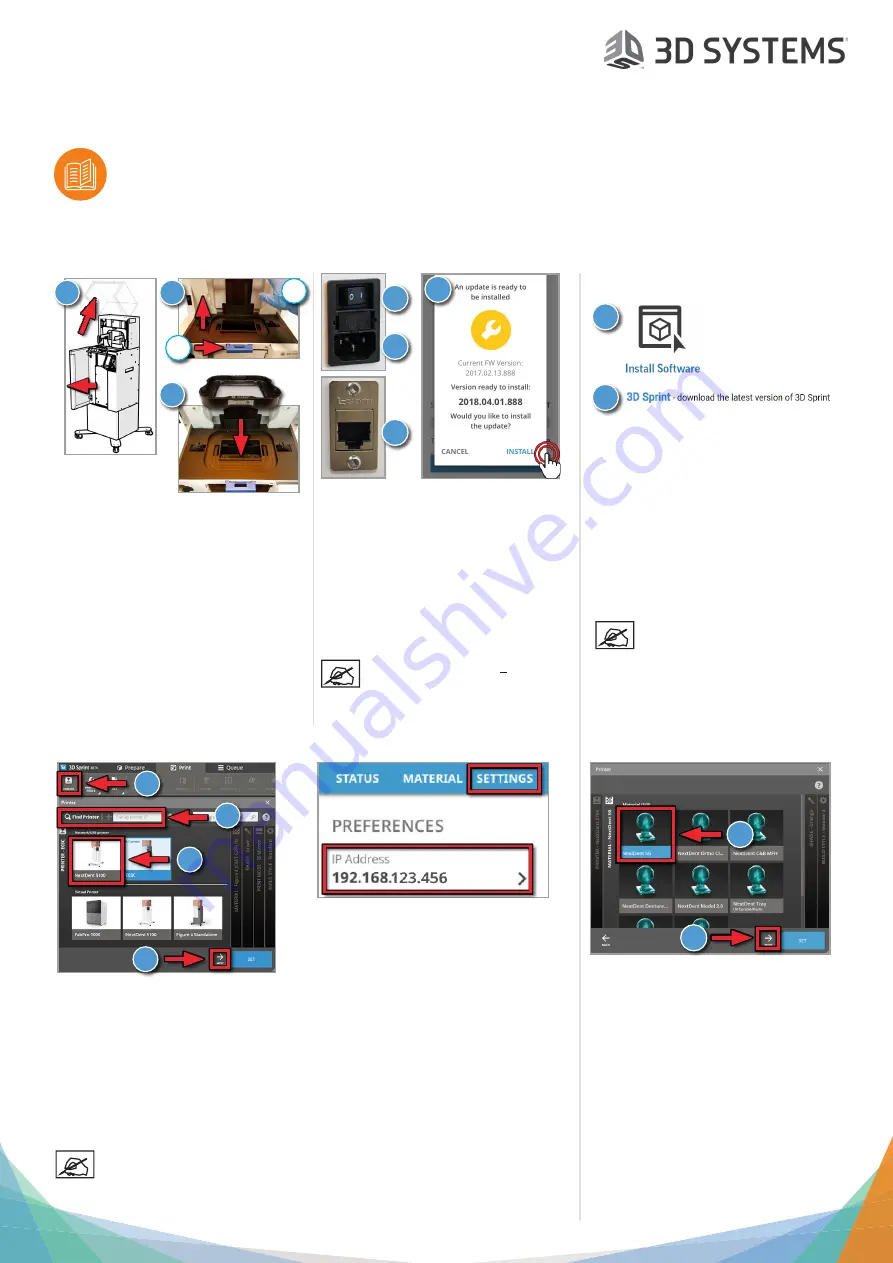
7. Install Resin Tray
1. Open printer lid and front door.
2. Push in the tension-release button
(a) and lift the tension arm (b).
3. Install resin tray in chassis, concave
side up and with fill lines in the
back (see
Initial Print Guide
). Low-
er the tension arm and push down
on it until it locks into place.
1
2
3
a
b
8. Power Printer On
9. Install 3D Sprint
Ensure your computer can
run 3D Sprint - See
User
Guide
for specs.
2
1
1. On a PC, go to
support.3dsystems.
com/nextdent-5100
.
Click
Install
Software
link.
2. Follow the instructions to down-
load/install 3D Sprint.
10. Add Printer
1. Open
3D Sprint
. Click the
Printer
icon if the Printer window is not already
open.
2. Click
Find Printer
button to find printer on your network. If this fails, enter
the printer’s IP address and press
Enter
. The IP address can be found on the
printer’s touch screen on the
Settings
tab (above, right).
3. Click the
NextDent 5100
icon that the software just found.
4. Click
Next
.
1
2
3
4
You will need to make the printer’s IP address an exception on your
network’s firewall, if applicable. Both the printer and the PC running
3D Sprint must be on the same network and connected to the
internet.
1. Plug in power cable and Ethernet
cable.
2. Flip the power switch to the “I”
position to turn printer on.
3.
The printer will search for firmware
updates. Tap
Install
on the touch
screen to install them.
802.11n WiFi bridge >300Mbps
may be connected to ethernet
port.
2
1
1
3
11. Select Material
1. Click the icon of the material that
you plan on using for the test
build.
2. Click the
Next
button.
2
1