UP! Desktop 3D Printer
User Manual - Ver 1.3
www.PP3DP.com
www.3DPrintingSystems.com
Page 1: ...UP Desktop 3D Printer User Manual Ver 1 3 www PP3DP com www 3DPrintingSystems com ...
Page 2: ... consequential damages in connection with the furnishing performance or use of this Material Changes or modifications to the system not expressly approved by PP3DP com the party responsible for compliance could void the user s authority for use This document is protected by copyright All rights reserved Its use disclosure and possession are restricted by an agreement with PP3DP com per software co...
Page 3: ...FUNCTIONS 17 3 2 1 Start the program 17 3 2 2 Loading a 3D model 17 3 2 3 View Options 18 3 2 4 Model transformations 19 3 2 5 Placing models onto the build platform 20 3 3 GETTING READY TO PRINT 21 3 3 1 Initializing the Printer 21 3 3 2 Calibrating the Nozzle Height 21 3 3 3 Other Maintenance Options 24 3 3 4 Preparing the Platform 25 3 3 5 Print Setup Options 26 4 PRINTING 30 5 MODEL REMOVAL 31...
Page 4: ...ee plugin for Sketchup 1 2 Precautions Please read this section carefully before using the printer 1 2 1 Safety The printer can only be used with the power adapters supplied with the printer or the product may be damaged with a risk of fire To avoid burning or model deformation do not touch the model nozzle or the platform by hand or any other part of the body while the printer is working or immed...
Page 5: ...ge may occur Do not shut down the UP Printer or pull out the USB cable when loading a digital model or the model data may be lost When using the Extrude function keep at least 50mm between the nozzle and the platform If too close the nozzle may get blocked The printer is designed to work properly at an ambient temperature of between 15 C and 30 C and humidity of between 20 and 50 Operating outside...
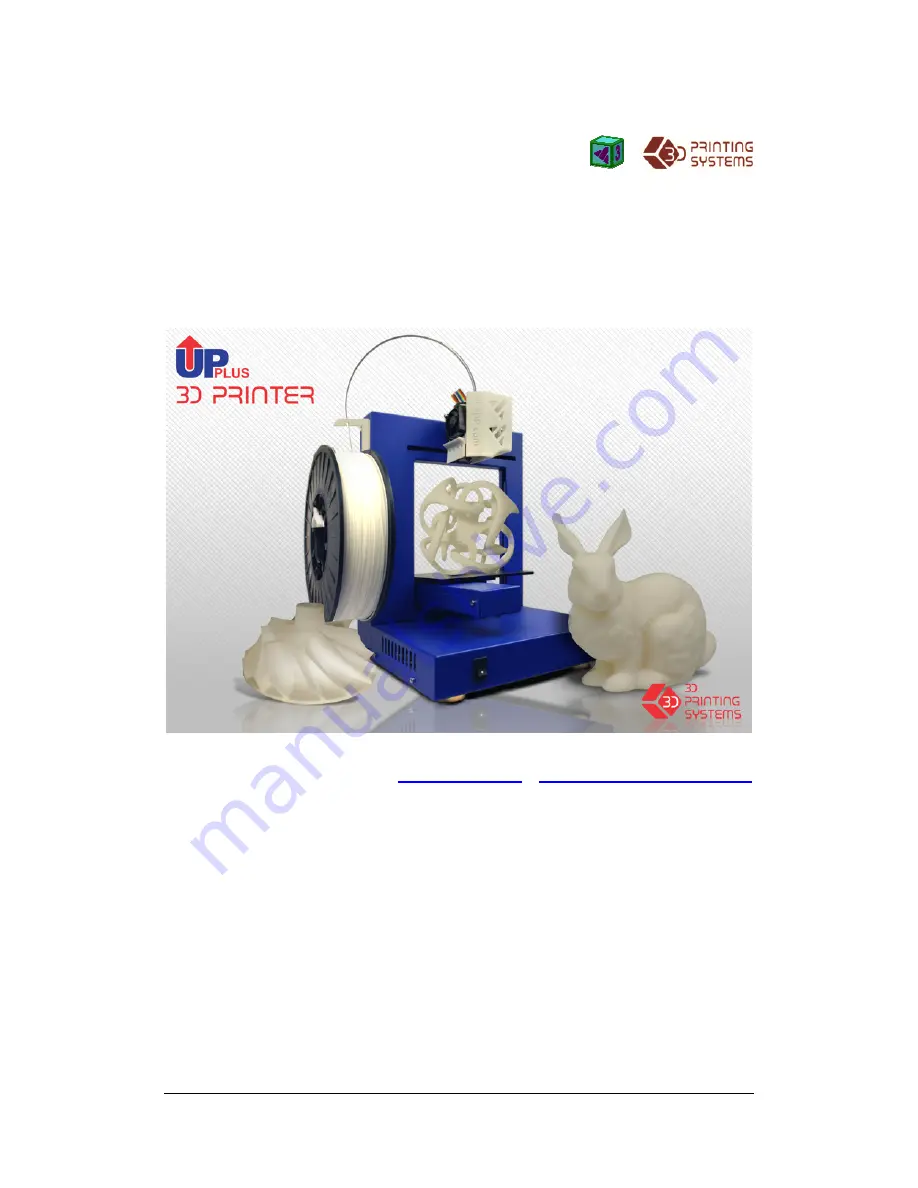
Page 6: ...and durable Congratulations on purchasing an UP 3D Printer 2 1 Appearance Figure 1 Front view of printer TUBE HEAD NOZZLE ROLL ROLL HOLDER PLATFORM INTILISE SWITCH RIBBON CABLE FEED GUIDE Figure 2 Kit contents UP Plus 3D Printer 1x 700g roll ABS white plastic Tools Power Supply and lead Guide Roll Holder Set of Allan Keys Metal Build Platform USB Cable Spatula Perfboard with clips Bag of screws an...
Page 7: ...0 140 135mm Printer Weight 5 KG 11 lb Printer Size 245 260 350 mm 2 2 2 Specifications Power Requirements 100 240 VAC 50 60 Hz 200W Model Support Auto generated Support Material Input Format STL UP3 Workstation compatibility Windows XP Vista Win7 MAC Y Y Y Y Axis Axis Axis Axis Left Left Left Left Right Right Right Right Z Axis Z Axis Z Axis Z Axis U U U Up p p p Down Down Down Down X X X X Axis A...
Page 8: ...2 Overview UP 3D Printer User Manual 7 2 2 3 Environmental specifications Ambient temperature 15 C 30 C Relative humidity 20 50 ...
Page 9: ...3 Operation UP 3D Printer User Manual 8 3 Operation 3 1 Preparation 3 1 1 Installing the printer Open the box and take out the printer and accessories Assemble the parts contained in the box as follows ...
Page 10: ...P 3D Printer User Manual 9 1 Unscrew the M4 screw from the extruder and fix the extruder onto the holder Please make sure the extruder is parallel with the Extruder axis Tool set includes the M4 screw and Allen key ...
Page 11: ... Manual 10 2 Install the ABS plastic spool guide holder Unscrew the short M3 screw M3X5 from the printer and then fix the spool holder with a long M3 screw M3X8 Please note that the spool holder should lock onto the printer s corner ...
Page 12: ... UP 3D Printer User Manual 11 4 Install the extruder cable 14 pin Open the extruder upper lid and you will see a 14 pin socket Connect the plug into the socket and put the upper lid back on Replace the head cover ...
Page 13: ...he ABS filament between the feeder guide B Insert the end of the ABS filament into and through the filament tube straw Warning Do not uncoil or let go of the end of the coiled plastic otherwise it will tie it s self in a knot and then eventually during use it might damage the printer If you have try and uncoil the plastic manually and ensure there are no knots it the roll of plastic Initialize Swi...
Page 14: ...ill beep Push the filament into the hole at the top of the extruder head and hold it there with some gentle pressure until the extruder motor grabs it and starts pulling it through the extrusion head The extruder will then automatically extrude a thin filament of material for approximately 30 seconds and then beeps to advise extrusion is over 8 Install the print platform Raise the platform axis by...
Page 15: ...3 Operation UP 3D Printer User Manual 14 ...
Page 16: ...Defaulted Program files UP Note This installs the UP software the UP drivers and the UP sample files into your Program files x86 UP 3 1 3 Installing drivers Connect the printer to a computer with the USB cable The computer should pop up the Found New Hardware Wizard window Choose No not this time and then next Choose Install from a list or specific location Advanced then Next ...
Page 17: ...3 Operation UP 3D Printer User Manual 16 Click Browse and choose C Program Files UP Driver then Next The following dialogue box pops up Choose Continue Anyway and the drivers will install automatically ...
Page 18: ...pen as follows 3 2 2 Loading a 3D model Click File Open or on the toolbar and select the model you want to open UP supports STL files which is the standard input format for 3D printing files and the UP3 format which is UP s proprietary compressed STL format Move the mouse pointer onto the model and click the left mouse key Some model information is presented in a floating window as shown below ...
Page 19: ...ng the model Choose the model then click Save The file is saved in UP3 format and its size is 12 18 of the original STL file This is a convenient format for users to archive or transfer files 3 2 3 View Options To observe the target model in different ways use the mouse to control the view Rotate Press the middle mouse button and move the mouse The view can be rotated and observed from different a...
Page 20: ...axis button the model will move again For example Move the model 5 mm along Z axis or down 5mm Procedure 1 Click on Move 2 Input 5 in the text box 3 Click the Z axis Rotating the model Click the Rotate button on the toolbar choose or input how many degrees you want to rotate in the text box then choose the axis to rotate around For example Rotate the model around Y axis by 30o Procedure 1 Click Ro...
Page 21: ...e text box 3 Click Scale again Example2 Scale up the model by 1 2 times along the Z axis only Procedures 1 Click Scale 2 Input 1 2 in the text box 3 Click Z axis Unit Conversion This option is provided as a convenient way to convert metric models to imperial and vice versa To convert an imperial model to metric select the 25 4 option from the scale menu and click Scale again To convert from metric...
Page 22: ...bar choose or input the distance in the text box and then choose the axis for the direction in which you want to move Note When more than one model is open the gap between each model should be kept to at least 2 5mm to prevent the models sticking together 3 3 Getting Ready to Print 3 3 1 Initializing the Printer Before anything can be printed the printer must be initialized Click the Initialize op...
Page 23: ...s the printer that after being initialized the platform is 142 1mm away from the nozzle To figure out the correct nozzle distance please follow these steps 1 Open the Maintain dialogue box from the 3D Print menu 2 In the text box type in the height to which you want the platform to move to and click the To button In the above example the platform would move to 128mm above the platform s origin 3 C...
Page 24: ...zle and platform 5 Once you are within 0 2mm of the nozzle write down the number you have in the To box This is the correct calibration height Close the Maintain window and open the Setup Window In the Setup window Nozzle box enter the number you recorded on the Maintain Screen Alternatively you can click the Set to Nozzle Height button to automatically transfer the value across to the setup scree...
Page 25: ...rial from the extrusion head When the material runs out or the nozzle needs to be changed click this button When the nozzle is up to temperature 260 C and beeps gently pull out the material If the material gets stuck pull it out it by hand New Spool This is used so the printer can keep track of how much material has been used and warn you if you don t have enough material left to print your model ...
Page 26: ...the Platform Before printing the platform must be prepared so that the model adheres to the platform enough to be printed without the model moving while at the same time being easy to remove from the platform after printing There are 2 options for preparing the platform Method 1 included Using the perfboard clip it down to the platform It is very important that the very first layer of plastic is s...
Page 27: ... printer model Optimize Disabled Height Options Base This is the thickness of the raft of material before the support layer is printed under the part When the printer starts printing it first prints a raft of non solid material in which all the lines of support material are horizontal along the Y axis It keeps building up horizontal rows of support material for as many mm as you have chosen Then j...
Page 28: ...he part has an outer wall thickness of solid plastic about 1 5mm but its interior is filled with a reasonably small scaffold structure Semi Hollow The part has an outer wall thickness of solid plastic about 1 5mm but its interior is filled with a medium spaced scaffold structure Hollow The part has an outer wall thickness of solid plastic about 1 5mm but its interior is filled with a large spaced ...
Page 29: ...Dense This represents how many layers of solid dense material form part of the support structure directly beneath the model Angle Angle at which support material gets used For example if 10 is used support material only gets used if angle of surface is greater than 10 from horizontal so support material is almost not used unless there is a direct overhang If set to 50 than support material is used...
Page 30: ...ould use a lot more support material if printed with the opening facing downwards than if it were facing upwards Space The distance between the lines of non solid support material Changing this parameter requires some experience in balancing the quantity of support material used ease of support material removal and part print quality Area The surface area above which support material gets used Whe...
Page 31: ... pops up Choose Preferences to set the printing parameters Click OK to begin to print Print Options Speed Fine Normal or Fast This simply determines the speed at which the printer moves As a general rule the slower you print the better the quality of the parts For tall parts running at Fast speed can be problematic as the printer can vibrate to the extent that print quality is affected For large s...
Page 32: ...hile the platform is still on the printer the mechanical structure of the printer may be damaged or its precision affected or the platform will no longer be level to the nozzle Removing Support Material Video removing the raft and the support material from objects safely http vimeo com 18525405 Printed models are composed of two parts One part is the model itself and the other part is the support ...
Page 33: ...al can easily be cracked off by hand Support material close to the model is easier to remove using tools such as wood carving chisels long nose pliers or wire cutters It takes some practice to get comfortable with removing support material but it can become quite an enjoyable and therapeutic task CAUTION The support material and the tools are sharp Wear gloves and safety glasses when removing the ...
Page 34: ...Print menu Then press the Extrude button in the maintain dialogue After the printer nozzle has warmed up to 260 C the printer will beep Push the filament into the hole at the top of the extruder head with a little pressure and the extruder will automatically extrude material The plastic thread squeezed out of the nozzle should be thin bright and smooth If the nozzle is blocked remove the nozzle an...
Page 35: ...e 3D Print menu and enter the measured X1 and X2 values into the appropriate boxes Next take down the Front Centre L shaped component and measure its deviation Put the exact value into the Z box If it deviates to the right side the value to be put into the Z box will be a positive value If the deviates to the left the value to put into the Z box will be a negative value ...
Page 36: ...ew and 3 springs under the platform heater Loosen a screw and the related corner of platform will rise Tighten or loosen the screws until you have the same gap between the nozzle and the platform at all four corners of platform Use the maintenance screen to move the platform to all four corners to the nozzle until it is level Cleaning the nozzle After a lot of printing the nozzle may be covered wi...
Page 37: ...across the surface of the platform Preheating the platform for upto half an hour before beginning large parts is essential to minimize this lifting Also the faster you can print such parts the less lifting you are likely to get Some ways to increase print speed include Print the part at an angle you ll be amazed at the results Ensure the platform is level to the nozzle If possible try to avoid pri...
Page 38: ...ector by removing the X axis cover Material not extruding Material is stuck in the extruder See 3 3 3 Maintain Extrude The gap is too wide between the bearing and wire feed rollers Cannot communicate with printer 1 Make sure the USB cable is connected to the printer and to the PC 2 Unplug the USB cable then plug in again 3 Reset the printer power off then power on 4 Restart the PC 5 Check in devic...