background image

9

_______________________________________________________________________________________________________________

PROBLEM: The pre-installation check utility notifies you that you are using
Windows 95 version 950b without the USB supplement present on your system.

______________________________________________________________________________________________________

POSSIBLE SOLUTION:

If you are using Windows 95 version 950b, you need to install the USB supplement, which is included on
the Video 

Connections CD-ROM. (NOTE: You cannot use Windows 95 version 950 or 950a with this product.)

Leave the CD in your CD-ROM drive. Click Windows 

St

St

St

St

Star

ar

ar

ar

arttttt

, point to 

Settings

Settings

Settings

Settings

Settings

, click 

Contr

Contr

Contr

Contr

Control Panel

ol Panel

ol Panel

ol Panel

ol Panel

, and

double-click the 

S

S

S

S

Syst

yst

yst

yst

ystem

em

em

em

em

 icon. Click the 

Device M

Device M

Device M

Device M

Device Mana

ana

ana

ana

anager

ger

ger

ger

ger

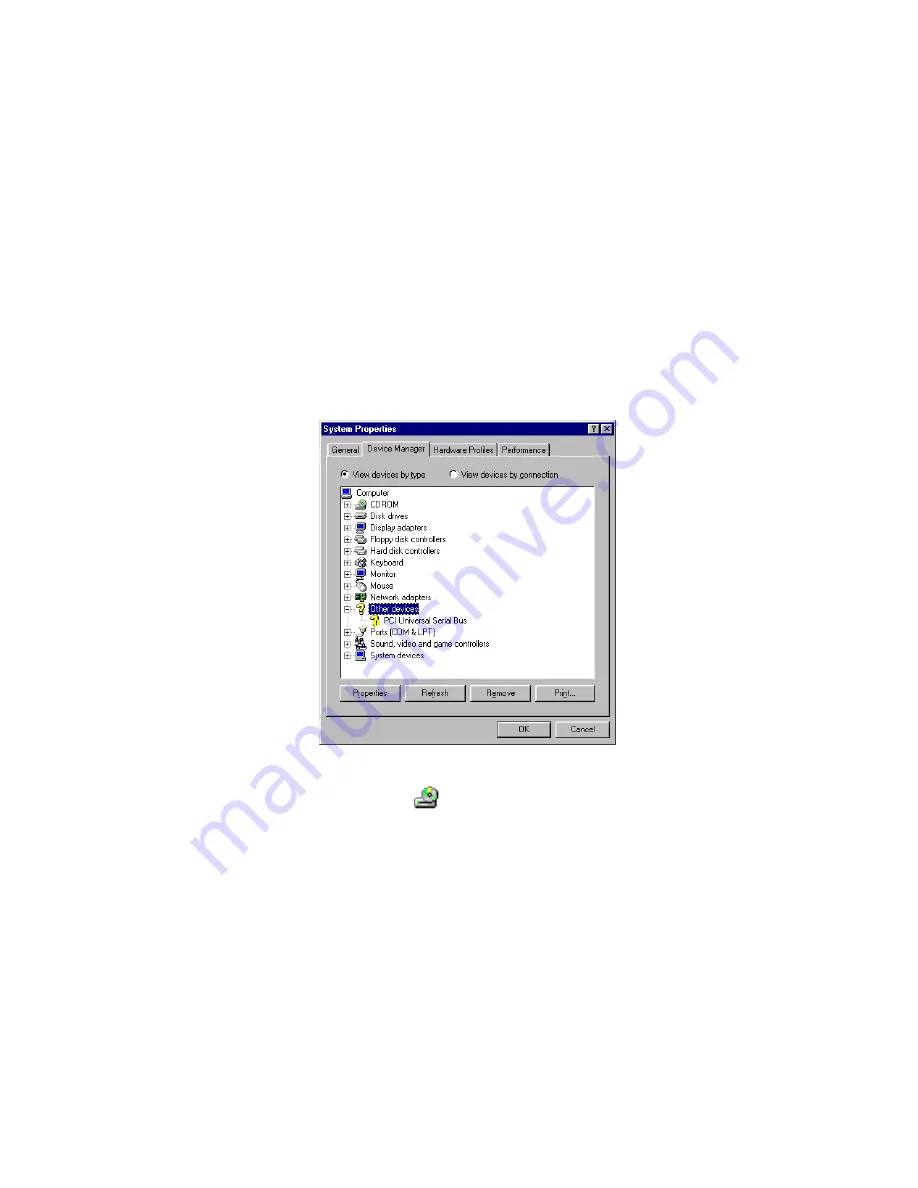
 tab. If you have an “Other Devices” option in the

list of devices that appears, click the plus sign to the left of the listing. If you do not see an 

“Other Devices”

option, exit out of the 

Control Panel

 and move on to the following paragraph. If you see “PCI Universal

Serial Bus” in the list of “Other Devices,” click it to highlight it and then click 

Remove

Remove

Remove

Remove

Remove

. You will be asked if you

are sure you wish to remove the device. Click 

OK

OK

OK

OK

OK

. Exit out of all open windows.

Next, Click Windows 

St

St

St

St

Star

ar

ar

ar

arttttt

 and then click 

Run

Run

Run

Run

Run

. Click 

Br

Br

Br

Br

Browse

owse

owse

owse

owse

. Locate your CD-ROM drive (usually the drive

labeled “D”), which should be indicated by the 

 icon and the text description “HomeConnect”. Double-

click  your CD-ROM drive and then double-click the “sourcpc” folder. Double-click the “USB Supplement”
folder and then double-click the 

usbsupp.exe

usbsupp.exe

usbsupp.exe

usbsupp.exe

usbsupp.exe

 file. Click 

OK

OK

OK

OK

OK

 in the 

Run

 dialog box. Follow the on-screen

instructions to install the supplement.

When the supplement is finished installing, you will be asked if you are ready to restart your system. Make
sure the camera is NOT plugged into your computer and then click 

OK

OK

OK

OK

OK

. When your system restarts, the pre-

installation check utility will launch again. Follow the instructions starting with step 1 on the other side of this
guide to complete your installation.

Summary of Contents for HomeConnect 3CP5098

Page 1: ...1 part number 1 024 2063 00 PC Digital Camera Installation Guide for Windows READ ME FIRST ...

Page 2: ... without difficult re installation routines These features combined with the winning collection of software on the included Video Connections CD ROM make your PC Digital Camera the best way to stay connected to family and friends Here are just some of the ways you can use your new camera and software Make live video calls over the Internet or corporate networks using the included Microsoft NetMeet...

Page 3: ...gin exe d begin exe if your CD ROM drive uses a letter name other than d type that letter in place of d Then press ENTER ENTER ENTER ENTER ENTER The pre installation check utility will display a warning message and shut down if either of the following criteria are not met Your computer s video card must be set for 16 bit color You must be running Windows 95 release 950b with the USB supplement Win...

Page 4: ...tiple USB ports you may use any one that is available Restart your computer When Windows restarts it will automatically detect your camera and begin installing its drivers 2 snapshot button The function of this button varies depending on the software in use Port configurations may vary from this diagram activity LED focus ring ...

Page 5: ... you do see an image click Y Y Y Y Ye e e e es s s s s and then follow the on screen instructions to install the 3Com HomeConnect software 3 Congratulations You have successfully installed your PC Digital Camera See the section below to learn how to take your first picture with the camera If you do not see an image click N N N N No o o o o and then follow the on screen instructions to troubleshoot...

Page 6: ...launcher appears click the Video Gear Video Gear Video Gear Video Gear Video Gear button circled below Then click P P P P Pictur ictur ictur ictur ictureW eW eW eW eWorks Live orks Live orks Live orks Live orks Live The application will start 3 2 N N N N Now Let s T ow Let s T ow Let s T ow Let s T ow Let s Take Y ake Y ake Y ake Y ake Your F our F our F our F our First P irst P irst P irst P irst...

Page 7: ...ction you should see a picture of yourself in the video window Use the focus ring that circles the lens to focus the image If you do not see an image in the window see the Troubleshooting section on the other side of this guide You can now double click the reduced size image in the Preview Area to view it at full size or click F F F F File ile ile ile ile and then Save A Save A Save A Save A Save ...

Page 8: ...thout the USB supplement present on your system PROBLEM The pre installation check utility warns that your video card is not set to 16 bit color depth PROBLEM Windows fails to automatically detect the digital camera PROBLEM There is no video in a video application s window Support Resources Regulatory Information ...

Page 9: ...o not see an Other Devices option exit out of the Control Panel and move on to the following paragraph If you see PCI Universal Serial Bus in the list of Other Devices click it to highlight it and then click Remove Remove Remove Remove Remove You will be asked if you are sure you wish to remove the device Click OK OK OK OK OK Exit out of all open windows Next Click Windows St St St St Star ar ar a...

Page 10: ... the 3comdrvr folder Double click the file setup exe setup exe setup exe setup exe setup exe inside the 3comdrvr folder Click OK OK OK OK OK in the Run Run Run Run Run dialog box Follow the on screen instructions to install your camera s drivers When the setup program is finished you will be asked if you want to restart your computer Make sure the Yes I want to restart my computer now radio button...

Page 11: ...eturn the Camera to Us Contact 3Com Customer Support If the support representative determines that you need to return the camera you will receive an SRO Service Repair Order number You must have an SRO number before returning the camera to us Ship the unit postage paid in a strong box made of corrugated cardboard with plenty of packing material DO NOT send the camera back in the original box Send ...

Page 12: ...t system is installed and when it is removed from the computer try to correct the problem with one or more of the following measures Reorient the receiving antenna for televisions with antenna reception only or cable input device Relocate the computer with respect to the receiver Relocate the computer and or the receiver so that they are on separate branch circuits If necessary consult your dealer...

Page 13: ...afe shipment and it is recommended that they be insured or sent by a method that provides for tracking of the package The repaired or replaced item will be shipped to Customer at 3Com s expense not later than thirty 30 days after 3Com receives the defective product WARRANTIES EXCLUSIVE IF A 3COM PRODUCT DOES NOT OPERATE AS WARRANTED ABOVE CUSTOMER S SOLE REMEDY FOR BREACH OF THAT WARRANTY SHALL BE...

Page 14: ... exclusions may be limited in their application to you When the implied warranties are not allowed to be excluded in their entirety they will be limited to the duration of the applicable written warranty This warranty gives you specific legal rights which may vary depending on local law GOVERNING LAW This Limited Warranty shall be governed by the laws of the State of California U S A excluding its...

Reviews: