3 Embers GAS8490AS Instructions Manual Download Page 12

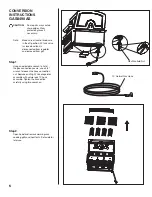
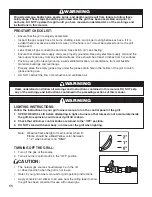
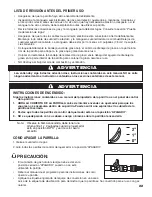
LIGHTING INSTRUCTIONS:

Follow the instructions in your grill owners manual or on the control panel of the grill.

1.  OPEN THE GRILL LID before attempting to light a burner so that fumes do not accumulate inside 

the grill. An explosion could occur if grill lid is down.

2.  Check that all burner control knobs are turned to the “OFF” position.

3.  DO NOT stand with head, body, or arms over the grill when lighting.

TURNING OFF THE GRILL:

1.  Turn off the gas at the source.

2.  Turn all burner control knobs to the “OFF” position.

   CAUTION:

• 

The natural gas source should always be in the off,


or closed position when the grill is not in use.

• 

Refer to your grill owner’s manual for grill operating instructions.


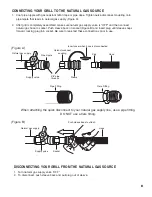
Apply conversion kit sticker to an area near the rating label to show 
the grill has been converted for use with natural gas.

WARNING

WARNING

Read, understand and follow all warnings and instructions contained in this manual. DO NOT skip 
any of the warnings and instructions contained in the preceding sections of this manual.

 Note:


 Observe fl ame height of main burner when lit: 
Flame should be a Blue/Yellow color between 
1”– 2” when burner is on 

HIGH

.

WARNING

Property damage, bodily harm, severe burns, and death could result from failure to follow these 
safety steps. These steps should be performed after the grill has been assembled and prior to 
each use. DO NOT operate this grill until you have read and understand ALL of the warnings and 
instructions in this manual.

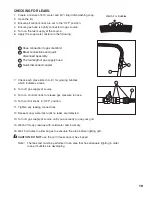
PRE-START CHECK LIST:

• 

Ensure that the grill is properly assembled.

• 

Inspect the gas supply hose for burns, chaffing, kinks, and proper routing before each use. If it is 
evident there is excessive abrasion or wear, or the hose is cut, it must be replaced prior to the grill 
being used. 

• 

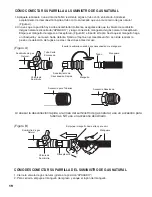
Leak check all gas connections and hose. See section on “Leak Testing”.

• 

Ensure that all electrical supply cords are properly grounded. Keep any electrical supply cord and the 
fuel supply hose away from any heated surfaces. Hose should be at least 3 inches from hot surfaces.

• 

Position your grill on level ground in a well ventilated location, a safe distance from combustible 
materials, buildings and overhangs.

• 

Properly place the empty grease tray under the grease drain hole in the bottom of the grill to catch 
grease during use.


DO NOT obstruct the fl ow of combustion and ventilation air.

11

Summary of Contents for GAS8490AS

Page 1: ...INSTALADOR ENTREGUE ESTAS INSTRUCCIONES AL PROPIETARIO DE LA PARRILLA PARA REFERENCIA FUTURA HAZARDOUS EXPLOSION MAY RESULT IF THESE WARNINGS AND INSTRUCTIONS ARE IGNORED READ AND FOLLOW ALL WARNINGS...

Page 2: ...___________ Failure to follow the instructions as written or installation by other than a trained professional will void all manufacturer warranties WARNING This conversion kit shall be installed by a...

Page 3: ...any If the supply pressure is different than 7 inch contact a professional service technician for assistance Not for use with LP gas WARNING FOR OUTDOOR USE ONLY DO NOT operate indoors or in an enclos...

Page 4: ...ay near this grill DO NOT leave the grill unattended while in use DO NOT allow the gas hose to come in contact with hot surfaces DO NOT allow grease from drain hole to fall on hose Keep any electrical...

Page 5: ...AD ALL SAFETY WARNINGS ASSEMBLY INSTRUCTIONS CAREFULLY BEFORE ASSEMBLING OR OPERATING THE CONVERTED GRILL The following tools are required to assemble the Conversion Kit Phillips and Flathead Screwdri...

Page 6: ...ll Step 1 Using an adjustable wrench to hold the gas connection secure use a 3 4 wrench to loosen the hose connection nut Replace existing LP hose regulator assembly with natural gas 10 hose assembly...

Page 7: ...Step 4 Use the gas orifice tool to remove the LP brass orifice from each main burner valve through the hole on the firebox front panel Note All orifices of the grill are double orifices LP gas and na...

Page 8: ...ill notice the knobs will stop at the MED setting on the dial This is the correct low setting for natural gas Do not try to turn the knob to LO setting Step 7 Carefully replace each burner making sure...

Page 9: ...ward locking plug into socket Be sure to leak test these connections prior to use Pipe nipple Quick disconnect coupling Plug Push sleeve back to attach Sleeve Socket Natural gas supply Natural gas sup...

Page 10: ...l is still hot DANGER WHEN TO PERFORM A LEAK TEST After assembling or converting your natural gas grill and before lighting for the first time even if purchased fully assembled Any time the gas compon...

Page 11: ...growing bubbles which indicates a leak 8 Turn off gas supply at source 9 Turn on control knobs to release gas pressure in hose 10 Turn control knobs to OFF position 11 Tighten any leaking connections...

Page 12: ...lit Flame should be a Blue Yellow color between 1 2 when burner is on HIGH WARNING Property damage bodily harm severe burns and death could result from failure to follow these safety steps These step...

Page 13: ...escritas dadas aqu se ignoran o una persona que no sea un profesional capacitado instala el aparato toda garant a del fabricante quedar anulada ADVERTENCIA Este equipo de conversi n deber ser instalad...

Page 14: ...serve una distancia m nima de 36 pulgadas 91 cm entre todos los lados de la parrilla del barandal de la cubierta de un muro u otro material combustible NO utilice la parrilla debajo de construcciones...

Page 15: ...ermita que los ni os utilicen la parrilla para jugar o jueguen cerca de ella NO deje la parrilla desatendida cuando la est utilizando NO permita que la manguera de gas toque superficies calientes NO p...

Page 16: ...E SER UN T CNICO PROFESIONAL DE SERVICIO PARA CONVERTIR ESTA PARRILLA LEA DETENIDAMENTE TODAS LAS ADVERTENCIAS DE SEGURIDAD E INSTRUCCIONES DE ENSAMBLADO ANTES DE ARMAR U OPERAR LA PARRILLA CONVERTIDA...

Page 17: ...able para detener bien la conexi n del m ltiple del gas use una llave de tuercas de 3 4 para aflojar la tuerca de conexi n de la manguera Reemplace el ensamblado manguera regulador para gas LP existen...

Page 18: ...ra quitar el orificio de lat n para el gas LP de las v lvulas del quemador principal introduci ndola a trav s del agujero en el panel frontal de la c mara de fuego Nota Todos los orificios de la parri...

Page 19: ...e detendr n en el ajuste MED del dial Este es el ajuste correcto para el gas natural No intente girar la perilla a la posici n LO Paso 7 Vuelva a conectar con cuidado Reemplace cada quemador de tal mo...

Page 20: ...tap n en el recept culo No se olvide realizar la prueba de detecci n de fugas en estas conexiones antes del uso Tubo Corto Enroscado Acoplamiento de Desconexi n R pida Tap n Empuje el manguito hacia...

Page 21: ...IZAR UNA PRUEBA DE DETECCI N DE FUGAS Tras haber ensamblado o convertido su parrilla para usarla con gas natural y antes de encenderla por primera vez incluso si la compr totalmente ensamblada Cada ve...

Page 22: ...dejar salir la presi n del gas en la manguera 10 Gire las perillas de control a la posici n de APAGADO 11 Apriete toda conexi n con fugas 12 Repita la prueba con el agua jabonosa hasta no detectar nin...

Page 23: ...contenida en las secciones anteriores de este manual Nota Observe la flama encendida debe tener una altura entre 1 y 2 pulgadas cuando el quemador est en posici n ALTO y ser de color azul o amarillo 2...

Page 24: ...O STATE WARRANTY Las autorizaciones de The Boltz Group al comprador original que equipo universal de conversi n del gas natural est libre de los defectos debido a la ejecuci n o a los materiales por 1...

Reviews: