background image

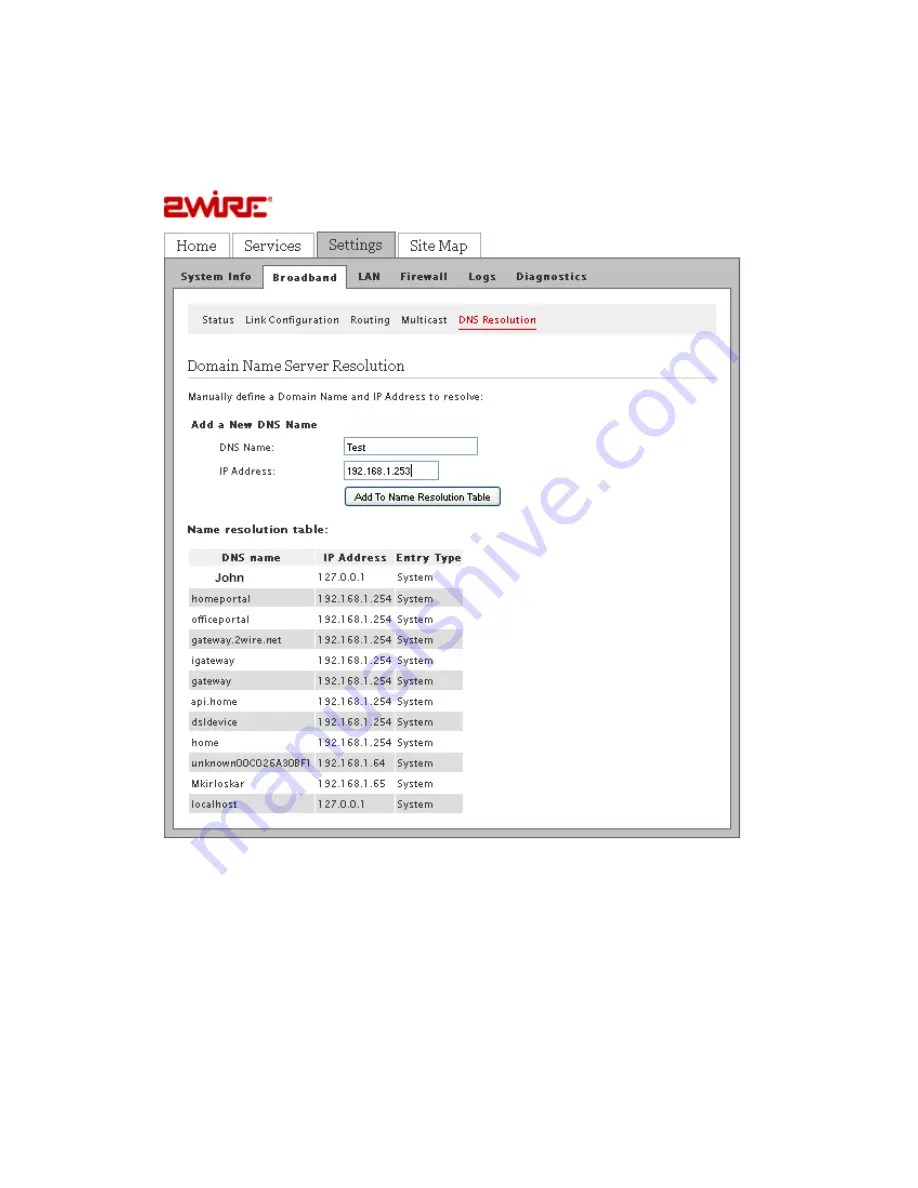
Resolving Domain Name

48

HomePortal 3801HGV Gateway User Guide

Configuring Broadband Settings

Steps

1.

Navigate to 

Settings

 > 

Broadband

 > 

DNS Resolution

. The 

Domain Name Server 

Resolution 

page appears.

2.

Enter a name for the network device in the 

DNS Name

 text box.

3.

Enter the IP address of the network device in the 

IP Address

 text box.

4.

Click 

Add To Name Resolution Table

. The 

Name Resolution Table

 section displays the 

newly added and existing DNS name, IP address, and Entry type.

See Also

Configuring LAN Devices

 on page 50

Configuring Firewall Settings

 on page 72

Summary of Contents for HomePortal 3801HGV

Page 1: ...HomePortal 3801HGV Gateway User Guide Release 1 0 ...

Page 2: ... CONTRACT OR OTHERWISE ARISING OUT OF OR IN CONNECTION WITH THIS MANUAL THE SOFTWARE OR OTHER INFORMATION CONTAINED HEREIN OR THE USE THEREOF 2Wire Inc reserves the right to make any modification to this manual or the information contained herein at any time without notice The software described herein is governed by the terms of a separate user license agreement Updates and additions to software ...

Page 3: ...gh Local Ethernet 5 Connecting through Wireless 6 Connecting the Broadband Interface 7 Connecting VoIP Interface 8 Connecting HPNA Interface to IPTV set top Box 9 CHAPTER 3 Accessing the User Interface 11 System Link Tabs 12 Summary 12 Quick Service Links 12 Home Network Devices 13 Top Networking Features 13 CHAPTER 4 Configuring Internet Connection 14 CHAPTER 5 Viewing Subscribed Services Status ...

Page 4: ...ng Encryption Key 55 Securing the Wireless Network Using MAC Filtering 57 Allowing MAC Addresses 58 Blocking MAC Addresses 59 Refreshing the List of Devices 60 Deleting the Devices 60 Configuring Advance Wireless Settings 61 Configuring Wi Fi Protected Setup 62 Setting Up WPS through the PIN Method 62 Setting Up WPS through the Push Button Method 63 Configuring Local Ethernet Ports 64 Configuring ...

Page 5: ...03 Enabling Syslog 105 Resetting the Gateway 106 Resetting System and Links 107 Resetting Configuration 108 Resetting Device to Factory Default 108 CHAPTER 13 Troubleshooting 3801HGV Gateway 109 Connection Issues 109 VoIP Issues 110 Home PNA Issues 110 System Information Issues 111 Broadband Issues 111 LAN Issues 112 Firewall Issues 113 Diagnostic Issues 113 APPENDIX A Glossary 114 APPENDIX B Regu...

Page 6: ... 14 Viewing Subscribed Services Status on page 17 Configuring Voice Based Services on page 19 Setting Up System Information on page 27 Configuring Broadband Settings on page 34 Configuring LAN Devices on page 50 Configuring Firewall Settings on page 72 Using Diagnostics Features on page 93 Troubleshooting 3801HGV Gateway on page 109 Glossary on page 114 Regulatory Information on page 117 Audience ...

Page 7: ... guide the HomePortal 3801HGV gateway documentation library includes HomePortal 3801HGV Hardware Functional Specifications Communicates the high level hardware related information HomePortal 3801HGV Software Functional Specifications Communicates the high level features of the gateway HomePortal 3801HGV Hardware Release Notes Communicates the hardware changes incorporated in the latest release Hom...

Page 8: ...Support viii HomePortal 3801HGV Gateway User Guide About This Guide Support Technical support is available from the 2Wire Website http support 2wire com index php ...

Page 9: ...ervice provider network The gateway has 4 10 100 Ethernet ports to connect to computers or devices in the home It comes loaded with hardware capabilities that enable you to use VoIP and Video Streaming technologies What the HomePortal 3801HGV Gateway Does for You The HomePortal 3801HGV gateway gives you a seamless high speed Internet access amongst a host of other features Seamless Wireless Connec...

Page 10: ...HPNA HPNA features for distributing entertainment and triple play data over existing coax cables Network Address Translation NAT NAT and Network Address and Port Translation NAPT technology for enabling multiple hosts on private network using a common IP address Internet Protocol Security IPsec IPsec for protecting data flows between a pair of hosts between a pair of security gateways or between a...

Page 11: ...on Components Your HomePortal 3801HGV gateway has the following components in the box 1 HomePortal 3801HGV Gateway 1 Power Cord Adapter See Also Installing the HomePortal 3801HGV Gateway on page 4 Accessing the User Interface on page 11 Configuring Internet Connection on page 14 Regulatory Information on page 117 ...

Page 12: ...rmance are the major considerations when planning your wireless network location Consider the following points before determining the WAP to deploy the gateway Place your gateway at least 5 feet 1 52 meters from cordless phones microwave ovens or other electronic devices to avoid potential interference and more than 6 inches 15 24 centimeters away from your television to avoid audio hissing or sta...

Page 13: ...s Connecting Your Computer to the Gateway The first computer you connect to the gateway is used to configure the HomePortal 3801HGV gateway for proper operation You can connect your gateway to additional computers and or other devices with Ethernet cable and wireless AP Connecting through Local Ethernet The HomePortal 3801HGV gateway has four Ethernet ports for directly connecting computers or dev...

Page 14: ...ryption key a 64 bit hex value located beneath the bar code on the side of the 2Wire gateway for example 1234567891 For Mac OS X users you may need to enter the character at the beginning of the encryption key for example 1234567891 Follow these steps to connect the computer to the gateway using Wireless 1 Push the wireless button at the bottom of the gateway front panel Verify that the WIRELESS l...

Page 15: ...w these steps to connect the gateway to Very High Bit rate DSL VDSL wall jack 1 Connect one end of the phone cord twisted pair cable to the DSL port green on your gateway 2 Connect the other end of the phone cord twisted pair cable to the VDSL enabled wall jack outlet Once the gateway recognizes the VDSL connection Broadband LED flashes green for a brief period of time and then turns solid green ...

Page 16: ...ith the capacity to support 2 phone lines using a splitter or multi jack adapter c Warning Do not connect the VoIP lines to your current home telephone wiring without contacting your service provider This requires special installation especially if your home has an alarm system which requires special wiring Follow these steps to connect the VoIP phone to the Voice 1 2 port of the gateway 1 To conn...

Page 17: ...l 3801HGV gateway can be configured to use IPTV services through the cable port Follow these steps to connect the gateway to the set top box 1 Connect one end of the coaxial cable to the CABLE port and the other end to the CABLE IN port of Ethernet over Coax adapter 2 Connect one end of the Ethernet cable to the Ethernet port of Ethernet over Coax adapter and the other end to the Ethernet port on ...

Page 18: ...set top Box 10 HomePortal 3801HGV Gateway User Guide Installing the HomePortal 3801HGV Gateway Figure 8 IPTV Connection VDSL over Coax See Also Introducing the HomePortal 3801HGV Gateway on page 1 Accessing the User Interface on page 11 ...

Page 19: ... HomePortal 3801HGV gateway user interface access the Home page of the gateway by entering one of the following URLs into a compatible browser on the computer connected to the gateway http gateway 2Wire net http home http 192 168 1 254 The Home page appears ...

Page 20: ... The Settings tab provides links to view and configure system information Also other sub tabs let you configure Broadband services LAN settings Firewall settings and perform Diagnostics on your gateway Site Map The Site Map tab provides a tree diagram view of the user interface Click any link on this page to access the relevant page This helps you to access the desired page directly without having...

Page 21: ... the device details or view the shared files of the connected devices Top Networking Features The Top Networking Features pane provides shortcuts to directly access the most commonly used gateway pages Click a link to access the relevant page directly See Also Introducing the HomePortal 3801HGV Gateway on page 1 Installing the HomePortal 3801HGV Gateway on page 4 Configuring Internet Connection on...

Page 22: ...ials to complete this configuration Also ensure the Broadband LED on the front panel of the gateway is solid green and the first computer is communicating with the gateway Note PPP credentials are provided by your ISP Steps 1 Access the Home page of the gateway 2 Navigate to Settings Broadband Link Configuration The Link Configuration page appears ...

Page 23: ...15 HomePortal 3801HGV Gateway User Guide Configuring Internet Connection ...

Page 24: ...the Internet connection becomes idle after that duration 8 Leave the selected radio buttons Obtain IP address automatically dynamic IP or DHCP and Obtain DNS information automatically in the Broadband IP Network Primary Connection section as they are if you do not want to configure the associated information statically Contact your ISP to get associated information for configuring IP address and D...

Page 25: ...O TV What do these sections display Will the user be able to see all these sections if he has not subscribed for a particular service This chapter provides information about the Status tab You can view the status of your subscribed services in this tab To view the Status tab navigate to Services Status The File Sharing page appears Click Remote Access configuration link to enable Web remote access...

Page 26: ...ted on the Status page Parameter Description File Sharing Displays all devices connected to the HomePortal 3801HGV gateway You can share files among these devices Web Servers Displays the Web servers configured to the gateway TELCO Digital Voice Displays the status of the VoIP lines and associated servers TELCO TV Displays the IPTV parameters ...

Page 27: ... Line Configuring Phone Lines on page 22 Phone Configuring Phones on page 23 Stats Viewing External Line Statistics on page 24 Note You can access this tab only if you have subscribed for the VoIP service from your provider Viewing Status This topic provides information about the Status page under the Voice Tab You can view the status of your phone lines and servers on this page To view the server...

Page 28: ...tain names or resources on the Internet Your service provider gives you all the information required to configure the SIP server Parameter Description Servers Name Displays the name of the configured SIP server Associated Line Displays the phone lines associated with the SIP server Line Status Line Displays the name of the configured line Number Displays the phone number of the configured line Sta...

Page 29: ...e Registrar Server Port text box The port number will be provided by the service provider The default port is 5060 6 Enter the domain name in the User Agent Domain text box This will be provided by the service provider 7 Enter the expire time in the Register Expire Time text box This will be provided by the service provider 8 Enter the re register interval time in the corresponding text box This w...

Page 30: ...an configure your telephone number on this page You can confgure 2 telephone lines at a time in the HomePortal 3801HGV gateway You can also configure a user name and password for your account to prevent unauthorized access Steps 1 Navigate to Services Voice Line The Line page appears 2 Select the Enable check box in the Line 1 section This activates the line for use ...

Page 31: ...ting as directed by the service provider 5 Select the appropriate server to associate with the line in the Line Association drop down list box 6 Click Save 7 Configure the second phone line if present in the Line 2 section and click Save Configuring Phones Objective To configure phones NOTE TO REVIEWER Why do we need to configure phones separately from lines Do we need different types of phones fo...

Page 32: ...ured in the Association drop down list box 4 Select the Service Outage check box if insert info here NOTE TO REVIEWER Need info about the Service Outage check box 5 Click Save 6 Configure the second phone if present in the Phone Phone 2 section and click Save Note You will get all information regarding the location association and service outage for your phone from the service provider Viewing Ext...

Page 33: ...lays registration information about the phone line in use Call Summary Current Call Displays call summaries for the current call Last Completed Call Displays call summaries for the for your last completed call Cumulative Since Last Reset Displays collective call information since you last reset the page Call Statistics Current incoming calls Displays complete call statistics of the current incomin...

Page 34: ...figuring Voice Based Services See Also Viewing Subscribed Services Status on page 17 Troubleshooting 3801HGV Gateway on page 109 All incoming calls Displays complete call statistics of all incoming calls All outgoing calls Displays complete call statistics of all incoming calls ...

Page 35: ...7 Password Setting Up System Password on page 29 Date Time Configuring Date and Time on page 30 Event Notification Enabling Event Notifications on page 32 Viewing System Information View your system information at a glance Find details pertaining to your system including the manufacturer name model and serial number and hardware and software versions To view the system information navigate to Sett...

Page 36: ...er of the gateway Software Version Version number of the software used for the gateway Key Code Key code of the gateway First Use Date Date when the gateway was powered on for the first time out of factory Cureent Date and Time Your current date and time Time Since Last Boot Time elapsed since you last booted the system DSL Modem Hardware version of the DSL modem System Password Displays Default i...

Page 37: ...n password Steps 1 Navigate to Settings System Info Password The Password page appears 2 You can perform one of the following tasks Set the default system password The default system password is displayed on the side of the gateway device Create your own system password Setting Default System Password To set the default system password 1 Select the Enable Password Protection box 2 Click Use Defaul...

Page 38: ...s with no spaces 4 Enter the same password in the Confirm New Password text box 5 Enter a hint in the Enter a Password Hint text box A password hint can be a word a phrase or a question that can help you in case you forget your password Note Although not required it is strongly recommended that you enter a hint to act as a reminder 6 Click Save Configuring Date and Time Objective To configure the ...

Page 39: ...Time To automatically set up date and time 1 Navigate to Settings System Info Date Time The Date Time page appears 2 Select your time zone in the Current Time Settings area 3 Click Save Note Do not forget to select the Daylight Savings Time check box in the Time Configuration area if Daylight Savings Time is observed in your state ...

Page 40: ...4 Set the date in the corresponding space in the yyyy mm dd format 5 Select the Daylight Savings Tim check box 6 Click Save Note When you configure the date and time manually do not forget to select the Override automatic time configuration check box Enabling Event Notifications Objective To view notifications of service impacting events This task allows you to eable disable event notifications En...

Page 41: ...fication and or Router Behind Router Detection check boxes 3 Click Save Note To enable router behind router detection make sure that DHCP and NAT are enabled and the gateways are not in bridge mode Disabling Notifications To disable notifications 1 On the Event Notifications page clear the Broadband Status Notification and or Router Behind Router Detection check boxes 2 Click Save See Also Using D...

Page 42: ...age 43 Viewing Multicast Statistics on page 44 DNS Resolution Resolving Domain Name on page 47 Viewing Broadband Status This task lets you view the connectivity status Internet connection details modem type and traffic statistics You can also reset the page to view up to date information Note Broadband and Service LEDs must be solid green on the front panel of the device Also ensure that the user ...

Page 43: ... following figure displays the Internet Details section of the Status page Parameter Description Internet Status of the Internet Connection This displays Connected when the ISP acitvates your Internet connection DSL Link Status of the DSL connection This displays Connected when the DSL port of the gateway is connected to the telephone jack Ensure that your service provider activates the VDSL conne...

Page 44: ...onjunction with your Internet address Default Gateway Default gateway is a server that assigns an IP address to your gateway for accessing the Internet Primary DNS IP address of the primary DNS server that the gateway uses for DNS name resolution DNS allows Internet users to specify a name domain name to reach a Web page for example www domainname com instead of its Internet address for example 11...

Page 45: ... listed on the status page Parameter Description Modem Type Displays modem type either built in VDSL modem or external broadband modem through Ethernet Connection Type Method by which the gateway connects to the ISP The method can be Direct IP PPPoE DSL Line Wire Pair Line 1 inner pair Line 2 outer pair or searching for DSL signal During installation the gateway auto detects whether the DSL signal...

Page 46: ...on about the DSLAM including country DSLAM vendor and specifics Rate Cap Configured DSL service downstream speed Attenuation 300kHz Measurement of the decrease in downstream signal strength in kilobytes per second Required Impulse Noise Protection Measurement of how much impulse noise can be mitigated Dependent on the current line configuration Uncanceled Echo Measurement of the uncancelled echo r...

Page 47: ... DSL loss of signal failures since the 2Wire gateway was last restarted and the elapsed time since the last loss of signal failure Loss of Power Failures Number of DSL loss of power indications from the ATU C since the gateway was last restarted and the elapsed time since the last loss of power indication Loss of Margin Failures Number of DSL loss of margin failures at current data rate since the ...

Page 48: ...band IP When the gateway is into bridge mode you can use a supplementary network or a third party router to handle the traffic The gateway will only function as a direct connection to the phone line Note By default the gateway is configured in the routing mode When routing is disabled the NAT and the DHCP server are also disabled Confirm with the ISP that the WAN protocol is compatible with bridgi...

Page 49: ...Make sure that you select this option because the firewall must be disabled for the bridge mode to function 5 Select the Use the built in system MAC address radio button from the System MAC Address section to use the configured MAC address OR Select the Override the built in MAC address radio button from the System MAC Address section and mention a MAC address of your choice in the Specify MAC add...

Page 50: ...y does not assign IP addresses to LAN devices through DHCP 12 Click Save The bridge mode is enabled on the gateway and LAN devices are configured to take the Broadband IP address The service LED on the front panel of the device remains off when the gateway is in bridge mode The supplementary network represented by the router is tailed to the gateway Adding Static Routes Objective To add static rou...

Page 51: ...f the destination network in the Subnet IP text box 3 Enter the subnet mask of the destination network in the Subnet Mask text box 4 Enter the gateway address of the destination network in the Gateway IP text box 5 Click Add To List The Static Route List section displays the new Subnet IP Subnet Mast Gateway IP and Interface name Configuring IP Multicast Sessions Objective To configure IP multicas...

Page 52: ...ppears 2 Select the IGMP Proxy check box to enable the feature When IGMP Proxy is enabled the gateway issues IGMP host messages on behalf of the hosts discovered through standard IGMP interfaces In other words the gateway acts as a proxy for its hosts 3 Select the IGMP Snooping check box to enable the feature When IGMP Snooping is enabled the gateway analyzes all IGMP packets and selectively forwa...

Page 53: ...meters listed on the multicast page IGMP Parameter Description IGMP Interface Name Name of the interface for which statistics are being reported IGMP Enable Query Displays whether the interface has IGMP querying enabled or disabled IGMP Fast Update Displays whether the interface has IGMP fast update enabled or disabled IGMP Version Displays the IGMP version ...

Page 54: ...ation Failure messages such as memory allocation failure IP address allocation failure and so on IGMP Host Group Exceeded Number of times host groups have exceeded in the message IGMP Sources Exceeded Number of times source addresses have exceeded in the message IGMP Other Querier Timeout period for group membership If no report is received for these groups before the timeout expires the group mem...

Page 55: ...ving Domain Name Objective To manually add a domain name for resolving the IP address of the networked devices This task allows you to name network devices such as printers or Web servers so that they can be easily accessed by other users on the network Note Confirm that the domain name is not in use ...

Page 56: ...ion page appears 2 Enter a name for the network device in the DNS Name text box 3 Enter the IP address of the network device in the IP Address text box 4 Click Add To Name Resolution Table The Name Resolution Table section displays the newly added and existing DNS name IP address and Entry type See Also Configuring LAN Devices on page 50 Configuring Firewall Settings on page 72 ...

Page 57: ...Resolving Domain Name 49 HomePortal 3801HGV Gateway User Guide Configuring Broadband Settings Using Diagnostics Features on page 93 Troubleshooting 3801HGV Gateway on page 109 ...

Page 58: ... links under the LAN tab and associated tasks Status Viewing LAN Status on page 51 Wireless Setting Up Wireless Network on page 53 Securing the Wireless Network Using Encryption Key on page 55 Securing the Wireless Network Using MAC Filtering on page 57 Configuring Advance Wireless Settings on page 61 Configuring Wi Fi Protected Setup on page 62 Wired Interfaces Configuring Local Ethernet Ports on...

Page 59: ...he following table to understand the Private Network parameters listed on the Status page Parameter Description Router Gateway Address IP address allocated to the gateway Subnet Mask Subnet mask allocated to the gateway Private Network DHCP Info Range Range of IP addresses available on the network Allocated Number of IP addresses allocated on the network Remaining Number of IP addresses remaining ...

Page 60: ... enabled or disabled Also displays the number of active and inactive wireless devices on the network HomePNA1 Displays whether the HPNA interface is enabled or disabled Also displays whether the HPNA interface is active or inactive on the network Parameter Description Wireless Channel Radio frequency band that the access point uses for your wireless network Wireless Power Level Power level for you...

Page 61: ...s network This configuration determines the wireless settings used to access the wireless interface of the gateway Steps 1 Navigate to Settings LAN Wireless The Wireless page appears Step Result Click Hide Inactive Devices Devices that are no longer on the local network will be hidden from the Devices list on this page and under Home Network Devices on the Home page Click Clear List Devices that a...

Page 62: ...Setting Up Wireless Network 54 HomePortal 3801HGV Gateway User Guide Configuring LAN Devices ...

Page 63: ...d connect to your wireless network You have to manually add a wireless profile in the LAN client to connect to the wireless network instead of selecting the SSID name from a typical scan list 5 Select a wireless channel radio frequency band from the corresponding drop down list box This is the access point used for your wireless network Wireless clients or wireless adapter cards auto detect the ch...

Page 64: ...east level of security For security reasons do not select this setting unless there is a compatibility issue with an older wireless client For added protection set an encryption key on your AP and enter the same key into your other wireless clients WEP Shared Similar to the WEP Open setting do not select this setting unless there is a compatibility issue with an older wireless client Unlike the WE...

Page 65: ...g the MAC filtering feature This feature enables you to block or allow wireless connection to all devices or an individual device based on the MAC address of the device You allow only known and trusted devices to associate with the wireless access point MAC address filtering is disabled as a default setting When enabled the wireless connection is granted only to the MAC addresses that are pre conf...

Page 66: ...bling MAC address filtering allows all the wireless clients to access the device 4 Click Save This ensures that the configured MAC filtering setting is saved 5 Allow block devices to access wireless interface based on MAC filtering feature by configuring the Select Devices to be Allowed or Blocked pane Allowing MAC Addresses Objective This feature enables you allow wireless connection to all devic...

Page 67: ...s connection to all devices or an individual device based on the MAC address of the device Steps 1 Navigate to Settings LAN Wireless The Wireless page appears 2 In the MAC Filtering section click Edit Blocked Allowed Device List link The Wireless MAC Filtering page appears 3 Select the device you want to block from the Allowed Devices pane Note To select multiple addresses hold down the Shift or C...

Page 68: ...ck Rescan For Devices to refresh the list of devices viewed in Allowed Devices and Blocked Devices panes Deleting the Devices Objective To delete a configured device This feature enables you to delete devices from the list of allowed or blocked devices Steps 1 Navigate to Settings LAN Wireless The Wireless page appears 2 In the MAC Filtering section click Edit Blocked Allowed Device List link The ...

Page 69: ... at the access point The default list is from 1 to 4 Following table provides the output power levels for 802 11b and 802 11g types of wireless modes 3 Select the Wireless Mode from the drop down list This allows you to force the gateway to use 802 11b g 802 11b only or 802 11g only modes of operation Check the wireless mode supported by the wireless adapter before configuring this option 4 Enter ...

Page 70: ...nfiguration methods When WPS is enabled the gateway automatically detects the presence of a WPS enabled client device Both methods require WPA or WPA2 security enabled and the predefined passphrase is provided to the WPS device Steps 1 Navigate to Settings LAN Wireless The Wireless page appears 2 In the Wi Fi Protected Setup section enable the WPS by selecting the Wi Fi Protected Setup check box S...

Page 71: ...Wireless page appears 2 In the Wi Fi Protected Setup section enable the WPS by selecting the Wi Fi Protected Setup check box 3 Select Push Button from the drop down list 4 Locate and push the WPS button found at the front panel of the device The gateway provides a push button on the front panel to enable the synchronization between the AP and the client You do not have to connect any devices to th...

Page 72: ...s 1 Navigate to Settings LAN Wired Interfaces The Ethernet Switch page appears 2 Enable or disable the local Ethernet networking by selecting or clearing the Ethernet Networking check box 3 Match the mode of the Local Ethernet port located at the back panel of the gateway with the Ethernet port of the LAN client Select one of the following options from the Port 1 Mode drop down list Auto detect 10...

Page 73: ...port If you select DSL it implies that you are using DSL port NOTE TO REVIEWER Unsure whether the user can actually use the DSL port to configure the HPNA interface The device has only one DSL port which is used to connect Internet My understanding is that the device must have an addition RJ 11 port to configure HPNA interface Need inputs for the same 4 Select 493 or 340 from the Noise Margin drop...

Page 74: ...e the DHCP server DHCP allows dynamic allocation of network addresses Your gateway can be both a DHCP client and a DHCP server When communicating with the local network devices such as computers and printers your gateway functions as a DHCP server However while communicating with your ISP the gateway functions as a DHCP client Parameter Description Firmware Version Firmware version number Firmware...

Page 75: ...You can select from two additional IP address ranges or configure the network settings manually When you select either of them the LAN clients are assigned IP addresses within the specified range Note You should manually configure these settings ONLY if you thoroughly understand IP internetworking An incorrect configuration can cause unpredictable results ...

Page 76: ...ble or disable the DHCP server by selecting or clearing the DHCP Server Enabled check box 3 Select a relevant radio button from DHCP Network Range to use the default range of IP addresses or configure the DHCP server manually If you are using the default range of IP address continue to step 5 However if you want a limited range of IP addresses then go to step 4 ...

Page 77: ...irst DHCP Address text box d Enter the last IP address in the DHCP address pool that you will be distributing over the private network in the Last DHCP Address text box 5 Enter a numerical value in the DHCP Lease Time text box This value represents the number of hours you can use the assigned IP address before the DHCP lease expires 6 Select Private Network from the New Device DHCP Pool drop down ...

Page 78: ...guration to override the default DHCP settings 3 Enable or disable the firewall by selecting the relevant option from the Firewall drop down list 4 Select the specific address type from the Address Assignment drop down list You can select from the private IP address pool or assign a static IP to the device NOTE TO REVIEWER Unsure of the purpose for this field 5 Leave the WAN IP Mapping drop down l...

Page 79: ... change might bring up more options in the drop down list Need inputs for the same 6 Click Save This saves the allocated IP address to a specific device or devices 7 Restart the gateway to view the updated configuration on this page See Also Configuring Broadband Settings on page 34 Using Diagnostics Features on page 93 Troubleshooting 3801HGV Gateway on page 109 ...

Page 80: ... Status on page 72 Applications Pinholes and DMZ Configuring Firewall Settings on page 73 Advanced Configuration Disabling Attack Detection on page 80 Controlling Inbound and Outbound Traffic on page 82 Configuring Firewall Security Enhancements on page 83 Configuring Application Layer Gateway on page 83 Viewing Firewall Status To view the Firewall status page navigate to Settings Firewall Status ...

Page 81: ... information Also you can delete the application profile you have saved By default firewall provides maximum protection and blocks unsolicited inbound traffic Steps 1 Navigate to Settings Firewall Applications Pinholes and DMZ The Allow device application traffic to pass through firewall page appears Parameter Description Firewall Status View whether firewall is enabled or disabled in this section...

Page 82: ...Configuring Firewall Settings 74 HomePortal 3801HGV Gateway User Guide Configuring Firewall Settings ...

Page 83: ...ist list box Note To select multiple applications hold down the Shift or Ctrl keys while making your selections Using the Shift key lets you make your selections in a contiguous order while the Ctrl key selects the groups in a random order 5 Click Add The application appears in the Hosted Applications list box Note To remove a hosted application select it in the Hosted Applications list box and cl...

Page 84: ...plication require only one port to be opened such as TCP port 500 others require that all TCP ports from 600 to 1000 be opened 6 Enter the duration in seconds in Protocol Timeout text box This is the amount of time the connection in the specified range remains open when there is no data transfer In most cases the default value is appropriate If you leave the text box blank the system uses the defa...

Page 85: ...ack to return to the Applications Pinholes and DMZ page 11 To edit a user defined applicaitons click Edit or delete user defined application in the Edit firewall settings for this computer section This lets you edit an existing profile or assign additional TCP or UDP ports to an existing profile The Edit or Delete a User Defined Application page appears Note You can add the definition of the profi...

Page 86: ...Configuring Firewall Settings 14 Modify the information as per your requirement 15 Click Add to List The configuration changes appear in the Definition List section of the same page 16 Repeat step 8 to 15 for each port or range of ports required for the application profile ...

Page 87: ...ations list box 3 Click Delete The configuration successful prompt confirms the deletion You cannot view the deleted application in the User defined applications list box Allowing all Applications To allow all applications through firewall 1 On the Allow device application traffic to pass through firewall page select Allow all applications DMZplus mode radio button This will enable DMZplus mode DM...

Page 88: ...ddress from the system and all unassigned TCP and UDP ports are forwarded to it m Use the DMZplus mode with caution A computer in the DMZplus mode is less secure because all available ports are open and all incoming Internet traffic is directed to this computer Disabling Attack Detection Objective To disable a specific port in the attack detection section By default attack detection is enabled on ...

Page 89: ...IP address check box When disabled the firewall does not verify IP addresses for Broadcast or multicast IP addresses TCP destination IP address is not unicast IP source and destination address are the same Invalid IP source received from private home network 5 Clear the Packet Flood SYN UDP ICMP Other check box When disabled the firewall does not check for SYN UDP ICMP and other types of packet fl...

Page 90: ...tion the firewall allows the traffic from the network to pass through the firewall to the Internet 3 Select or clear any check box in the Inbound Protocol Control section If you select any of the check boxes in the Inbound Protocol Control section the firewall allows the corresponding protocol to pass from the Internet to the network 4 Click Save This saves the configuration changes done to the in...

Page 91: ...ing or clearing the Block Ping check box When you disable Block Ping intruders can use ping to launch an attack against your network because ping can determine the IP address of the network for example 105 246 172 72 from the domain name for example www mynetwork com If you enable Block Ping your network will block all ping requests 4 Enable or disable the restricted transmission of packets by sel...

Page 92: ...you have to explicitly open up a large number of ports in the firewall rendering the network vulnerable to attacks on those ports Steps 1 Navigate to Settings Firewall Advanced Configuration The Advanced configuration page to configure the SIP ALG settings appears 2 Enable or disable the SIP ALG on the gateway firewall by selecting or clearing the check box 3 Click Save This saves the configuratio...

Page 93: ...ing tabs Event Log System Log Upgrade Log Firewall Log Viewing Event Log Objective To view event logs You can perform the following tasks on this page View all event logs Assign a filter to view specific event logs Clear logs from the display list Viewing All Event Logs Steps To view all event logs navigate to Settings Logs Event Logs The following page appears ...

Page 94: ...rmation about the logs that you can view on the Event Logs page Name Description Type The type of event Given below is a list of event types ALM Alarms DBG Debug EMR Emergency ERR Error FLT Faults INF Information NTC Notice WRN Warning Date Time The date and time when the event occurs with the latest date on the top Event Decription Source and destination IP addresses with their ports and a brief ...

Page 95: ...Event Logs To clear all logs from a list click the Clear Log button Note To clear a particular log type select an option in the Display Filter list and then click Clear Log Viewing System Log Objective To view system logs You can perform the following steps on this page Filtering and viewing the following types of system logs DBG Debug INF Information NTC Notice WRN Warning ERR Error FTL Faults AL...

Page 96: ... and view system logs 1 Navigate to Settings Logs System Log The following page appears 2 Select a log type in the Display Filter drop down list box 3 Click Submit to view all logs of the type you selected Note You can further filter logs by selecting an option from the drop down list box beside the Submit button and click ...

Page 97: ...s an inserted mark in the system log Clearing Logs Steps To clear logs 1 Select a type of logs in the Display Filter drop down list box You can further filter the logs by selecting an option in the next drop down list box 2 Click Clear Log Viewing Upgrade Log Objective To view upgrade log You can view the software upgrade information about your system on this page Name Description Type The type of...

Page 98: ...rmation navigate to Settings Logs Upgrade Log The following page appears You can view the initial software version and the current software version of the system on this page Viewing Firewall Log Objective To view the firewall log You can perform the following tasks on this page View firewall log Clear log ...

Page 99: ...tion about the logs that you can view on the Firewall Log page Name Description Type The type of event Given below is a list of event types ALM Alarms DBG Debug EMR Emergency ERR Error FLT Faults INF Information NTC Notice WRN Warning Date Time The date and time when the event occurs with the latest date on the top Event Decription Source and destination IP addresses with their ports and a brief d...

Page 100: ...al 3801HGV Gateway User Guide Viewing Logs Clearing Log You can clear logs on the Firewall Log page and minimize the clutter from previous events when you try to diagnose a problem To clear the firewall log click the Clear Log button ...

Page 101: ...adband Link on page 93 Link Tree Viewing Link Tree on page 95 DSL Viewing DSL Diagnostic Information on page 96 IP Utilities Testing IP Utilities on page 97 NAT Viewing NAT Information on page 103 Syslog Enabling Syslog on page 105 Resets Resetting the Gateway on page 106 Testing Broadband Link Objective To test your broadband connection You can run a series of diagnostic tests on your broadband c...

Page 102: ...ngs Diagnostics Link Test The Link Test page appears 2 Click Start to start running diagnostic tests on your broadband connection 3 Click Refresh Page to view the results of your test Note Running diagnostic tests on your broadband connection may take a few minutes and broadband will not be available during this time ...

Page 103: ...Viewing Link Tree 95 HomePortal 3801HGV Gateway User Guide Using Diagnostics Features Viewing Link Tree To view Link Tree navigate to Settings Diagnostics Link Tree The Link Tree page appears ...

Page 104: ... any link to view its details at the bottom of the page This is shown in the figure below Viewing DSL Diagnostic Information The DSL page displays disgnostic information about DSL which you can use in case of any problems To view the DSL diagnostic information navigate to Settings Diagnostics DSL The DSL page appears ...

Page 105: ...tion on this page Testing IP Utilities Objective To test the following IP utilities Parameter Description General Information Technical information about the DSL Training History Information about DSL training history Bitloading Graphic representation of DSL bitloading Note Explanation of terms used in DSL training history ...

Page 106: ...e the route taken by packets across an IP network DNSquery A generic query resolution interface Testing Ping To test ping 1 Navigate to Settings Diagnostics IP Utilities and select ping in the Test Type drop down list The following page appears 2 Type the host address in the Host Address text box 3 Select the Enable Name Resolution check box if you want to find the IP address corresponding to the ...

Page 107: ...ting IP Utilities 99 HomePortal 3801HGV Gateway User Guide Using Diagnostics Features 5 Click Stop to stop testing Note To clear logs select all logs in the provided space and press Delete on your keyboard ...

Page 108: ...ities and traceroute in the Test Type drop down list The following page appears 2 Type the host address in the Host Address text box 3 Select the Enable Name Resolution check box if you want to find the IP address corresponding to the host address 4 Click Start to start testing You can view the results in the space provided The following figure displays the test results ...

Page 109: ...ing IP Utilities 101 HomePortal 3801HGV Gateway User Guide Using Diagnostics Features 5 Click Stop to stop testing Note To clear logs select all logs in the provided space and press Delete on your keyboard ...

Page 110: ...ties and dnsquery in the Test Type drop down list The following page appears 2 Type the host address in the Host Address text box 3 Select the Enable Name Resolution check box if you want to find the IP address corresponding to the host address 4 Click Start to start testing You can view the results in the space provided The following figure displays the test results ...

Page 111: ...difying network address information in datagram packet headers while in transit across a traffic routing device for remapping a given address space into another Most NAT devices allow the network administrator to configure table entries for permanent use This feature is referred to as port forwarding and allows traffic originating in the outside network to reach designated hosts in the masqueraded...

Page 112: ...Viewing NAT Information 104 HomePortal 3801HGV Gateway User Guide Using Diagnostics Features ...

Page 113: ...appears 2 Select the Enable Syslog check box 3 Enter the IP address of the server in the Server Location text box 4 Select Enable Throttling if you want to limit the number of logs sent to the server per second Selecting this feature increases server performance Name Description Pinholes A firewall pinhole is a port that is opened through a firewall to allow a particular application Web site to ga...

Page 114: ...hin the system It is recommended that you discuss your problems with customer service before attempting to reset your device You can work with the following areas on this page System Link Resets You can reset the following in this area Device List IP PPP Broadband System Configuration Resets You can reset the following in this area Wireless Configuration Firewall Configuration Reset to Factory Def...

Page 115: ...ar if you want to clear the device list Devices will be re listed as the system rediscovers them Note Clearing the device list deletes many per device settings you may have made IP addresses host application mappings and so on It is recommended that you do this only when instructed by a customer support executive b Click Reset for Reset IP PPP if you want to refresh the broadband IP address c Clic...

Page 116: ...to factory default b Click Reset for Firewall Configuration Reset if you want to reset the firewall settings to factory default Resetting Device to Factory Default In the Reset to Factory Default State section click Reset for Reset to Factory Default State if you want to reset the firewall settings to factory default Note Resetting device to factory default will erase all saved changes and revert ...

Page 117: ...g VDSL connection not established Verify if VDSL service is activated on the phone cable connected to the gateway To do so contact the ISP Loose Ethernet or DSL cable Check the Ethernet cable connection on the gateway and the phone jack and make sure that it is securely seated in both ports SERVICE LED blinking Internet service is not activated Contact your ISP to activate Internet service BROADBA...

Page 118: ...puter settings Ensure that the correct settings are configured on the LAN computer No HOME PNA light Inadequate connectivity Check the COAX cable connection on the CABLE port of the gateway and the COAX adapter and make sure that it is securely seated in both ports Home PNA networking is disabled Select the HomePNA Networking check box from Settings LAN Wired Interfaces Issue Possible Cause s What...

Page 119: ...oes not detect tailed router Router behind router detection not enabled Navigate to Settings System Info Event Notifications Select the Router Behind Router Detection check box Issue Possible Cause s What to Do Unable to connect to the Internet Incorrect interface type Navigate to Settings Broadband Link Configuration Select the correct interface type from the Choose Interface type drop down list ...

Page 120: ...s Home PNA networking is disabled Select the HomePNA Networking check box from Settings LAN Wired Interfaces Wireless client is not locating the gateway SSID Broadcast is disabled Navigate to Settings LAN Wireless Select the SSID Broadcast check box in the Network section Wireless client is not getting an IP address Wireless networking is disabled Navigate to Settings LAN Wireless Select the Enabl...

Page 121: ...Unable to connect to the VPN tunnel Unsupported port Check if the VPN service supports PPPoE L2TP PPTP and IPSec ports If not then you must open the supported port To open the supported port perform port forwarding that is add a new user defined application Issue Possible Cause s What to Do Ping Traceroute DNS query does not respond Incorrect host address is entered Ensure that you populate the co...

Page 122: ... host is up the local time and the address mask used on your network respectively ICMP messages are also sometimes used as part of DOS attacks such as flood ping or ping of death Invalid TCP flags Combination of TCP flags such as SYN FIN that signal a malicious attempt to get past the firewall IP Internet Protocol The standard signaling method used for all communication over the Internet IP Addres...

Page 123: ...f time in seconds during which a connection in the specified range remains open when there is no data transfer After a connection has been established on a given port the sender and receiver usually determine when the session is finished and the connection is closed However if the connection is left open and data transfer stops the system must eventually close the connection and reclaim the resour...

Page 124: ...mmunicate with each other using radio frequency signals in the band between 2 4GHz and 2 5GHz Neighboring channels are 5 MHz apart however due to the spread spectrum effect of the signals a node sending signals using a particular channel will use frequency spectrum 12 5HHz above and below the center channel frequency As a result two separate wireless networks using neighboring channels for example...

Page 125: ...damaged or exposed to excess moisture Telecommunication Cord m To reduce the risk of fire use only No 26 AWG or larger UL Listed or CSA Certified Telecommunication Line Cord Internal Telephone ports VoIP Telecommunication equipment connected to this port e g via Voice 1 2 port should be UL Listed and the connections shall be made in accordance with Article 800 of the NEC Location Electrical Consid...

Page 126: ...t conforme aux specifications techniques applicables d Industrie Canada Cet appareil numérique de la classe est conforme à la norme NMB 003 du Canada Manufacturer 2Wire Inc Model s RG3801HGV 00 Part 15 of FCC Rules This device complies with Part 15 of the FCC Rules Operation is subject to the following two conditions 1 This device may not cause harmful interference and 2 This device must accept an...

Page 127: ...iffs An FCC compliant telephone cord and modular plug is provided with this equipment This equipment is designed to be connected to the telephone network or premises wiring using a compatible modular jack that is Part 68 compliant If this equipment causes harm to the telephone network the telephone company will notify you in advance that temporary discontinuance of service may be required If advan...

Page 128: ...sure guidelines Making changes to the antenna or the device is not permitted Doing so may result in the installed system exceeding RF exposure requirements This device must not be co located or operated in conjunction with any other antenna or radio transmitter Installers and end users must follow the installation instructions provided in this guide ...

Reviews: