background image

22

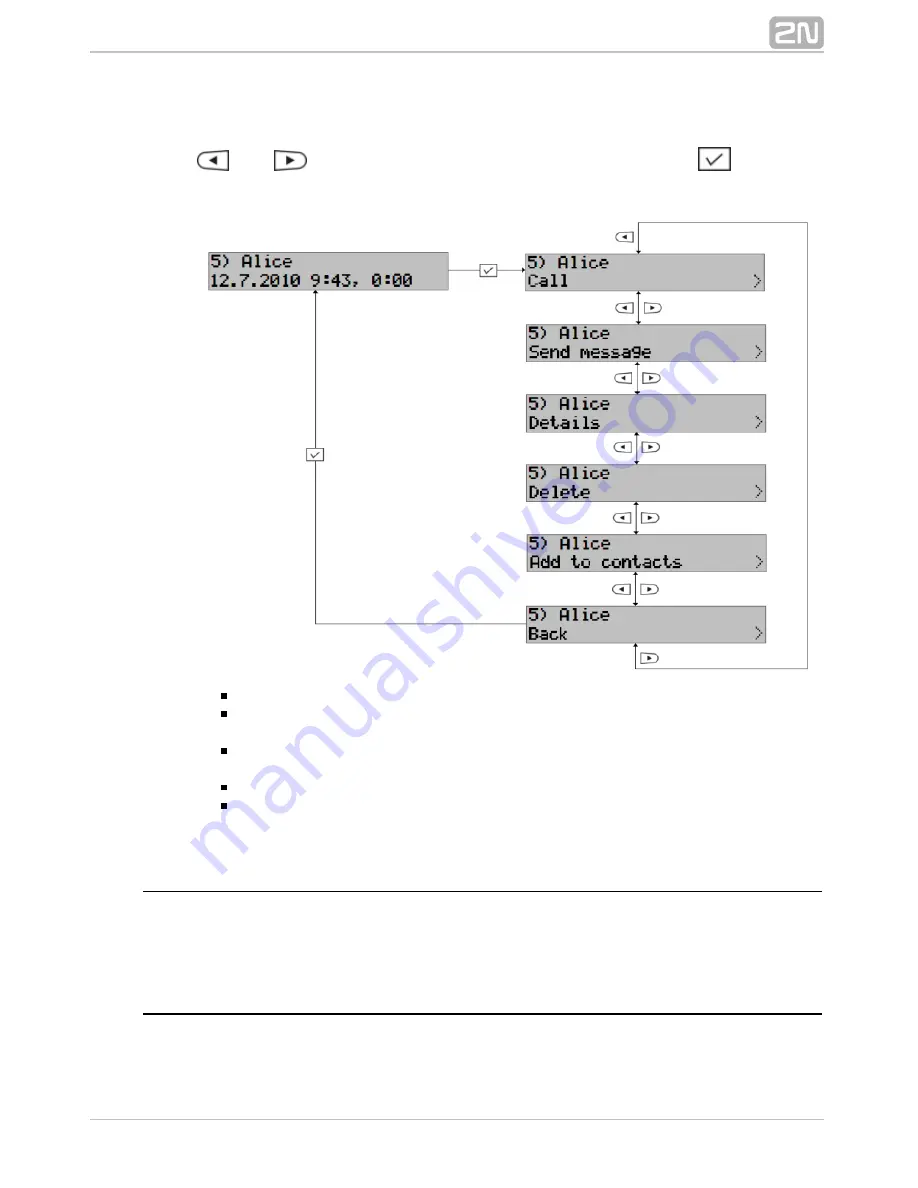
Record Processing Options

All call register items are displayed when you enter the appropriate list of calls. Use the

  and 

  arrows  to  browse  through  the  records.  Push  the 

confirmation

button to display the submenus.

Call

 – press the key to set up a call to the selected record.

Send  message

  –  press  the  key  to  move  to  the  SMS  editing  section  where  the

addressee's number has already been entered.

Details

  –  display  additional  information  on  the  selected  call  (name,  number,

type, date, time, duration).

Delete

 – delete the record. Confirmation is required before deletion.

Save to list

 – save a record number into the user telephone directory under a

selected name.

Received Calls and Dialled Numbers

The way of control of these two menus is completely identical with that of the missed
call  menu.  You  can  make  calls  and/or  send  text  messages  to  the  records  and  view
details on the records.

Delete Recent Call List

Use  this  option  to  easily  delete  a  selected  call  history  list  or  all  lists  at  once.
Confirmation is required before deletion. Once deleted lists cannot be recovered.

Summary of Contents for StarPoint 500 Advance

Page 1: ...www 2n cz Version 2N StarPoint User Manual 3 1 0 ...

Page 2: ...ademarks and or trademarks or brands protected by law 2N TELEKOMUNIKACE administers the FAQ database to help you quickly find information and to answer your questions about 2N products and services On www faq 2n cz you can find information regarding products adjustment and instructions for optimum use and procedures What to do if Declaration of Conformity 2N TELEKOMUNIKACE hereby declares that the...

Page 3: ...uring a Call 17 3 Telephone Menu and Functions 19 3 1 Main Menu 20 3 2 Call Register 21 3 3 Messages 24 3 4 Contacts 28 3 5 Profiles 32 3 6 Settings 36 4 Button Functions 41 4 1 Basic Terminal Buttons 42 4 2 Programmable Buttons Setting 44 4 3 Programmable Buttons Functions 46 5 2N OptiSet Terminals 50 6 2N OpenStage Terminals 52 7 Glossary 57 8 Important Warnings and Certifications 58 ...

Page 4: ...4 1 Basic Information Here is what you can find in this section 1 1 Introduction 1 2 Getting Started 1 3 Accessories 1 4 Telephone Description ...

Page 5: ...office telephone is the 2N StarPoint 500 Economy Standard basic type of a digital key system phone with a two row display and 12 programmable buttons The model offers a one way Speakerphone is not equipped with a Economy HandsFree microphone the model has a two way Speakerphone is Standard equipped with a HandsFree loudspeaker and microphone The model is not Economy equipped with interfaces for op...

Page 6: ...the delivery Be sure to connect the phone to a dedicated 2N StarPoint 500 socket only Button Tagnames Use the to create button tagnames automatically Click 2N NetStar Assistant on on the button displaying screen to create a complete Prepare for printing template in the PDF format automatically You can also use a blank template as included in the delivery to create button tagnames Refer to for deta...

Page 7: ...es to increase the count of available buttons Connect multiple consoles serially to get an extremely high number of buttons Program the console buttons like your telephone buttons 18 button module is only available for the 2N OpenStage and terminals 15T 40T Every 90 button module needs a power supply of its own Every other 16 button module needs a power supply of its own Figure Console 16 buttons ...

Page 8: ...ttons 2N OpenStage Button Console Connection Connect the console mechanically to the phone Interconnect the telephone and the console using a cable Connect the included mains adapter to the dedicated bottom socket for power supply ...

Page 9: ...r HandsFree Any volume change applies to the current call only the next call will have a volume level as set in the phone menu or 2N NetStar Assistant Telephone Display All the telephones except for Entry ones are equipped with a 2N StarPoint 500 two row display The display contrast is adjustable in eight steps time is displayed in 12h or 24h formats Refer to for display parameter details Settings...

Page 10: ...lay tilt 2N StarPoint in six steps Programmable Buttons The telephones are equipped with programmable buttons Use 2N StarPoint 500 the to program the buttons The system administrator defines 2N NetStar Assistant the basic settings the user may adjust the button settings as required Refer to for more details Programmable Buttons Setting Refer to for available Programmable Buttons Functions programm...

Page 11: ...11 2 Basic Operation Here is what you can find in this section 2 1 Outgoing calls 2 2 Incoming calls 2 3 During a Call ...

Page 12: ...s the confirmation button after dialling a number to activate HandsFree Outgoing Call to Call Register Record The telephone stores records on missed incoming and outgoing calls the so called call register Using these records you can call the subscribers whom you called or who called you before The call register can contain up to one thousand records Response to Missed Call Situation The phone is s...

Page 13: ...items according to their names or name parts Pick up the handset press f or confirmation or push the HandsFree button to dial the telephone number for the selected list item Refer to for more details on phone directory search Contacts Speed Dialling You can program the so called speed quick dialling buttons for frequently used numbers Just push the button once to dial the selected telephone number...

Page 14: ...pressed the Intercom pre programmed button Start speaking when you hear a beep The called subscriber answers the call automatically switching into the HandsFree mode The called subscriber is notified of the call with an acoustic signal Keep the button pressed during the whole call Release the button to terminate the call Refer to for Intercom button programming Programmable Buttons Setting ...

Page 15: ...olume Control Suppose you do not want to answer or reject a call yet do not want to be disturbed by your telephone s loud ringing In that case either lower the volume or mute the call as follows Push to adjust the ringing volume a Push the or arrows select and press to mute ringing b Ringer off of an incoming call Rejecting Incoming Call Use the or arrows select and press for confirmation The Reje...

Page 16: ...jection is followed by a missed call record on your display allowing you to call the number later Outgoing calls are set up without limitations Pre program a button for the mode The active state is signalled by a Do Not Disturb shining LED indicator at the button Press the pre programmed button again to cancel the mode Refer to for DND button programming Programmable Buttons Setting ...

Page 17: ... on again Call Transfer Suppose you want to transfer your opponent to another telephone number during a call Call Transfer with Hang Up Procedure Push the or programmable button Flash Call slot You can hear the dialtone in your handset the opponent hears music Dial the telephone number to which you want to transfer the call Hang up after receiving the ringing tone The two subscribers will get conn...

Page 18: ...18 3 Having received the ringing tone hang up Call transfer with hang up or wait for answer and then hang up to complete the transfer Call transfer without hang up ...

Page 19: ...19 3 Telephone Menu and Functions Here is what you can find in this section 3 1 Main Menu 3 2 Call Register 3 3 Messages 3 4 Contacts 3 5 Profiles 3 6 Settings ...

Page 20: ...d arow keys to browse through the menu items Press to enter the submenus You can program an button to accelerate your return ESC to higher menu levels If you press at relax you will get directly to the List of called numbers If you press at relax you will get directly to the menu Contacts Telephone directory ...

Page 21: ...calls You can access the call lists both from the main menu and by pressing a programmable button The lists are also accessible in the user interface 2N NetStar Assistant Missed Calls It is useful to program the call history access button particularly for missed calls After programming the button you will be notified of a missed call by a flashing LED and also on your phone display ...

Page 22: ...ion on the selected call name number type date time duration Delete delete the record Confirmation is required before deletion Save to list save a record number into the user telephone directory under a selected name Received Calls and Dialled Numbers The way of control of these two menus is completely identical with that of the missed call menu You can make calls and or send text messages to the ...

Page 23: ... Assistant Settings The menu offers the following display options for your call history records Name and time the name and call date time and duration are displayed Number and time the number and call date time and duration are displayed Name list names are displayed only Number list numbers are displayed only ...

Page 24: ...ing SMS and to for receiving SMS The figure below Create Message Inbox shows the menu structure Push the following sequence to get into this Messages menu at relax You can also use the web application for 2N NetStar Assistant sending and receiving SMS Refer to the Assistant manual 2N for more details NetStar version 3 1 x ...

Page 25: ...buttons to browse through the contacts to contact Having chosen a number email address or contact press to send the message Inbox To read a received message Push while an incoming message is signalled on the display Use the programmable button with the function Refer to Received messages for button programming 4 2 Programmable Buttons Setting Or access the messages through the telephone main menu ...

Page 26: ...o send the message Resend message here you can alter and forward the message to another user Delete message here you can delete the message Confirmation is required before deletion Bulk Message Delete Enter the following sequence at relax to enable mass deleting of messages 2x The following options are available ...

Page 27: ...mation is required before deletion Being deleted the messages are completely removed from the system and cannot be recovered even using the in 2N NetStar Assistant terface Therefore be careful while using this function Message Settings The menu offers several display options for received messages They are as follows Name and time the name and receiving time are displayed in the list of received me...

Page 28: ...one directory Again use and to browse through the items Telephone Directory Search You are recommended to use the search function for extensive directories Press any key on the numerical keypad while you are in the directory to activate the function Letters are entered using the numerical keypad each numerical key is assigned defined letters see the button tagnames Each letter in the sequence is t...

Page 29: ...ord Remember that phone directory email items cannot be called but can only be sent messages Send message press the key to enter the message editing section with the sender s number pre defined Details display complete information on the contact name number prefix email Edit edit contact details sequentially Push to move to the next contact detail Delete delete the phone directory items in singles...

Page 30: ...an item to the phone directory to be called or sent messages To add an item Enter the name and push for confirmation Enter the contact number or URL and push for confirmation Select a prefix from the menu using the and buttons or confirm None with The record will be stored in your user directory Add email add an item to the phone directory to be sent only text messages which are transformed into e...

Page 31: ...n The record will be stored in your user directory Settings The menu offers two display options for the phone directory records They are as follows Name and number the contact name and number are displayed in the directory Name list contact names are displayed only ...

Page 32: ...ng represents nine unique configuration settings The web application provides the user with 2N NetStar Assistant extended profile editing options including time condition creation and links to selected profiles Refer to the for NetStar Assistant manual more details on web interface configuration Menu Structure To access the profile menu Use the programmable button with the function Refer to Profil...

Page 33: ...ons Having selected a profile in the menu and confirmed it with you get into Profiles a profile processing submenu Use and to browse through the profile options The figure below shows the profile processing structure ...

Page 34: ...ou can also assign user profile activation to a programmable button Delete profile delete the selected user profile Confirmation is required before deletion Rename profile rename the selected profile A profile name may not occur more than once for one user ...

Page 35: ...tomatic switching Profiles confirmation Automatic profile switching according to time conditions will be activated automatically By activating a profile manually in the automatic profile switching mode you disable automatic switching Create New Profile A profile may be created by the system administrator or a user using the 2N terminal or the web application Each user may StarPoint 2N NetStar Assi...

Page 36: ...gure below shows the main items of the menu Use the and arrows to browse through the items Push to confirm selections All the settings included in this section can also be made from the 2N web application which provides a higher user NetStar Assistant comfort Refer to the for more details NetStar Assistant manual ...

Page 37: ...e to be displayed to calling users in case the calling party uses a display equipped terminal Typically each user profile 2N StarPoint has a unique presence message announcing whether or not the user is currently available To set the presence text Find in the menu and press for Presence text Telephone settings confirmation Type the presence text using the numerical keypad buttons Use the button to...

Page 38: ...38 ...

Page 39: ...currently check the effect of the changes thanks to sound examples Confirm the selected tune with Information Type Use the item to change the information displayed in the bottom Information type display row when the terminal is at relax Push and to select the required information type and push for confirmation The following options are available Name the station name is displayed to the left in th...

Page 40: ...ed calling list the calling name or number and called name or number are displayed alternately Key Timeout Use the item to change the interval for entering subsequent characters Editing delay in the system Push and to select one of seven pre defined 2N StarPoint levels Confirm your selection with System Information To display system information on the PBX select the item in the System information ...

Page 41: ...41 4 Button Functions Here is what you can find in this section 4 1 Basic Terminal Buttons 4 2 Programmable Buttons Setting 4 3 Programmable Buttons Functions ...

Page 42: ...ear overview Dialling numbers you cannot switch the terminal into the editing mode while dialling since it is useless If you need special characters press and Editing text messages you need the most comprehensive set of characters to edit text messages The editing mode is enabled by default and you can change it any Abc time by pressing Entering contacts the editing Abc and numerical 123 modes are...

Page 43: ...o the mode that is currently enabled in the terminal Volume adjustment Ringing adjust the ringing volume for incoming calls Handset adjust the handset volume if the handset is picked up i e durign a call or outgoing call setup HandsFree adjust the HandsFree volume in the HandsFree mode i e during a call or outgoing call setup in the HandsFree mode Programmable Buttons All terminals are equipped wi...

Page 44: ...elect the menu in the upper toolbar Telephones Select the type in the menu 2N StarPoint Click on the button to be programmed in the terminal figure to open the window as shown in the figure below Select the required function in the menu Complete the other active Function windows if necessary station name user name number etc and click on for confirmation Change The button is now ready for use Refe...

Page 45: ... Tagnames The system is equipped with the automatic button tagname 2N NetStar Assistant creating function Procedure Click on the item on the main telephone setting screen Prepare for printing This creates and displays a complete template in the PDF format The template consists of tagnames defined and displayed in the 2N NetStar Assistant environment Pozn Make sure that a suitable PDF file browser ...

Page 46: ... the button to cancel the function The resultant effect of CLIR depends on additional settings of your PBX for calls outside the PBX Consult your system administrator in the event of error Default The programmable button with this function helps you use the functions defined by the PBX administrator These functions can be inherited by connected terminals unless the user sets a function of its own ...

Page 47: ...setting up a new call using another call slot By default each terminal has three call slots Use Push the unused switched off call slot button during a call The active call will be put on hold as with the Flash function you will hear the dialtone and the held user will hear pre defined music If there are more calls in your terminal call slots you can switch them using the respective call slot butto...

Page 48: ... Disturb mode In this mode outgoing calls can be set up but incoming calls are rejected Missed calls are shown on the telephone display Use Push the button with the DND function The active state is indicated by the button LED Re push the button to deactivate the function Profiles Use the function to set a quick access to the menu Profiles Answered Calls Use the function to set a quick access to th...

Page 49: ...umber by pressing a single button You can assign both user numbers and service access codes to the button Use Push the pre defined button to dial the number If the handset is hung up at the moment the call is set up in the HandsFree mode The state and speed dialling functions can be combined as necessary For example you can monitor a station other than the speed dialled one Phone Directory Use the...

Page 50: ...em They represent an earlier type of telephones intended for common NetStar office operations The phones are equipped with programmable buttons and with the exception of a two row display 2N OptiSet Entry 2N OptiSet Types Figure 2N OptiSet Entry 2N OptiSet Standard 2N OptiSet Advance Description of Types 2N OptiSet Entry The telephone ...

Page 51: ...elve programmable buttons cannot be extended with an additional button module supports HandsFree The and buttons are used for menu browsing and configuration The terminal is controlled identically as the 2N terminals StarPoint 2N OptiSet Advance The telephone is intended for demanding users assistants and operators is equipped with a two row display is equipped with twelve programmable buttons can...

Page 52: ... The telephone sets are digital key system phones designed for the 2N OpenStage system They represent an innovative type of terminals which can be 2N NetStar widely used thanks to a variety of types 2N OpenStage Types Figure 2N OpenStage 10T 2N OpenStage 15T ...

Page 53: ...53 Figure 2N OpenStage 20T 2N OpenStage 40T ...

Page 54: ...additional button module has dedicated buttons for HandsFree activation and volume control 2N OpenStage 15T The telephone is equipped with a display is equipped with eight programmable buttons can be extended with an additional button module has dedicated buttons for access to call history access to SMS messages reading viewing HandsFree activation and volume control Control The buttons are used f...

Page 55: ... Disturb DND Mute function Control The cross buttons are used for menu browsing and configuration corresponds to corresponds to corresponds to 2N OpenStage 40T The telephone is equipped with an adjustable six row display has six programmable buttons can be extended with an additional button module has dedicated buttons for access to call history access to SMS messages reading viewing HandsFree act...

Page 56: ...ion head set activation Control The cross buttons are used for menu browsing and configuration corresponds to the Back Esc button It is used for rejecting calls deleting texts or quitting menus corresponds to and correspond to corresponds to ...

Page 57: ...g calls where an external microphone and a loudspeaker are used for speaking The Speakerphone mode uses an external loudspeaker and the handset microphone Intercom a function for flexible communication calls are answered automatically by the called station KEY module a small button module operator s console with 16 programmable buttons Mute temporary microphone muting during a call Redial redialli...

Page 58: ...the telephone Microfibre cloth is recommended for display cleaning Certificate of Compliance These devices meet all technical requirements concerning radio and telecommunications equipment pursuant to Act No 22 1997 Coll in the latest wording and Governmental Decree No 426 2000 Coll and have been awarded a Certificate of Compliance CE Marking The CE marking certifies compliance with EU Directive 1...

Page 59: ...roduct in order to improve its qualities Use the product for no purposes other than those specified in the User Manual When the service life of the product or a part thereof is exhausted dispose of it in accordance with applicable environmental regulations ...

Page 60: ...60 2N TELEKOMUNIKACE a s Modřanská 621 143 01 Prague 4 Czech Republic Tel 420 261 301 500 Fax 420 261 301 599 E mail sales 2n cz Web www 2n cz 1963v3 1 0 ...

Reviews: