background image

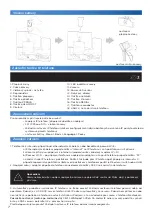
IP Phone Basic Functions

3

3.

4.

5.

6.

7.

8.

9.

15.

                16. 

17.

14.

13.

12.

2.

1.

10.

11.

Putting in Operation

18.

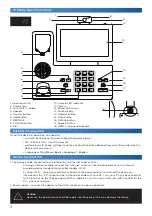
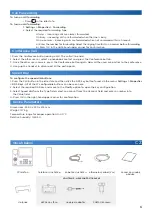
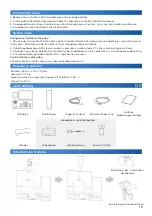
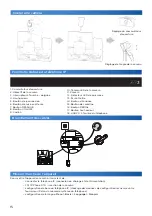
To put the device in operation, you need to:
 

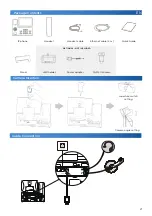
• connect the IP phone (connect cabling and power supply)


• 2N® IP Phone D7A – insert the camera


• perform basic IP phone settings (save the configuration data obtained from your IP provider into the 

                     phone system memory)
 

• Language setting: 

Menu >Basic > Language >  English

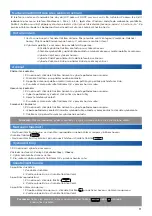
Device Connection

1. The phone can be connected to the Internet by an Ethernet cable or Wi-Fi.
 

a) Using an Ethernet cable, connect the “Internet” socket on the IP phone directly to the Internet 

                   providing device (modem/router, cable modem, Wi-Fi).
 

b) Using Wi-Fi – having connected your phone to the power adapter and turned the phone on,  


interconnect the “PC” socket on the IP phone backside with your PC. Thus, your PC will be connected  


to the Internet via the IP phone again. With multiple PCs, you can use an external switch or HUB for the 


PC – phone connection.

2. Power supply – connect the adapter to the DC5V socket on the phone backside. 

Caution

Never use the power source and PoE supply simultaneously! This may damage the device.

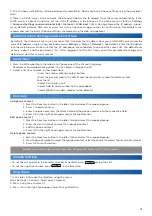
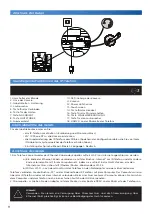
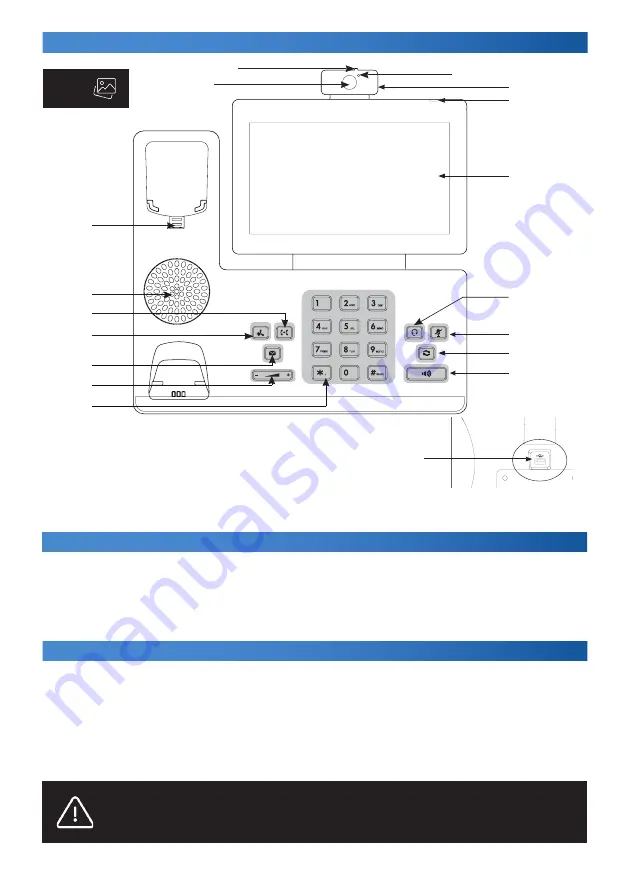
10. Camera LED indicator
11. Camera
12. Power LED sensor
13. Touch display
14. Headset button
15. Mute button
16. REDIAL button
17. Speaker button
18. USB 2.0 on phone backside

1. Aperture switch
2. Camera lens
3. Fork switch – holder
4. Speaker
5. Transfer button
6. Hold button
7. MESSAGE
8. VOLUME button
9. Dial 

Summary of Contents for D7A

Page 1: ...2N IP Phone D7A Quick Guide ord 1120102 2N Telekomunikace a s www 2n com Mod ansk 621 Prague 4 143 01 EN CZ DE EN FR ES RU IT 2 6 10 14 19 23 27...

Page 2: ...ertion Cable Connection IP phone Handset Handset cable Ethernet cable 2 m Quick Guide Stand Wall holder Power adapter CAM50 camera PC Internet DC5V PC Internet DC5V OPTIONAL NOT INCLUDED Aperture swit...

Page 3: ...em router cable modem Wi Fi b Using Wi Fi having connected your phone to the power adapter and turned the phone on interconnect the PC socket on the IP phone backside with your PC Thus your PC will be...

Page 4: ...e into the Name field and the phone number into the respective field 4 Press OK in the right hand upper corner for confirmation Edit phone contact 1 Press the Directory button in the idle state and se...

Page 5: ...ring a call To continue a call perform the following If just one call is being held press or the Continue button Call Transfer Transfer without consult blind 1 Press or the Transfer button during a ca...

Page 6: ...n obsluze stoj nek dr k na st nu nap jec adapt r CAM50 kamera VOLITELN NEN SOU ST BALEN CZ Call Forwarding To turn on call forwarding Press in the idle state To turn on call forwarding 1 Settings Prop...

Page 7: ...s va po ta ovou s t p mo k za zen zaji uj c mu p ipojen k internetu modem router kabelov modem Wi Fi b Pomoc Wi Fi po p ipojen telefonu k nap jec mu adapt ru a zapnut telefonu propojte zd ku PC na za...

Page 8: ...at kontakty i z v pisu historie vol n Viz v e Historie vol n Historie vol n 1 Ve stavu ne innosti stiskn te tla tko Historie Pak je mo n volit z kategori Zme kan Odchoz hovory P ijat nebo P esm rovan...

Page 9: ...t Pro pokra ov n hovoru je t eba prov st n sleduj c Pokud je p idr en pouze jeden hovor stiskn te tla tko nebo tla tko Pokra ovat P epojen hovoru P epojen bez konzultace naslepo 1 B hem hovoru stiskn...

Page 10: ...po adovan ho sla Parametry za zen Rozm ry 259 4 x 220 x 215 mm Hmotnost 1275 g Teplotn rozmez pro spr vn fungov n IP telefonu 0 40 C Vlhkost 10 95 Konferen n hovor 1 B hem hovoru stiskn te tla tko Kon...

Page 11: ...utsch Anschluss des Ger ts 1 Das Telefon kann entweder per Ethernet Kabel oder kabellos mittels Wi Fi ans Internet angeschlossen werden a Ein Ende des Ethernet Kabels verbinden sie mit der Buchse Inte...

Page 12: ...1 Dr cken Sie im Ruhezustand die Taste Telefonbuch und w hlen Sie die gew nschte Gruppe aus 2 W hlen Sie den betreffenden Kontakt aus indem Sie auf das Symbol des Stiftes dr cken 3 ndern Sie den Kont...

Page 13: ...pr chs die Taste oder die Taste Halten Um das Gespr ch fortzusetzen m ssen Sie Folgendes tun Wenn nur ein Gespr ch gehalten wird dr cken Sie die Taste oder die Taste Fortsetzen Weiterleiten eines Gesp...

Page 14: ...aften Weiterleiten 2 W hlen Sie die gew nschte Art der Weiterleitung aus Immer Eingehende Gespr che werden immer weitergeleitet Besetztzeichen Eingehende Gespr che werden weitergeleitet wenn besetzt i...

Page 15: ...ME 9 Cadran 3 Ins rer une cam ra PC Internet DC5V PC Internet DC5V R glage du commutateur d ouverture R glage de l angle de la cam ra Fonctions de base du t l phone IP Branchement des c bles Mise en m...

Page 16: ...dresse IP le masque de sous r seau la passerelle par d faut et le serveur DNS confirmez OK dans le coin en haut droite Cependant nous recommandons d effectuer la configuration de base du t l phone IP...

Page 17: ...ur pour activer l appel avec le micro casque 2 S lectionnez le num ro que vous souhaitez appeler et appuyez sur le bouton Appel Note Les modes peuvent galement tre chang s pendant un appel l aide des...

Page 18: ...le num ro pour le transfert Pour le poste Indisponible s lectionnez encore la dur e de la sonnerie avant le transfert b Pour enregistrer les modifications confirmez avec le bouton OK dans le coin en...

Page 19: ...el conmutador del diafragma Ajuste del ngulo de la c mara Funciones b sicas del tel fono IP 11 C mara 12 Sensor Power LED 13 Pantalla t ctil 14 Bot n de auriculares 15 Bot n de bajadade volumen 16 Bot...

Page 20: ...terior del tel fono Aviso Jam s combine a la vez la alimentaci n de la fuente de alimentaci n y la alimentaci n PoE El aparato puede resultar da ado 3 Se realizar la iniciaci n autom tica del tel fono...

Page 21: ...ico 1 Durante la inactividad pulse el bot n Directorio y seleccione el grupo requerido 2 Seleccione el contacto requerido pulsando el s mbolo del l piz marque el contacto seleccionado y pulse el s mbo...

Page 22: ...ealizar lo siguiente En el caso de que solo una llamada est en espera pulse el bot n o el bot n Continuar Desv o de llamada Desv o sin consulta a ciegas 1 Durante la llamada pulse el bot n o el bot n...

Page 23: ...ido Par metros del dispositivo Dimensiones 259 4 x 220 x 215 mm Peso 1275 g Rango de temperatura para la funci n correcta del tel fono IP 0 40 C Humedad 10 95 Llamada de conferencia 1 Durante la llama...

Page 24: ...lingua italiana Menu Basic Language Italian Connessione del dispositivo 1 Il telefono pu essere collegato a Internet tramite un cavo ethernet o in modalit wireless tramite Wi Fi a Tramite il cavo eth...

Page 25: ...il contatto corrispondente e sul simbolo del cestino per cancellare una voce dall elenco Selezionare Chiama per comporre un numero Selezionare Aggiungi per aggiungere un numero alla rubrica telefonica...

Page 26: ...l tasto per entrare nell elenco delle Chiamate in uscita poi premere sul contatto per selezionare il numero desiderato o premere il tasto Mentre il telefono inattivo premere due volte il tasto dopo av...

Page 27: ...lla rubrica e premere il tasto Conferenza 3 Quando l altra parte risponde premere nuovamente il tasto Conferenza Tutte le parti fanno ora parte della conferenza 4 Per disconnettere tutte le parti riag...

Page 28: ...PC Internet DC5V PC Internet DC5V IP IP 2N IP Phone D7A IP IP Menu Basic Language 1 Ethernet Wi Fi a Ethernet IP Wi Fi b Wi Fi PC IP IP HUB 2 DC5V 10 11 12 13 14 15 16 17 18 USB 2 0 1 2 3 4 5 6 7 8 9...

Page 29: ...29 PoE IP IP DHCP IP Ipv4 IP admin 2n 3 IP DHCP IP IP WAN IPv4 IP DNS OK IP 1 2 1 2 3 4 1 2 3 4 1 2 3...

Page 30: ...30 1 2 3 1 2 1 2 1 2 Redial...

Page 31: ...0 x 215 1275 IP 0 40 C 10 95 Hereby 2N TELEKOMUNIKACE a s declares that the radio equipment type 2N IP Phone D7A is in compliance with directives 2014 53 EU and 2011 65 EU The full text of the EU decl...

Page 32: ...wiki 2n com 2585v1 1...

Reviews: