background image

Copyright © 2021 Nortek Security & Control LLC

17

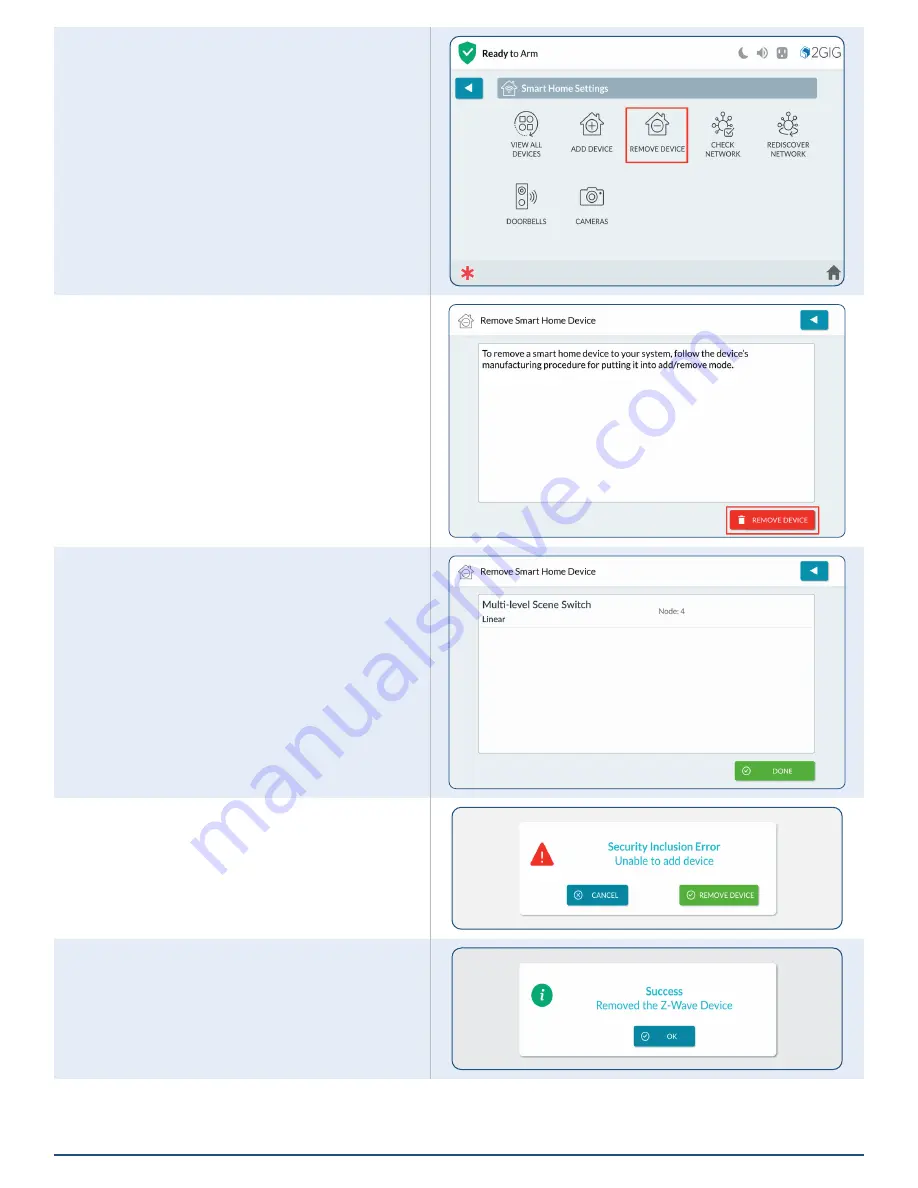
Remove Device

To remove a device from the system:

1. 

At the Smart Home Settings menu, tap 

Remove Device

2. 

Follow on-screen instructions prepare the 

device for removal.

3. 

Tap 

REMOVE DEVICE

. The panel will listen 

for a device to remove.

4. 

Follow the instructions included with the 

Z-Wave device to start the Remove process.

The removed device will no longer be displayed.

5. 

Tap 

DONE

.

Security Inclusion Failure

If a Z-Wave device fails due to a security inclusion 

failure, the following screen will be displayed:

1. 

Tap 

Remove Device

.

2. 

The panel will display confirmation that the 

device has been removed. Tap 

OK

Summary of Contents for EDGE

Page 1: ...TM 2GIG EDGE TM Security Smart Home System SMART HOME MANUAL...

Page 2: ...t 12 Devices 12 Geo Services 12 Notifications 12 Activity 12 The Alarm com Mobile APP 13 Smart Home Setup 14 View All Devices 14 Rename a Smart Home Device 14 Identify a Smart Home Device 15 Add Devic...

Page 3: ...to communicate with the 2GIG EDGE Panel using the Z Wave and Z Wave Plus wireless communication protocol The 2GIG EDGE Panel can be included and operated in any Z Wave network with other Z Wave certif...

Page 4: ...ly from the 2GIG EDGE Panel To learn about options in this menu see Smart Home Controls next page If the Smart Home Controls menu is not configured on your system the following notification message ap...

Page 5: ...tch to turn an assigned light Off or On Locks Use the controls in the Locks screen to lock and unlock your smart devices To lock and unlock devices 1 At the Smart Home menu tap Locks 2 At the Locks sc...

Page 6: ...t the Smart Home menu tap Cameras 2 At the Cameras screen tap the video thumbnail to view its live feed 3 Tap when finished to return to previous menus Live View View the feed of a specific camera ful...

Page 7: ...ing 3 During the call tap the volume icons to increase or decrease volume or tap to mute sound 4 Tap the button to lock or unlock a Z wave door lock if installed 5 Tap to access the Panic Fire and Eme...

Page 8: ...eas After authentication the Smart Areas screen will only show the Smart Areas the user is assigned 3 The Smart Areas screen will display status for each Smart Area similar to the panel s home screen...

Page 9: ...he alert issue must still be resolved Smart Areas Arming To Arm a Smart Area tap the Arms Stay or Arm Away button s Smart Areas Alarms Acknowledge or clear an alarm 1 Press the Disarm button on the Sm...

Page 10: ...the Username and Password provided by your dealer 3 When prompted to agree to Alarm com s terms and conditions select I Agree 4 Create your new password following the Minimum Requirements 5 Choose the...

Page 11: ...cess Screen 1 Enter four numbers to generate the user s access code 2 Click on a switch to enable or disable selected devices for the new user 3 When you re finished select Save User Profile 1 Click t...

Page 12: ...s and doorbells Settings Login Settings Make changes to the login password email address and other settings related to Login Account Management Edit Account Information System Information and Property...

Page 13: ...ity will differ for each device Example Z Wave Thermostat Example Z Wave Garage Door 1 To make adjustments tap on the Thermostats Controls for the device are displayed 2 Tap on a control to access the...

Page 14: ...ome Settings NOTE This option is only available if enabled by your installer Smart Home Settings available View All Devices Add Device Remove Device Check Network Rediscover Network Doorbells Cameras...

Page 15: ...fy the node 3 Use the keyboard to enter the new name then tap UPDATE Add Device Pair a Z Wave compatible device with the panel 1 Tap Add Device The Add Smart Home Device appears NOTE It s recommend th...

Page 16: ...process 5 When the system discovers a device the system automatically adds it and the Adding Device message appears 6 Enter the device s DSK code then tap ENTER NOTE This enter code screen only applie...

Page 17: ...DEVICE The panel will listen for a device to remove 4 Follow the instructions included with the Z Wave device to start the Remove process The removed device will no longer be displayed 5 Tap DONE Sec...

Page 18: ...ay in yellow 1 Tap the Notification Tapping the Notification will display this message 2 Tap OK then tap DONE to return to the Z Wave Settings screen 3 Tap Check Network see next page Remove a Failed...

Page 19: ...e device from the View Smart Home Devices screen Check Network Check the network for failed nodes 1 Tap Check Network 2 Tap TEST 3 The system scans the network for failed nodes This can take several m...

Page 20: ...panel will discover available nodes then complete 4 Tap when finished to return to previous menus Remote Keypad Options Sound The sound setting for the 2GIG EDGE Remote Keypad can be found in the Set...

Page 21: ...ightness Screen Timeout Tap the current setting then select a new time for the screen to timeout 30 seconds to 10 mins Default is 2 min Screen Saver The Screen Saver setting allows for photos to be di...

Page 22: ...Duration Number of seconds to transition between photos Options 2 3 or 5 seconds 4 Display Sequence Order in which the photos are displayed Options By Photo Name Shuffle Random 5 Full Landscape Mode...

Page 23: ...Z Wave settings menu Reset the panel s Z Wave Controller back to default settings 1 Tap Reset Controller 2 Tap Yes to start the process NOTE Once Yes is selected the reset cannot be reversed NOTE If...

Page 24: ...tart Z Wave Add Mode 4 The panel will enter Learn Mode Follow on screen instructions to activate Learn mode on the device 5 If an S2 device is found the app will prompt for the first 5 digits of the k...

Page 25: ...ameras Cameras must first be added to same WiFi network as the 2GIG EDGE panel or to the panels access point Cameras on the local network are auto discovered by the panel during the add camera process...

Page 26: ...rches for available cameras 8 Once the camera s are added tap the camera displayed to access camera settings NOTE The panel will add all network cameras with the same login name and password If the ca...

Page 27: ...Password Login and Password options are available for creating a Login name and assigning the Password 1 Tap Login or Password to access a keypad to create a Login or name or Password 2 On the Login...

Page 28: ...RD CAMERA 21 At the On Board Camera Settings screen tap the switch adjacent to the Event setting to enable or disable The On Board Camera will now capture photos associated with enabled events 22 Tap...

Page 29: ...pported Command Classes and Security Levels NOTE EDGE minimum required security level is none Command Class Version Number COMMAND_CLASS_ZWAVEPLUS_INFO 2 COMMAND_CLASS_MANUFACTURER_SPECIFIC 1 COMMAND_...

Page 30: ...2GIG EDGE Smart Home Manual 30 A L A R M D E A L E R I N F O R M A T I O N Company Name Your Account Number Installation Date...

Page 31: ...system contact 2GIG Technical Support at Nortek Security Control For support in the USA and Canada contact 2GIG Technical Support at Nortek Security Control Phone 800 421 1587 Online www nortekcontro...

Page 32: ...2GIG EDGE Smart Home Manual 32...

Reviews: