21
EN
SYSTEM COMPONENTS INSTALLATION
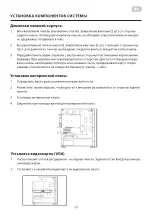
Remove case panels.
1.
Side (left) panel (tempered glass). Fastened with screws (2 pcs) from the side of the back
panel. To dismantle the panel, it is necessary to unscrew the screws and gently hold and
move the left side.
2.
Side (right) panel (metal). It is fixed with screws (2 pcs.) from the back of the case. To
dismantle the panel, it is necessary to unscrew the screws and carefully remove the panel.
3.
The front panel is fixed from the inside with plastic fasteners (clips). When pressed, they are
released from the holes. In order to dismantle the panel, it is necessary to pull its lower part,
holding the case. When the clips detach from the hole (click), the panel is removed.
Motherboard installation.
1.
Determine the location of the motherboard.
2.
Position so that the external connectors are accessible from the rear panel.
3.
Motherboard installation.
4.
Fix with MB screws.
普通书纸,
大 小 ,双面印刷, 对 折
VGA installation.
1.
Expension slots on rear plate of chassis. Remove related PCI bay.
2.
Insert & fix VGA to proper position.
普通书纸,
大 小 ,双面印刷, 对 折
Summary of Contents for GAMING VERTEX BLACK
Page 1: ...RU UA EN COMPUTER CASE OPERATION GUIDE 2E GAMING VERTEX BLACK 2E GI01B...
Page 3: ...3 UA 1 2 3 4 5 140 ARGB 6 120 ARGB SSD 2 5 24 4 3 8 1 MOLEX 1 4 5 1 6 2 3...
Page 4: ...4 UA 1 2 2 2 3 1 2 3 4...
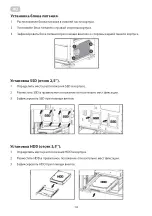
Page 5: ...5 UA VGA 1 2 1 2 3 SSD 2 5 1 SSD 2 SSD 3 SSD...
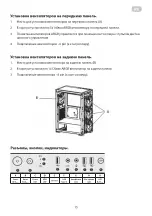
Page 6: ...6 UA HDD 3 5 1 HDD 2 HDD 3 HDD 1 2 3 140 ARGB 3 ARGB 4 6 pin 1 2 1 120 ARGB 3 6 pin A B...
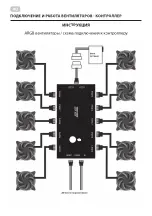
Page 8: ...8 RU ARGB LED...
Page 10: ...10 UA 1 2 3 4 5 6 1 2 3 4 3 CR2025...
Page 12: ...12 RU 1 2 3 4 5 140 ARGB 6 120 ARGB SSD 2 5 24 4 3 8 1 MOLEX 1 4 5 6 3 1 2...
Page 13: ...13 RU 1 2 2 2 3 1 2 3 4 VGA 1 2...
Page 14: ...14 RU 1 2 3 SSD 2 5 1 SSD 2 SSD 3 SSD HDD 3 5 1 HDD 2 HDD 3 HDD...
Page 16: ...16 RU ARGB LED...
Page 18: ...18 RU 1 2 3 4 5 6 1 2 3 4 3 2025...
Page 28: ...2 1 2 3 4 5 6 12 _____________________________________________________________...


