


4
6. Connect your network devices
We recommend you to first connect one computer/tablet (if possible via a wired
connection), then complete the rest of the procedure and as a final step connect the
other devices.
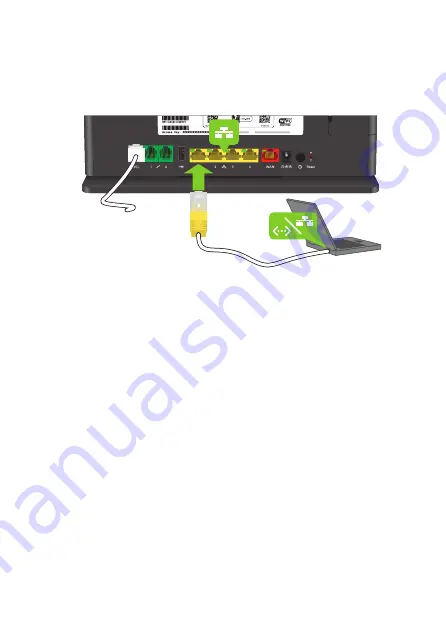
6.1. Connect your wired (Ethernet) devices
If you want to connect a device using a wired (Ethernet) connection:
1
Take the Ethernet cable with the yellow connectors.
2
Connect one end of the Ethernet cable to one of the yellow Ethernet ports on
your
DGA4231
.
3
Connect the other end of the Ethernet cable to your device.
4
Connect your other Ethernet devices.
5
We recommend you to first configure your
DGA4231
to your needs (optional)” on page 6
) before connecting your
Wi‑Fi devices (see
“6.2. Connect your Wi‑Fi devices” on page 4
).
6.2. Connect your Wi‑Fi devices
Your
DGA4231
has two Wi‑Fi access points:
• The
5 GHz access point
offers superior transfer rates, is less sensitive to
interference and allows you to connect IEEE802.11a/n/ac Wi‑Fi devices.
• The
2.4 GHz access point
allows you to connect IEEE802.11b/g/n Wi‑Fi devices.
Use this access point for Wi‑Fi devices that don’t support 5 GHz.
4. Connect your telephones to your DGA2231
Connect your corded phone or DECT base station to one of the green ports.
.
5. Power on your DGA2231
1
Plug the connector of the electric power supply adapter into the power inlet port
(
) of your DGA2231. Plug the adapter into a nearby power outlet.
2
Press the power button ( ) on the back panel.
If the LED is blinking green or orange, your DGA2231 is updating its
software. If this is the case, wait until the LED becomes solid green.
This can take several minutes! Do not power off your device or unplug any
cables!
Summary of Contents for technicolor DGA4231
Page 1: ...DGA4231 Quick Setup Guide ...


