1010music Toolbox User Manual Download Page 13


Toolbox User Manual 

11/23/17 10:32 AM 


Copyright 1010music LLC 2017 


Digital Heart – Analog Soul


P. 13 

knobs to move the cursor through the bars.  Turn the right control knobs to adjust the height of the bar at 
the currently selected step.  

9.


Touch the grid icon in the top left corner, or press 

HOME

 to return to the Main screen. 

Note: 


The CV Sequencer Screen always shows the same number of steps and allows the cursor to move to 
all of the steps. However, only the number of steps selected in the Step Count parameter will be 
used during playback. 


To set the value of a step to 0, use the control knobs to adjust the value.  


If a value of a CV Sequencer parameter is changed during playback of the sequence, the change will 
take effect at the start of the next loop through the sequence. 

Apply Modulation 

Toolbox provides the ability to modulate parameters using internal signals and external CV inputs. The following 
parameters are 

Modulation Targets

 because modulation can be applied to them: 


Sound Element 

Parameter 

Example usage 

Note Sequencer  Step 

Length 

Use an LFO square wave to change the rhythm of a sequencer between 
two different durations. 

Note Sequencer  Step Count 

Use an LFO to adjust the number of steps to add variation. 

Note Sequencer  Transpose 

Use an LFO to add movement to the pitch and variety to the sequence. 

 
To apply a modulator to a specific modulation target: 

1.


From the Main screen, touch one of the Note Sequencers to display the Note Sequencer screen.   

2.


Press the INFO button to display the Note Sequencer Parameters screen. 

3.


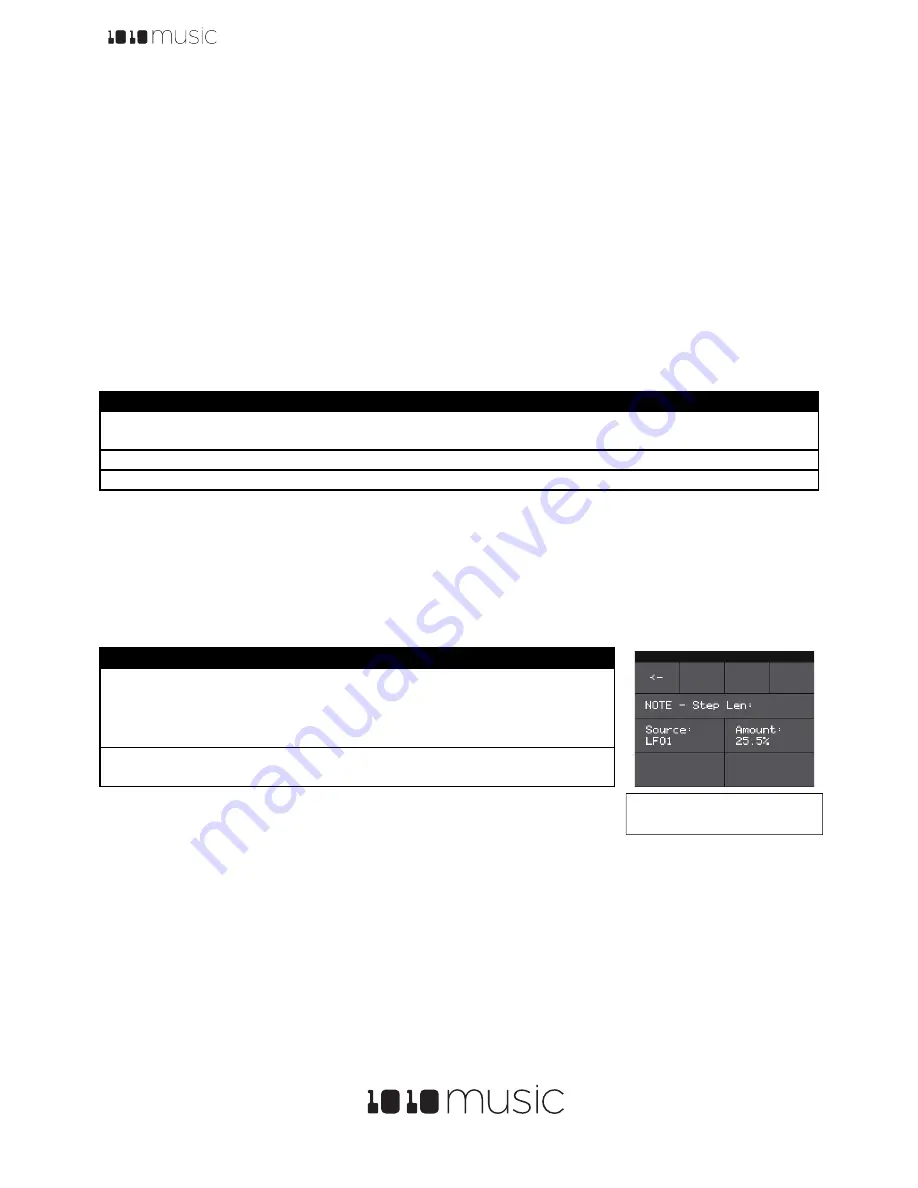
The parameters that can be modulated will have three black boxes below them. This allows you to apply up 
to three modulators to each of these parameters. Touch one of the boxes below a parameter to open the 

Modulation Selection Screen

.  

4.


Adjust the modulation parameters by turning the Control Knob closest to the parameter. 

5.


Once you have selected all the settings, touch the arrow (

<-

) in the top left 

or press 

HOME

 to go back to the parameters screen. 

6.


Touch another black box below a parameter to add more modulation. 

7.


Press 

HOME

 to return to the Main screen. 

Synchronizing with Other Modules 

Toolbox is designed to work together with other modules.  It can follow an external clock input and then use that to 
control the CV and MIDI outputs to other modules. The toolbox clock can be driven by three sources, and will use the 
highest priority clock signal available.  The sources, in decreasing order of priority are: 

1.


CV clock input in the Clock Input jack 

2.


MIDI Clock from the MIDI Input jack 

3.


Internal free running clock 

 
 When a MIDI Clock is used, toolbox responds to MIDI clock pulse, play and stop signals.   When a MIDI play signal is 
received, the playback of the module resumes from the beginning, and the play signal is passed along to the MIDI 

Parameter  Description 

Range of Values 

Source 

The source of modulation to be 
applied. 


None 


LFO1 


LFO2 


LFO3 


SEQ  


EXT1 


EXT2 


EXT3 

Amount 

Choose the amount of 
modulation that will be applied.   

-100% to +100% 

Figure 16: Modulation 

Selection Screen


Summary of Contents for Toolbox

Page 1: ...Toolbox User Manual 11 23 17 10 32 AM Copyright 1010music LLC 2017 P 1 Toolbox User Manual ...

Page 2: ...8 Mute Mode 8 Use the Sequencers and Function Generators 8 Use the Gate Sequencer 8 Use the Note Sequencer 9 Use the LFO Function Generators 11 Use the Control Voltage Sequencer 12 Apply Modulation 13 Synchronizing with Other Modules 13 Preset Management 14 Select a Preset 14 Save a Preset 14 Copy a Preset 14 Rename a Preset 14 Delete a Preset 15 Use Save As to Save Current Changes to a Preset as ...

Page 3: ... Next we will quickly discuss basic preset usage and muting capabilities Then we will walk you through how to use each of the sequencers and function generators followed by a discussion of using modulators with the sequencers Then we will cover how to synchronize toolbox with other modules Finally we will go into more depth about preset management tasks and discuss how to upgrade your firmware If ...

Page 4: ...Overview The front panel of toolbox contains a touch screen control knobs HOME and INFO buttons MIDI input and output jacks and CV input and output jacks as shown in Figure 1 The INFO and HOME buttons at the top of the front panel of toolbox are used to navigate the screens Press INFO to view the information screen for the current selection In some cases you can press INFO more than once to get to...

Page 5: ...d In Displays the state of the external control voltage modulation inputs in rows 1 through 3 Row 4 displays the state of CV Mod In 4 that controls playback 2 Gate Sequencers Displays a small representation of the four gate sequences Touch each row to configure the corresponding sequencer 3 Note Sequencers Displays a small representation of the note sequences Touch each row to configure the corres...

Page 6: ...ted into the Memory Card Slot Most modules come with the microSD card already inserted The card should be inserted with the notched edge down Now you can power up the rack The module should start up in less than 10 seconds and you will see the Main screen as shown in Figure 2 Main Screen Overview above Note A microSD card must be inserted into toolbox before you can get started All presets are sto...

Page 7: ...start creating our own sequences lets make sure the module is setup properly by playing back some content from a preset that comes with the module Select a Preset A preset is a set of pre configured sequences function generators and modulators You can use the 1010music presets or create your own To select a preset 1 Press the HOME button to display the Main screen if needed 2 Cycle through the pre...

Page 8: ...s allows you to turn different components on and off during the course of playback or to isolate a single component while creating the sequence To use Mute Mode to temporarily disable playback of toolbox components 1 Press HOME to return to the Main screen if needed 2 Press HOME to toggle Mute Mode on and off In Mute Mode the colors of the screen components change to green and red 3 Touch boxes on...

Page 9: ...tputs The CV output is in the form of a pair of gate and pitch signals for each Note Sequencer The CV Output is monophonic and will play back the most recently entered note for each step in the sequence The CV gate signals for each Note Sequencer are output through Gate Outputs 5 8 labeled Note Sequencer Gate Outputs in Figure 1 Front Panel Overview The CV Pitch signals are output through CV Outpu...

Page 10: ... the MIDI Input Jack with each successive MIDI input note adding a note to the next step in the sequence Touch Step again to stop recording 3 You can use the Control Knobs and touch gestures to zoom and scroll through the sequencer Action Result Turn the top left control knob Moves the current note position cursor Turn the top right control knob Scrolls the piano roll up and down Turn the bottom l...

Page 11: ...ternative input as the clock signal By default the toolbox internal clock INT will be used INT EXT1 EXT2 EXT3 GATE1 GATE2 GATE3 GATE4 MIDI Ch The MIDI channel that this sequencer will use for output 1 through 16 Quant Size Defines precisely when to restart the sequence when using the internal clock When the sequence ends toolbox will wait until the start of the next Quant Size interval to restart ...

Page 12: ...ence is playing the cursor will move across the step bars to show the current playback position Touch a step bar to set the value at the height selected Turn the left control Beat Sync Controls the operation of the rate parameter On Off Parameter Description Range of Values Step Len The length of each step in the sequence 1 64 1 32T 1 32 1 16T 1 16 1 8T 1 8 1 4T 1 2T 1 bar 2 bars 4 bars 8 bars T T...

Page 13: ...the Note Sequencers to display the Note Sequencer screen 2 Press the INFO button to display the Note Sequencer Parameters screen 3 The parameters that can be modulated will have three black boxes below them This allows you to apply up to three modulators to each of these parameters Touch one of the boxes below a parameter to open the Modulation Selection Screen 4 Adjust the modulation parameters b...

Page 14: ...ed preset and go back to the Main screen Save a Preset Toolbox does not automatically save your changes to presets You have to manually save by following these steps 4 From the Main screen touch the preset name to display the Preset Selection screen 5 Touch Edit to display the Preset Edit Submenu 6 Touch Save to save the changes to the preset and return to the Main screen Copy a Preset If you pref...

Page 15: ...copy over to your microSD Card Install New Firmware Here are the steps required 1 Download the toolbox firmware onto your computer You can find the latest firmware image in the Firmware Downloads sub forums at https forum 1010music com NOTE You must be a registered member of the forum in order to access the firmware download sub forums 2 Unpack the zip file Some browsers do this automatically for ...

Page 16: ...ck 1010music products are compatible with cables that use the following mapping of MIDI signals between female MIDI connectors and mini TRS audio jacks MIDI Signal MIDI Connector Mini TRS Audio Current Source Pin 4 Tip Current Sink Pin 5 Ring Shield Pin 2 Sleeve Table 1 MIDI Connector to Mini TRS Audio Jack Mapping For more information on the use of adapters read the blog post on our website Mini ...

Reviews: