


Toolbox User Manual
11/23/17 10:32 AM
Copyright 1010music LLC 2017
Digital Heart – Analog Soul
P. 11
Note:
•
If a value of a Note Sequencer parameter is changed during playback of the sequence, the change
will take effect at the start of the next loop through the sequence.
Use the LFO Function Generators
Toolbox can generate three low frequency oscillation (LFO) signals. These outputs play out the
Function
Generator Output Jacks 5
through
7
. The output range for these signals is -5V to +5V. To configure an LFO:
1.
From the Main screen, touch one of the
LFO
buttons in the right column to display the LFO Parameters
screen.
2.
Use the control knobs to adjust the values of the following parameters:
Step Count
The number of steps in the sequence. The
number of boxes on the screen will
remain the same, but if a value lower than
32 is selected, the sequencer will only
move through the number of steps
selected. This parameter can be
modulated.
1 to 32
Clk Source
This parameter allows you to use an
alternative input as the clock signal. By
default, the toolbox internal clock (INT)
will be used.
INT, EXT1, EXT2, EXT3,
GATE1, GATE2, GATE3,
GATE4
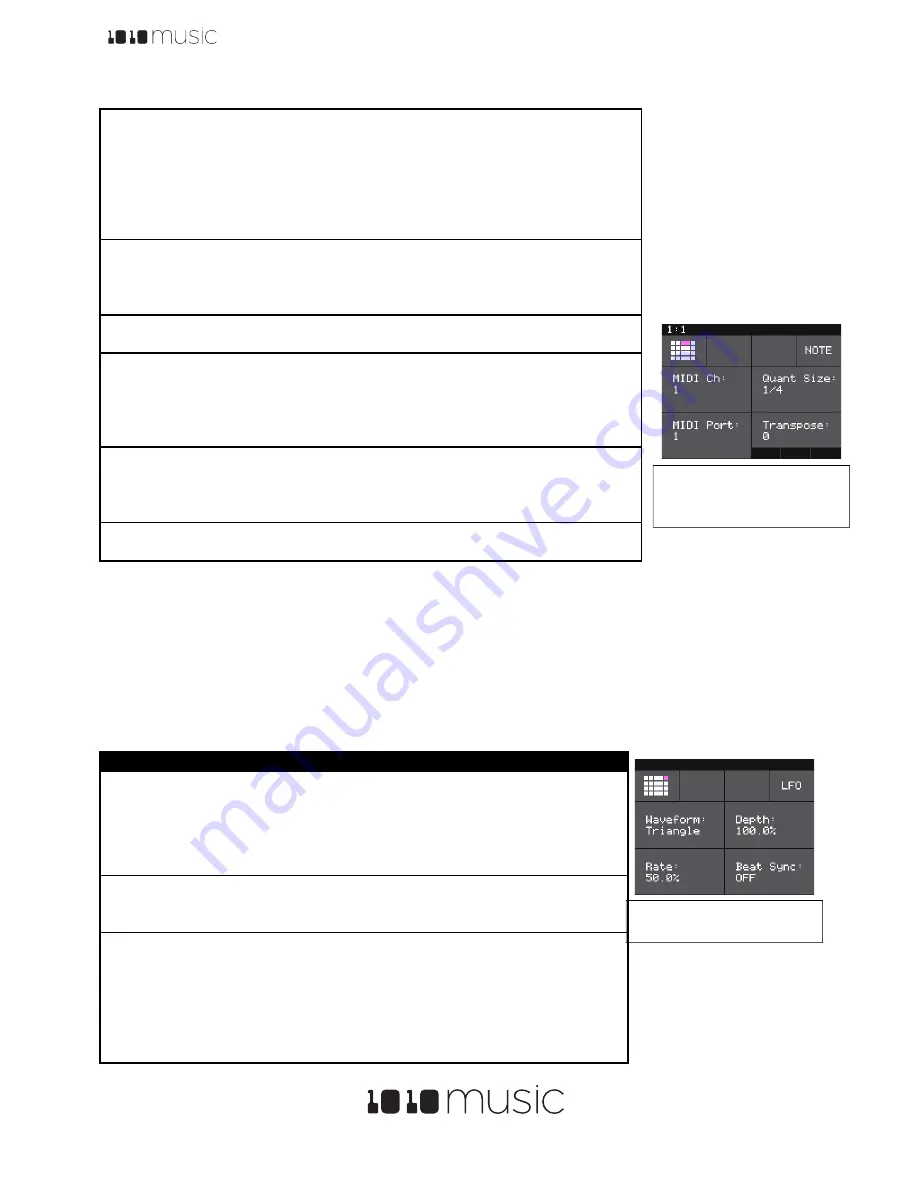
MIDI Ch
The MIDI channel that this sequencer will
use for output.
1 through 16
Quant Size
Defines precisely when to restart the
sequence when using the internal clock.
When the sequence ends, toolbox will
wait until the start of the next Quant Size
interval to restart the sequence.
1/64, 1/32T, 1/32, 1/16T,
1/16, 1/8T, 1/8, 1/4T,
¼
,
1/2T,
½
, 1 bar, 2 bars
(T= Triplet)
MIDI Port
Controls which of toolbox’s MIDI Output
jacks will be used for the output of this
sequencer. Multiple Note Sequencers
may use the same MIDI Port.
1 through 4
Transpose
Shifts the This parameter can be
modulated.
-48 to 48
Parameter
Description
Range of Values
Waveform
Choose the desired
Oscillator.
•
Saw
•
Rev Saw
•
Triangle
•
Pos Tri
•
Square
•
Pos Square
Sine
•
Pos Sine
•
Random
Depth
The amount or
amplitude of the
LFO.
0 to 100%
Rate
The frequency of the
LFO from about
0.1Hz to 12 Hz. When
Beat Sync
is
On
,
this specifies the rate
in beats and
measures.
0 to 100%
or
1/64, 1/32T, 1/32, 1/16T, 1/16, 1/8T, 1/8,
1/4T,
¼
, 1/2T,
½
, 1 bar, 2 bars
(T= Triplet)
Figure 13: LFO
Parameters Screen
Figure 12: Note
Sequencer Parameters
Page 2


