background image

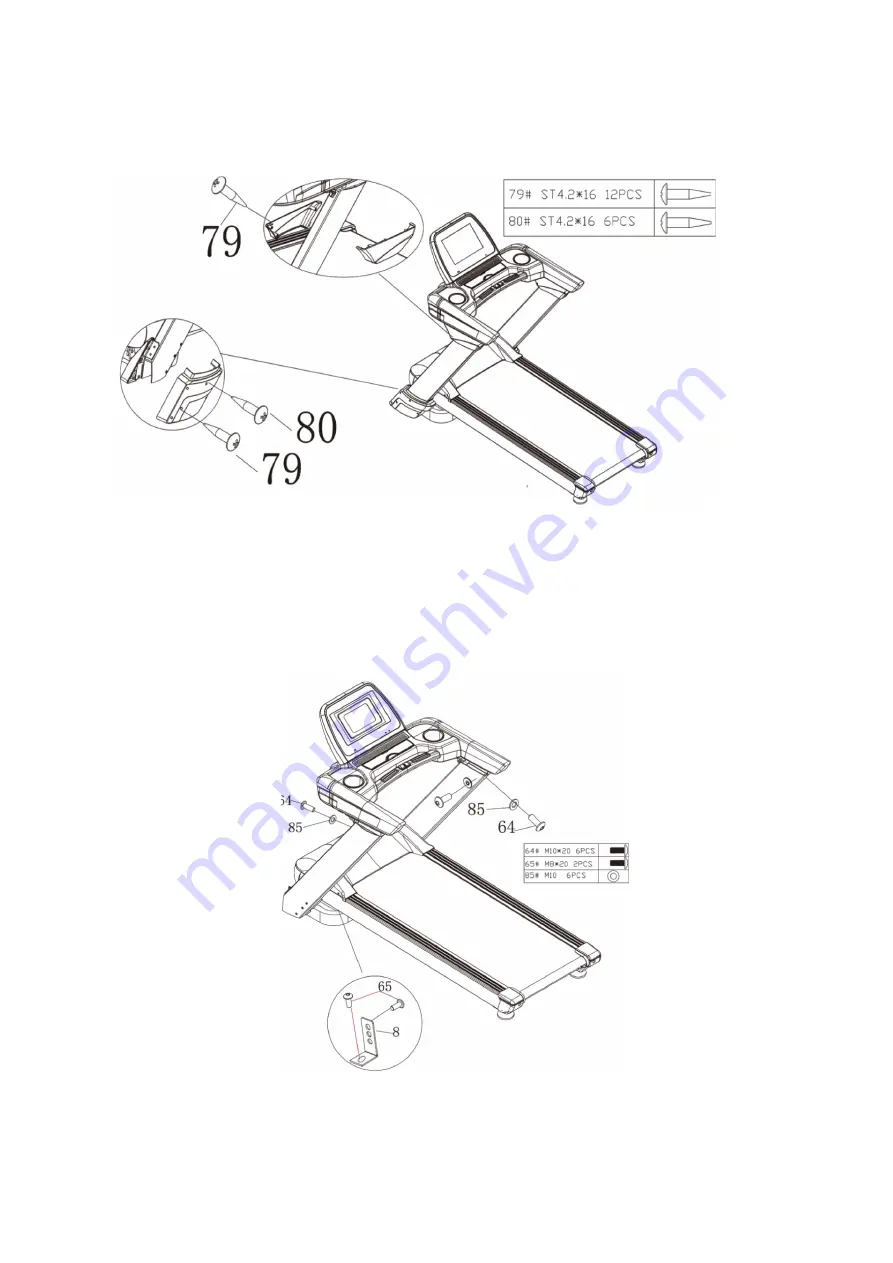
Two  people  put  the  assembled  electronic  meter  on  the  pole,  first  connect  the
  signal  line  of  the  electronic  meter  and  then  test  it  to  OK,  and  then  fix  the  p
ole  to  the  base  with  the  screw  64#  and  the  flat  washer  85#. 


Pole  side  cover  assembly


1. Fix  the  left  and  right  upper  cover  of  the  column  with  the  screw  79# 
2. Fix  the  inner  side  of  the  lower  part  of  the  pole  to  the  base  with  screws  7
9# 
3. Fix  the  outer  cover  of  pole  to  the  pole  and  inner  cover  with  scews  79#  an
d  80#. 


Finally,  after  all  the  accessories  have  been  assembled,  make  sure
  all  the  screws  are  tightened  before  use. 
 

Summary of Contents for 210T

Page 1: ...MOTORIZED TREADMILL INSTRUCTION MANUAL 210T WWW HUNDREDFIT COM ...

Page 2: ...roduct outline 1 2 Safety Instructions 4 3 Accessories details 6 4 Installation instructions 9 5 Operation instructions 11 6 Instrument Operation 14 7 Automatic Refueling 39 8 Daily Maintenance 40 9 Warm up Demonstration 42 ...

Page 3: ...USB interfac e MP3 connection hole 1 Product Outline Power switch LCD screen Bottle cage Handrail Handrail Emergency key Keyboard Bottle cage Ride rail Ride rai l Running belt ...

Page 4: ...2 Configuration list Main frame Left and right Pole Electronic meter stan d Panel Left and rig ht side cov er Left and right inne r covers Pole front cove r ...

Page 5: ...Outer cover on pole Inner cov er on pol e Bag of inst ruction 21 safety switch 20 MP3 connecting line 90 silicone oil 83 instruction Tools and screws 56 wrench M5 1pcs ...

Page 6: ...screwST4 2X15 12pcs 74 screw M8X15 10pcs 58 cross wrench 1pcs 67 wrench 1pcs 60 screw M10x80 4pcs 59 screw M12x80 2pcs 64 screw M10x20 4pcs 80 screw ST4 2x15 6pcs 89 screw Nuts M10 4pcs 84 washer M8 10pcs 86 washer M12 2pcs 85 washer M10 12pcs ...

Page 7: ...Product specification Net weight 153kgs Running belt size 1600 580mm Unfolding size 210 83 139cm Motor AC32 0HP Speed 1 20 8km h Max weight 150kgs Incline 0 18 4 Safety instrucitons ...

Page 8: ...And make sure the screws and nuts are tight 7 When running on treadmill wear comfortable tight fitting clothing to prevent t he clothes from being caught by the machine Do not let children or pets play around the treadmill to avoid accidents 8 Place the treadmill on a smooth clean level surface Make sure there are no sharp objects nearby Please do not use it near water and heat sources 9 Please av...

Page 9: ...do not use the damaged plug 7 Unplug the plug from the socket before cleaning and maintenance 8 Waring if the plug is not pulled out it may lead to personal injury and equip ment damage when not use 9 Please check each part carefully before use 10 Please do not use this product outdoors in high humidity and in the sun 11 Please turn off the machine and remove the plug when you leave 12 For your sa...

Page 10: ...6 Parts List of explosion diagram ...

Page 11: ...d hexagon screw M10 65 1 19 Gas spring 1 71 Half round head hexagon screw M10 45 5 20 MP3 connecting line 1 72 Half round head hexagon screw M10 20 8 21 Safety lock 1 73 Half round head hexagon screw M8 20 6 22 Computer top line 1 74 Half round head hexagon screw M6 40 1 23 Computer middle line 1 75 Half round head hexagon screw M8 40 2 24 Computer bottom line 1 76 Half round head hexagon screw M8...

Page 12: ...asher 2 41 Motor cover 1 93 M8 spring washer 6 42 Motor bottom cover 1 94 M6 lock nut 1 43 Upright post bottom side outer cover R L 1 95 M8 lock nut 12 44 Upright post bottom side outer cover R L 1 96 M10lock nut 6 45 End cap R L 1 97 M5 Hex wrench 1 46 End cap bottom cover R L 1 98 M6 Hex wrench 1 47 Motor front cover 1 99 M8 Hex wrench 1 48 Side rail 1 100 Cross opening wrench 1 49 Moving wheels...

Page 13: ... the panel on the electronic meter with the screw 74 and the flat washer84 Electronic meter Assembly Take out the frame from the carton first use the screw 59 flat washer 86 and screw 60 flat washer 85 to assemble the left and right pole on the base Note when screw 60 the other end with nut 89 Connect the right pole signal line with frame signal line Pole Assembly ...

Page 14: ...w 64 and the flat washer 85 Pole side cover assembly 1 Fix the left and right upper cover of the column with the screw 79 2 Fix the inner side of the lower part of the pole to the base with screws 7 9 3 Fix the outer cover of pole to the pole and inner cover with scews 79 an d 80 Finally after all the accessories have been assembled make sure all the screws are tightened before use ...

Page 15: ...running The safety lock can be pull out at any time and th e treadmill can be stopped immediately to prevent it from falling If it is use d again please put the safety lock back 3 Error start 1 After press Start jump on the running belt that is sliding 2 Turn on the treadmill while stand on the running belt 3 Turn on treadmill running in quick mode 4 Start running without click emergency key on cl...

Page 16: ...please move treadmill to a place where children shoul d not play to prevent children from hitting the cylinder causing the running belt to fall and bruises causing unnecessary accidents Folding Unfolding 10 Panel instruction ...

Page 17: ...achine automatic continuous incline decline 4 8 12 incline shortcuts set the slope quickly Volume plus minus increase or decrease the volume Video music adjustment button Play the previous next song of music or video 4 8 12 speed shortcuts set the speed quickly Speed range shortcuts speed range 1 0 20 8km h adjustment range is 0 1km time and when continuously pressed for more than 0 5 seco nds the...

Page 18: ...n the speed increases to 5 or 6 you are walking or joggi ng Based on this state the body has been basically adapted you can maintain o r increase the speed and slope according to your own needs then officially run f or about 20 minutes and finally set to a slower speed slow down for 5 minutes as a relaxation let The body gradually adapts during exercise This takes about 3 0 minutes at a time Usual...

Page 19: ...lay interface The main interface is divided into nine functional modules weather forecast local audio and video local music local video Internet built in third part y video app WIFI connection cleaner skin settings applications settin gs sports center Built in time countdown calorie countdown distance coun tdown step countdown program movement heart rate control runway mode scene motion custom Ico...

Page 20: ... ccording to your preferences Setting Built in brightness adju stment language selection ma chine management factory mo de four functions Applications Built in third par ty music app third party vide o app internet social news sports center built in 9 kinds of sports time countdown c alorie countdown distance cou ntdown step countdown work out heart pulse control runw ay mode realview run custo m ...

Page 21: ...terface Support play MP3 APE Mp4 MOV audio video format file s The files in the local video and audio do not need to be conne cted to the network and can be directly played Please try to choose a rhythmical music during running It is best to adapt to the rhythm of the running The music with a larg e rhythm changes easily has an adverse effect on the rhythm of t he running Please try not to watch t...

Page 22: ...he song t o be selected Start playing music Play music according to the song list Stop play music Random play of the song li st Play the previous Loop Play the next Move the bar to the left or right to change the progre ss of the music 2 2 Local Video Press icon enter into video interface Swipe up and down to browse for the video name in the list on the left ƒ Press video file to start play ...

Page 23: ...he left or right to change the pro gress of the video 3 Internet Build in third part APP To connect to the WIFI network before use Please try not to browse webpage or w atch the video while running which is easy to distract and cause accidental injury You can st art running after setting the content Listen to some relaxing music during th e running to reduce the boring feeling during e xercise ...

Page 24: ... during running Return to the previous menu click to indicate the moti on parameters during runn ing Adjust the volume Open the floating button Back to Home page Turn off the fly button 4 WIFI 4 1 In the main interface click to enter the WIFI interface 5 Cleaning 5 1 Click in the main interface to clean up the cache and memory of the machi ne 6 Sports center ...

Page 25: ...here is a simple criterion that is a feeling of sweati ng when running no feeling of being out of breath and very uncomfortable the running speed is the be st Be sure to check if the safety lock is valid before exercising Any abnormal sit uation occurred during running pulled off the safety lock and the treadmill quickly decelerate d to stop running Please pay attention to your heart rate value du...

Page 26: ... his or her own sports goal Control directory time coun tdown calorie co untdown distance c ountdown step count down Work o ut heart puls e control runway m ode Realview r un Custom m ode 6 2 Click on the runway mode icon to enter the runway mode page ...

Page 27: ...ounting after a full cir cle Treadmill parameter adjustment 1 Click on any area of the screen to pop up the operating window to controls the tread mill 2 Click the floating button the treadmill will appear two restarts and stops for the user to select No operation in three seconds this floating window is automatically clos ed Start of runway mode ...

Page 28: ...parameters by the treadmill will slow down and stop run ning the treadmill will pop up and for the user to choos e When the user has not made a selection click the back button in the upper rig ht corner to return to the main interface to operate other operations After the us er selects click on any sport mode in the sports center interface Will return to t he runway mode interface Press The treadm...

Page 29: ...t running speed Indic ates the current incline Adjust speed Click to select the user can slide the rectangle coordinates up and down and customize the current running spe ed Once the user setting is successfully the program data of the user defined setting will be automatically saved check the adj ustable speed map Adjust incline Click to select the user can slide the rectangle ...

Page 30: ...ay is not selected Adjustment time The user presses the time plus or minus butt on on the display window to set the current running time Start User data setting OK click here the treadmill starts run ning 6 4 Click the heart pulse control icon to enter the heart pulse control setting pa ge The user sets the parameters according to his own needs clicks the start button and the treadmill starts runn...

Page 31: ...tton in the upper right corner to return to the main interf ace to operate other operations After the user selects and clicks on any sport mo de of the sports center interface it will return to the heart pulse control speed int erface Click any area of the screen to pop up the operation floating window to c ontrol the treadmill ...

Page 32: ...e needs and the built in fixed tim e If the user wants to set it himself click Customize press the plus or minus b utton on the window to set the exercise duration Once the setting is OK click th e button to start the exercise Press the stop button the treadmill will slow down and stop running The treadmill will pop up restarts and stops for the user to select Select the stop button the system wil...

Page 33: ...6 6 Click on the real view icon to enter the real view page 3kinds of Real view Gobi Grassland seaside 6 6 1 Real view running In the real view interface click to enter the Gobi page ...

Page 34: ... the Gobi running interface click the icon to hide the bottom motion parameter click to display the motio n parameter Control directory Floating window Click the pull up or pull do wn button of the interface to show or hide the motion parameter float frame 7 Skin ...

Page 35: ...refer ences 7 1Skin setting In the main interface click the skin icon to enter the skin selection pa ge After the user selects the selection button appears in the upper right corner The machine skin has been set to OK Click the upper right corner to return to the main interface 8 Application Built in third party music and video APP applications Internet social news and other fiv e functional modul...

Page 36: ... the content and then start the treadmill Listen to some relaxing music during the runnin g process to reduce the boring feeling during exerc ise Click on the entertainment icon to enter the entertainment interface 9 Setting Built in brightness adjustment language selection machine management factory mode four functions This system will prohibit users from installing ot her APP applications to avo...

Page 37: ...System Settings page 9 1Brightness adjustment In the settings interface click the brightness adjustment icon to enter the leaderboard interfa ce Slides left and right on the brightness bar slides to the right to increase the brightness and slides to the left to decrease the brightness 9 2 Machine Management ...

Page 38: ...the number of miles from t he next maintenance The error interface Note When the treadmill is used if there is an abnormality the interface will have an e rror message and a solution Some exceptions will not occur depending on the model 6 1AC motor Errors 6 1 1 List of G Way Inverter Error Reports overvoltage overflowing overload Inverter MICU breakdown ...

Page 39: ...nal fr om controller inverter inside communication er ror1 inverter inside communication er ror12 receive boot signal but before sh utdown signal has not een received lifting fault controller cannot receive signal fr om inverter reverse switch action ...

Page 40: ... in the picture after using the treadmill for a period of time you need to oil the running belt use your hand to lift the running belt up insert the silicone oil bottle under the running belt and lubricate the silicone oil o n the treadmill board try to lubricate silicone oil to the middle of the running board ...

Page 41: ... tightness of the running belt to improve How to adjust the running belt 1 Insert the 6mm Allen key into the adjustment screw on the left side of th e running belt and turn the wrench 1 4 turn clockwise to adjust the rear roll er to tighten the running belt 2 Repeat step 1 to adjust the right screw It must be determined that the a djustment screw rotates the same distance so that the rear roller i...

Page 42: ...elt 11 Important Matter Warning Please consult your doctor and receive complete physical examination before using the product Don t carry out frequent and violent exercise without per mission of doctor Please stop using the product and consult your doctor if y ou feel unwell in use The product shall be used correctly Please read servi ce manual in detail before exercise Please keep children and pe...

Page 43: ...e that the plan is practical and start exercise plan at leisure You can add some aerobic exercises into exercise plan such as walking jogging swimming dancing or riding Test pulse frequently If you have no electronic heartbeat monitor consult the doctor about how to correctly measure pulse with hand from wrist or neck In addition you must set tar get heart rate on the basis of age and physical con...

Reviews: