ExpWave 240B Secure Outdoor Ethernet Radio Link
Network Setup
7-1
Chapter 7 Network Setup
This chapter describes how to configure the Network Setup using
Menu 6 — Network Setup
.
7.1 Introduction
From the main menu, enter 6 to open
Menu 6 – Network Setup
.
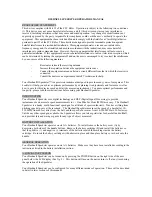
Figure 7-1 Menu 6 - Router Mode Network Setup and Status
Table 7-1 Network Setup Field
FIELD
DESCRIPTION
Operation Mode
Set AC
Enable
or
Disable
.
Device ID
AP set to 1 , AC1 set to 2 , AC2 set to 3.
Pre_Share Key
Set the key for AP to AC make authentication.
Ethernet (LAN) Setting
LAN IP
Enter the IP address of device lan port in dotted decimal notation.
Network Mask
Device will automatically calculate the subnet mask based on the IP
address that you assign. Unless you are implementing subnetting, use the
subnet mask computed by the Devie.
RIP Directio
Press the [SPACE BAR] to select the RIP direction from
Both/In
Only/Out Only/None.
RIP Version
Press the [SPACE BAR] to select the RIP version from
RIP-1/RIP-2B/RIP-2M.
DHCP Edit
Type space bar change
Yes
or
No
, if select Yes and enter SMT6.1.
Wireless (WLAN) Setting
MAC Address
Indicate the station with the same mac address will only be accepted to
join in.
VPN Security
Set security level (
None
,
Low
,
Medium
,
High
) for AP and AC conection
AC1 & AC2 VPN
Security
Set security level (
None
,
Low
,
Medium
,
High
) for AC1 and AC2
connection
The VPN security level parameters of authentication & encryption are described in Table 7-2:
Menu 6 - Router Mode Network Setup
AP AC1 AC2
Operation mode: Enabled Disabled
Device ID: 1 2 N/A
Pre_Share Key: 951753258 N/A
Ethernet (LAN) Setting:
LAN IP: 192.168.80.217 192.168.223.1 N/A
Network Mask: 255.255.255.0 255.255.255.0 N/A
RIP Direction: Both Both N/A
RIP Version: RIP-2B RIP-2B N/A
DHCP Edit: No N/A
Wireless (WLAN) Setting:
MAC Address: 00:02:CF:13:46:79 N/A
VPN Security: None N/A
AC1&AC2 VPN Security: High
Press ENTER to Confirm or ESC to Cancel:
Press Space Bar to Toggle.