ZyXEL Communications PoE-80 Скачать руководство пользователя страница 12

PoE-80 User’s Guide 

12 

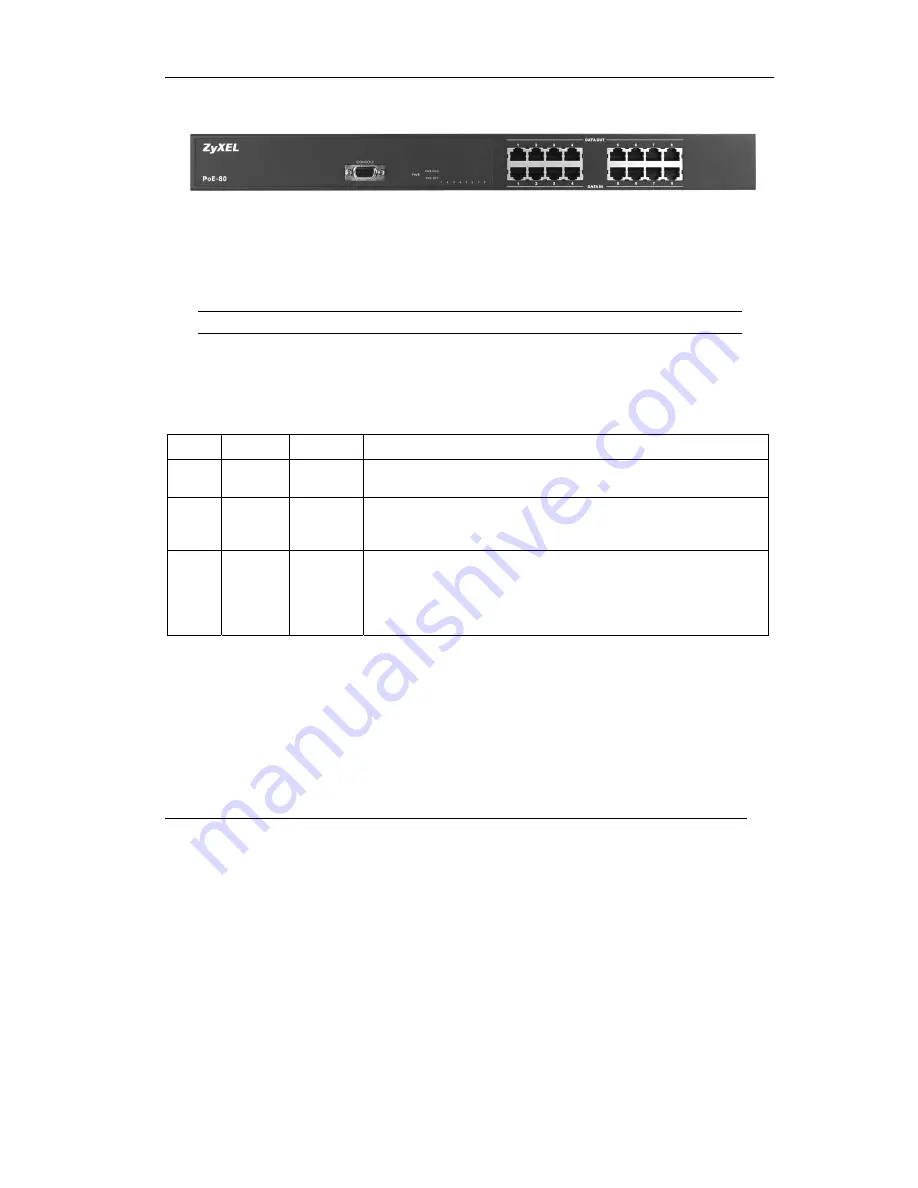
2.4 Front Panel Connections 


The 

DATA OUT

 ports send power and data to the PoE-enabled devices. Use Ethernet cables to 

connect the eight 

DATA OUT

 RJ-45 Ethernet ports to PoE-enabled devices. 


Use Ethernet cables to connect the eight 

DATA IN

 RJ-45 Ethernet ports to the LAN. 

The maximum Ethernet cable length is 100m. 

Use a console cable to connect the console port to a management computer. 

2.5 Front Panel LEDs 

The LEDs give real-time information about the system’s operational status. 

LED COLOR STATUS 

MEANING 

PWR Green  On 

Off 

Power is being supplied to the PoE-80.  
No power is being supplied to the PoE-80. 

PWR 
FWD 

Green 

On 
 
Off 

The 

DATA OUT

 port is connected and sending power to an 

Ethernet device.  
The 

DATA OUT

 port is not sending power to an Ethernet device. 

PWR 
OFF 

Orange 

On 
 
 
Off 

The Ethernet device connected to the PoE-80’s 

DATA OUT

 port 

requires more power than the PoE-80 can provide or the 
Ethernet cable is shorted.  
The connection to the Ethernet device is functioning properly or 
no Ethernet device is connected to the 

DATA OUT

 port. 


3 Software Utility Installation  

Install the software utility in order to configure the PoE-80 PD. You can easily view the PoE-80’s 
power parameters and control it through the software utility. The software utility provides an easy-
to-use GUI interface. The software utility is compatible with Windows 2000 and XP. Please follow 
the below steps to install the software utility. You may need to use your Windows CD during the 
installation. 

Содержание PoE-80

Страница 1: ...PoE 80 Eight port Power over Ethernet Hub User s Guide Version 1 06 April 2004...

Страница 2: ...ware and Installation 10 2 1 Desktop Installation 10 2 2 Rack mounted Installation 10 2 3 Rear Panel Connections 11 2 4 Front Panel Connections 12 2 5 Front Panel LEDs 12 3 Software Utility Installati...

Страница 3: ...described herein without notice This publication is subject to change without notice Trademarks Trademarks mentioned in this publication are used for identification purposes only and may be properties...

Страница 4: ...he drop down list box on the ZyXEL home page to go to that product s page 3 Select the certification you wish to view from this page Information for Canadian Users The Industry Canada label identifies...

Страница 5: ...place the defective products or components without charge for either parts or labor and to whatever extent it shall deem necessary to restore the product or components to proper operating condition An...

Страница 6: ...over Ethernet Hub may be called the PoE 80 the power injector or the system in this guide Customer Support When you contact your customer support representative please have the following information...

Страница 7: ...FRANCE info zyxel fr 33 0 4 72 52 19 20 www zyxel fr ZyXEL France 1 rue des Vergers Bat 1 C 69760 Limonest France support zyxel es 34 902 195 420 SPAIN sales zyxel es 34 913 005 345 www zyxel es ZyXE...

Страница 8: ......

Страница 9: ...e 1 1 Key Features Eight RJ 45 10 100 Mbps PoE enabled ports Ensures a constant power supply to PoE enabled devices Automatically detects if connected devices are PoE enabled to avoid sending power to...

Страница 10: ...e supplied rubber feet Step 4 Attach the rubber feet to each corner on the bottom of the PoE 80 These rubber feet help protect the PoE 80 from shock or vibration and ensure space between devices when...

Страница 11: ...in the brackets with the appropriate holes on the rack Secure the PoE 80 to the rack with the rack s mounting screws 2 3 Rear Panel Connections Connect the female end of the power cord to the power r...

Страница 12: ...The DATA OUT port is connected and sending power to an Ethernet device The DATA OUT port is not sending power to an Ethernet device PWR OFF Orange On Off The Ethernet device connected to the PoE 80 s...

Страница 13: ...your CD ROM drive Step 2 Run browse to and double click setup exe Step 3 The installation screen displays Click OK to go to the next step Step 4 Click the icon button to start the installation Step 5...

Страница 14: ...PoE 80 User s Guide 14 Step 6 Click Yes if the Version Conflict screen displays Step 7 When installation finishes click OK to finish...

Страница 15: ...rt Programs ZyXEL Power over Ethernet Series and then ZyXEL Power over Ethernet Series to run the software utility 4 Removing the Utility Use the following procedure to remove the software utility fro...

Страница 16: ...PoE 80 User s Guide 16 Step 2 Click Add or Remove Programs Step 3 Click ZyXEL Power over Ethernet Series and Change Remove Step 4 Click Yes to remove the software utility Step 5 Click OK...

Страница 17: ...abled device to a DATA OUT port on the PoE 80 Start the utility and the management interface displays as shown next The configuration changes you make in the utility are not saved when you turn off th...

Страница 18: ...ault settings The device resets and the PWR FWD and PWR OFF LEDs flash You must disconnect all of the PoE enabled devices from the PoE 80 before you calibrate the system PD Discovery R ohms Set the up...

Страница 19: ...this button to apply the new configuration to the PoE 80 Configuration changes are lost when you turn off the PoE 80 or it loses power 5 3 Port Specific Control This section of the screen displays por...

Страница 20: ...connected to the port Fault Status This displays the status Null Overload or DR Fail of the connected PoE enabled device that the system has detected Null No PoE enabled device is connected to the po...

Страница 21: ...alue does not display when you enable the bypass classification function 6 Troubleshooting Make sure you have securely attached the proper cables to the proper ports Refer to the Rear Panel Connection...

Страница 22: ...maximum Current per port maximum 350mA 48V DC Management Microsoft Windows based application for power management Power Management Functions Current ports serviced list system total serviced power bu...

Страница 23: ...uide 23 7 1 DATA OUT PoE Injector RJ 45 Port Pin Assignments PIN NO RJ 45 SIGNAL ASSIGNMENT 1 Output Transmit Data 2 Output Transmit Data 3 Receive Data 4 Power 5 Power 6 Receive Data 7 Power 1 2 3 4...

Отзывы: