background image

P-2602HWUDL-D Quick Start Guide

2

To read the User’s Guide insert the CD that came in the box into your CD-ROM drive. A 
screen should pop up. Navigate to the User’s Guide from this screen. If a screen does not 
pop up, open Windows Explorer (click My Computer), click on the CD-ROM drive (usually 
drive D:) and navigate to it from there.

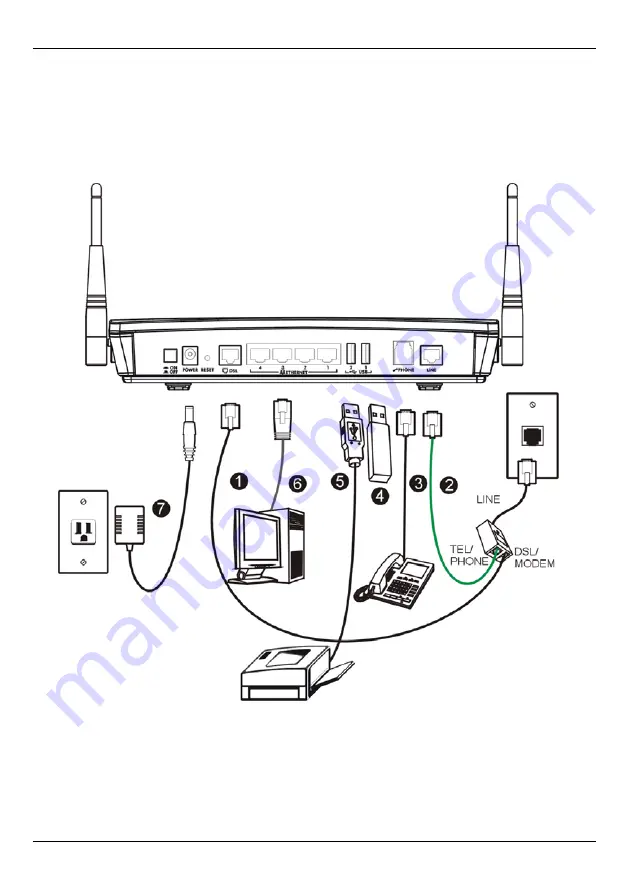
2 Hardware Connections

1 DSL

: Use a telephone wire to connect this port to the 

DSL 

or 

MODEM

 jack on a splitter.

2 LINE

: Use the green PSTN cable to connect the 

TEL 

or 

PHONE

 jack on the splitter to this 

port. Connect the splitter to a telephone jack.

Содержание P-2602HWUDL-D

Страница 1: ...ht 2007 All rights reserved P 2602HWUDL D 802 11g Wireless ADSL VoIP IAD with Built in DECT Base Station Quick Start Guide Version 3 40 8 2007 Edition 1 DEFAULT LOGIN IP Address http 192 168 1 1 Password 1234 ...

Страница 2: ...602HWUDL D can use regular phone services through regular PSTN phone lines and can also function as a print server 1 Requirements Make sure you have the following things before you set up your P 2602HWUDL D Internet access account information provided by your ISP such as user name password and so on VoIP account You need the account information provided by your VoIP service provider the company th...

Страница 3: ...n If a screen does not pop up open Windows Explorer click My Computer click on the CD ROM drive usually drive D and navigate to it from there 2 Hardware Connections 1 DSL Use a telephone wire to connect this port to the DSL or MODEM jack on a splitter 2 LINE Use the green PSTN cable to connect the TEL or PHONE jack on the splitter to this port Connect the splitter to a telephone jack ...

Страница 4: ...rce to this socket 8 Push the power switch to the on position Look at the LEDs lights on the top panel of the P 2602HWUDL D The POWER light blinks during start up and is green once the P 2602HWUDL D is ready Each ETHERNET light turns on if the corresponding ETHERNET port is properly con nected The lights blink when the P 2602HWUDL D is sending or receiving data through the corresponding ETHERNET p...

Страница 5: ...blem remains contact your local vendor 3 DECT Phone Registration In order to use your DECT phone with the P 2602HWUDL D the DECT phone must register with the P 2602HWUDL D s DECT base station Take the following steps to register your DECT phone with the P 2602HWUDL D 1 Press down the DECT base station button on the left side when facing the LEDs lights of your P 2602HWUDL D for 6 to 11 seconds Whe...

Страница 6: ...D during the registration process See the User s Guide for details 3 When a P 2602HWUDL D discovers a DECT phone in registration mode it sends a request for a Personal Identification Number PIN Your DECT phone receives the request and prompts you to enter the PIN Enter the PIN in the DECT phone by using the handset keypad Entering a PIN ensures that only authorized DECT phones connect to and use y...

Страница 7: ...L D For the P 2602HWUDL D you can also assign your DECT phones to receive calls from the PSTN line regular phone line 4 Initial Configuration 1 Open your browser and enter the P 2602HWUDL D s IP address 192 168 1 1 default as the URL 2 Enter the admin password 1234 default Click Login If your browser cannot find this screen make sure your browser is configured correctly See Troubleshooting in the ...

Страница 8: ...SP did not provide some information To create a wireless network the P 2602HWUDL D and your wireless computer s must all use the same SSID network name channel and security settings If you do not set wireless security any one within range could use your P 2602HWUDL D to access your network and the Internet Make sure your wireless security settings are compatible with your existing wireless devices...

Страница 9: ... a laptop use either a wireless USB adapter or a wireless CardBus card These are built into many laptops To add a computer to your network you need to configure your wireless enabled computer with the same SSID channel and security settings as the P 2602HWUDL D Alternatively use OTIST ZyXEL s One Touch Intelligent Security Technology OTIST feature It allows you to automatically configure the SSID ...

Страница 10: ...to make sure you can also use the regular phone line while one of your VoIP accounts is registered When the ZyXEL Device does not have power the phone s connected to the PHONE port can still be used for making PSTN calls In the main screen click VoIP PSTN Line PSTN Line Pre fix Number Enter a prefix up to seven numbers you dial before you dial the phone number if you want to make a regular phone c...

Страница 11: ...set in Section 5 and then dial the phone number Follow these directions to call the phone that is connected to the P 2602HWUDL D Use your VoIP service provider s dialing plan or just dial the phone number 7 VoIP Trunking Overview VoIP trunking connects an IP network like the Internet and the Public Switched Telephone Network PSTN PSTN includes the world s circuit switched telephone network which i...

Страница 12: ...This section shows you how to enable USB file sharing In order to start file sharing you need to Connect your USB 2 0 file sharing device See Section 2 Enable the file sharing feature Create an account user name and password for sharing the files Browse to your files using the IP address of the P 2602HWUDL D 8 1 Configure USB File Sharing 1 Click Advanced File Sharing 2 Check the box Enable File S...

Страница 13: ... USB device which is connected to the USB port and makes it available for sharing 8 2 Browse to the USB File Share 1 In Windows Explorer s Address bar type a double backslash followed by the IP address of the P 2602HWUDL D 192 168 1 1 is the default and hit ENTER 2 Enter the user name and password when prompted and hit OK 3 The files on the USB file sharing device connected to the P 2602HWUDL D ar...

Страница 14: ...de for more details 3 Make sure you typed the address correctly If the address has changed you can press the RESET button for ten seconds to restart the P 2602HWUDL D and to restore factory defaults The default IP address is 192 168 1 1 and the default password is 1234 V If you cannot access the Internet follow these steps 1 Check the device s lights If they are different than what is described in...

Страница 15: ...g PHONE port 2 Make sure the VOICE OVER INTERNET SETUP wizard screens are properly configured see Section 4 3 3 You can also check the VoIP status in the Status screen See the User s Guide for more information about this screen Viewing Your Product s Certifications 1 Go to www zyxel com 2 Select your product from the drop down list box on the ZyXEL home page to go to that product s page 3 Select t...

Отзывы: