More information
Install in just 3 steps –
it’s this easy:
Preparing the
installation
Insert the supplied œ CD and
follow the instructions to install
your œ HomeBox. If the œ CD is
not supported by your operating
system* or if you do not have
a CD drive, then manual
installation is possible as an
alternative. To do this, fi rst use
the yellow LAN cable to connect
your œ HomeBox with your
PC or establish a direct WLAN
connection (see ‘Initial setup of
your WLAN’). Then just continue
with point 2.
1
3
Start surfi ng
Your œ HomeBox 6641 is now
fully confi gured for access to
the Internet and to make phone
calls.
2
Set up Internet
connection
The following set-up wizard
will help you to confi gure
and activate your Internet
connection. Alternatively,
you can also complete the
confi guration manually by
accessing your œ HomeBox
6641 menu at any time via
your browser at
o2.box
or
192.168.1.1
. You will also fi nd
information about this in the
manual (also on the œ CD or
on our website under
http://o2.de/hilfe/o2homebox2).
*
Note
Customers with a MAC OS or older Windows operating system (Windows XP and previous versions) should please use
the manual on the CD supplied to set up the œ HomeBox. To do that, open the document using Adobe Acrobat Reader.
Initial WLAN set-up
1.
Switch on your computer’s WLAN function and ensure
that the WLAN function is activated on your
œ HomeBox 6641. (WLAN LED is lit = activated /
WLAN LED off = activate using push-button)
2.
a) Use the œ CD provided to set up the WLAN network via the confi guration wizard or confi gure the WLAN
network using your Windows computer as follows:
b) Double-click on ‘Wireless network connection’. In the new window you will be shown all of the available
wireless networks within range. (The path to open your network settings can vary depending on your
operating system.)
3.
Select the wireless network from your œ HomeBox 6641. You will fi nd the name
of the network (SSID) and the network keÿ (WPA2 key) on the name plate on the
back of your œ HomeBox 6641.
4.
Click ‘Connect’ and enter your WLAN network key (WPA2 key).
5.
The WLAN connection has now been completely set up.
On the œ
CD provided, you will find brief instructions in Russian as well as the initial steps
to set up your
œ
HomeBox.
On the œ
CD provided, you will find brief instructions in Turkish as well as the initial steps
to set up your
œ
HomeBox.
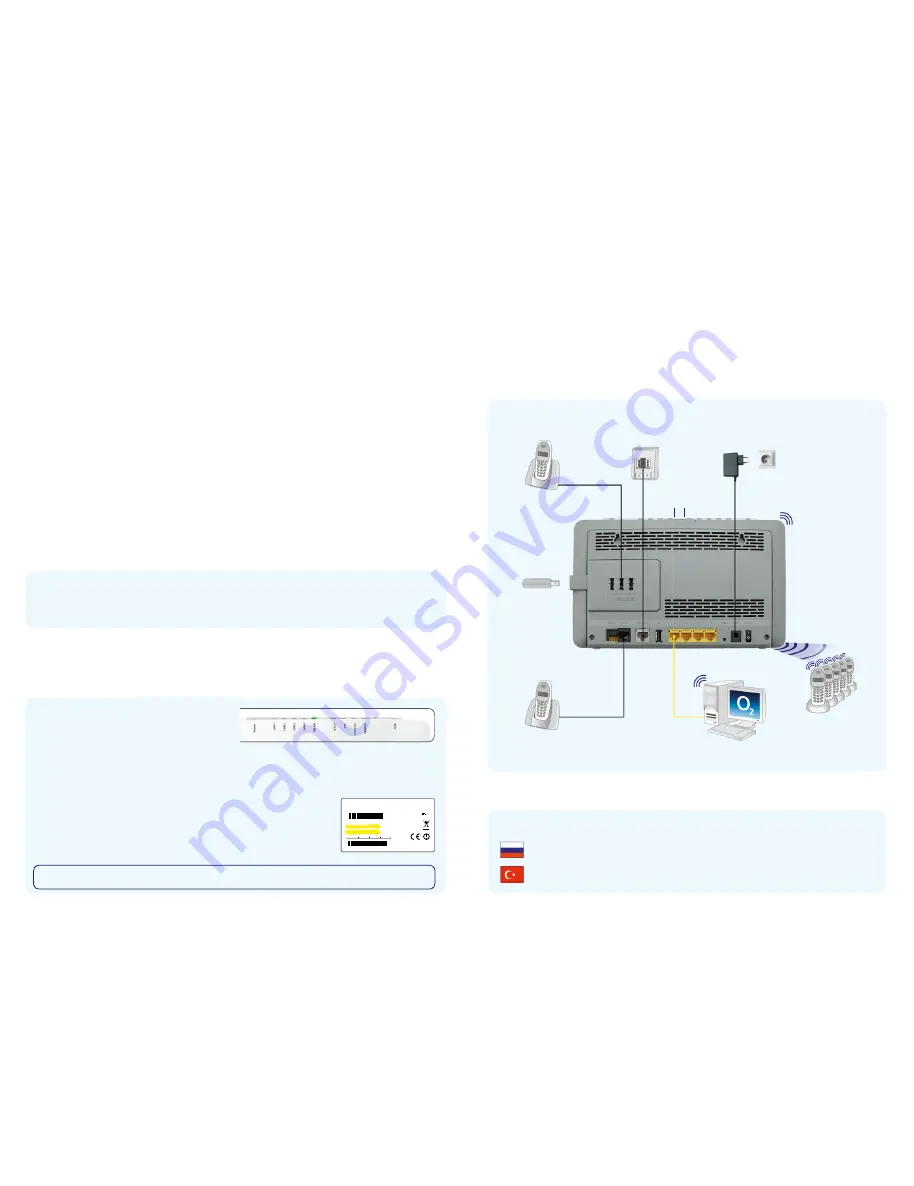
Cabeling of your œ HomeBox
6641: the connection types
After successfully setting up a connection, please change the WLAN key for the router to maintain security.
You will fi nd more information under http://www.dsl.o2.de/.
Analogue and ISDN connection for œ:
Regardless of the selected product you can still connect analog and ISDN devices for telephony use.
TAE socket
Mains socket
Integrated DECT
Integrated 2.4 GHz
and 5 GHz WLAN
LAN cable
USB mass storage
Analogue phone
ISDN phone
DECT phones
Computer
DECT push-
button
WLAN/WPS
push-buttons
o2 HomeBox 6641
Mat.-Nr.:101505
Serial Number: S317000001
SSID: o2-WLANxx
WPA2-Schlüssel:
MAC-Adresse:EC43F6ABB1D3
ZyXEL Communications Corp.
PN:VMG7947-B40A-DE01V1S
Netzteil:12V
MM/YY:04/13
Made in China
2.5A
X X X X X X X X X X X X X X X X
SSID: o2-WLANxx
WPA2-Schlüssel:
Below you will find an example showing the cabling of your œ HomeBox 6641.
Connect the equipment accordingly.
All manuals and user guides at all-guides.com


