background image

                                                                                                                              ASI2400 Manual 


12 

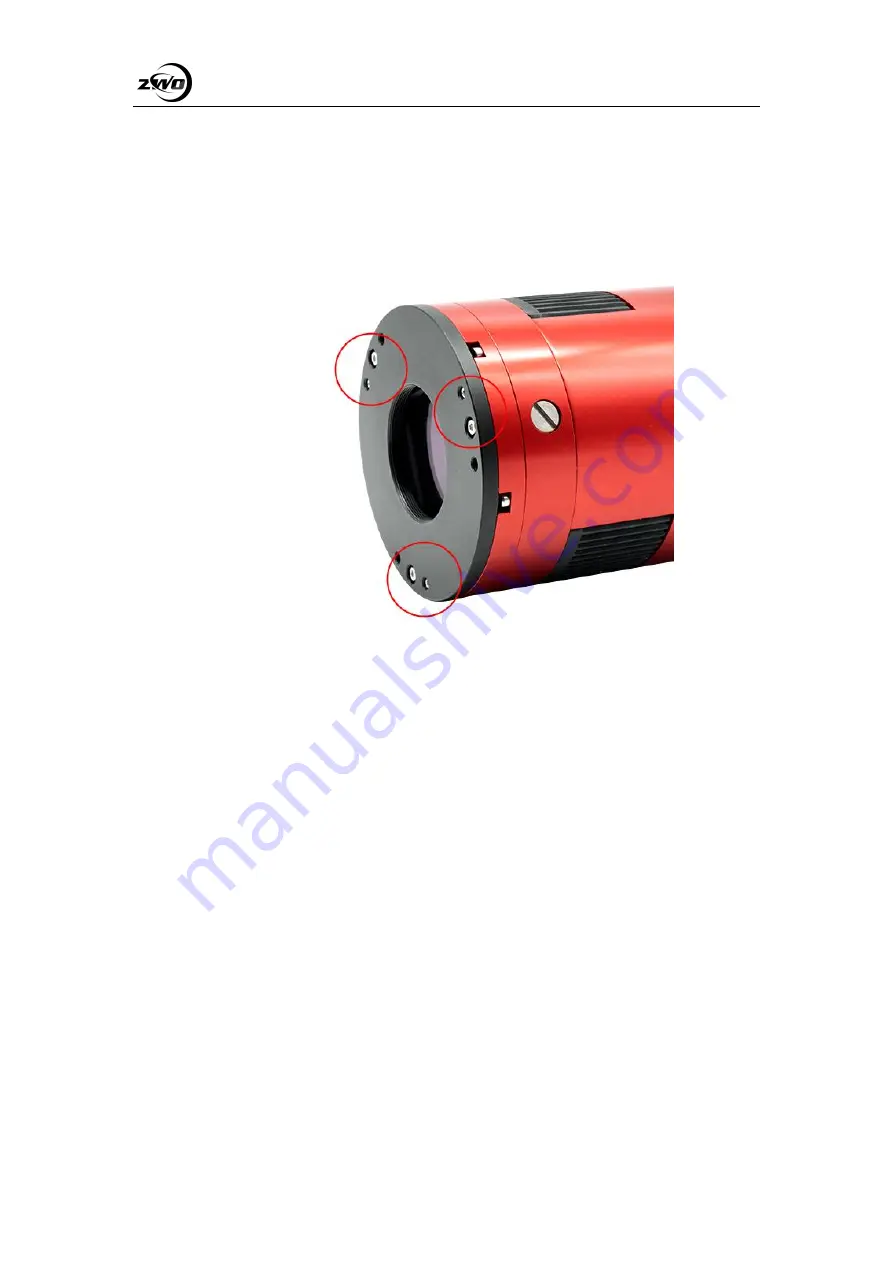
5.9 Tilt Adjustment 

There are 3 sets of screws that can be used to tilt the sensor, to make it same with the primary 
mirror of Newtonian, two screws per set for screw in /out.   


You can refer to below: 

 
1. Take a starred image with the camera, you will easily find out the tilt part in the image through 
the software, and then adjust one or more sets of flange adjustment screws on the camera 
corresponding to the image. 

 
2. Take another image after the sensor tilt adjustment, compare the new image with the previous 
one in the software. If the tilt issue is reduced, that means the adjustment is correct. Otherwise, the 
adjustment is wrong. 

 
3. Repeat step 2 until the stars in all corners are perfect. 


Содержание ASI2400 Series

Страница 1: ...Version 1 1 Aug 2020 All materials related to this publication are subject to change without notice and its copyright totally belongs to Suzhou ZWO CO LTD Please download the latest version from our O...

Страница 2: ...iew 8 5 2 Power consumption 9 5 3 DDR Buffer 9 5 4 Cooling System 9 5 5 Focus Distance 10 5 6 Protective Window 10 5 7 Analog to Digital Converter ADC 11 5 8 Binning 11 5 9 Tilt Adjustment 12 6 How to...

Страница 3: ...https www facebook com ZwoDesignAstronomyCameras User Forum https bbs astronomy imaging camera com ASI2400 Camera is specifically designed for astronomical photography It is not only suitable for DSO...

Страница 4: ...ASI2400 Manual 4 2 What s in the box ASI2400MC Pro...

Страница 5: ...Range 32 s 2000s Read Noise 1 1 6 4e QE peak Above 80 Full well 100000e Unity Gain 158 ADC 14bit DDR3 buffer 256MB 2Gb Interface USB3 0 USB2 0 Adapters M54 0 75 Protect window IR CUT Dimensions 90mm W...

Страница 6: ...ise of the ASI2400 camera is extremely low when compared with traditional CCD cameras In addition it is with Built in HCG mode which can effectively reduce read noise at high gain and keep the same wi...

Страница 7: ...ASI2400 Manual 7...

Страница 8: ...oved 3 Radiator 4 USB2 0 Hub 5 USB3 0 USB2 0 Interface 6 Cooling power supply DC power port size 5 5 2 1mm positive inside and negative outside 12V 3A power is recommended 7 Ultra quiet magnetic levit...

Страница 9: ...re is the ASI2400 cooling efficiency graph 5 3 DDR Buffer The ASI2400 Pro camera includes a 256MB 2Gb DDR3 memory buffer to ensure the stability of data transmission Additionally the use of a memory b...

Страница 10: ...image will be little Cooling system can be set to a minimum temperature of 35 below ambient temperature Here s the dark current curve of ASI2400 sensor between 20 and 30 5 5 Focus Distance The female...

Страница 11: ...utions on USB3 0 and USB2 0 of ASI2400 in 14bit mode Resolution 14Bit ADC USB 2 0 USB 3 0 6072 4042 0 88fps 8 01fps 4096 3072 1 72fps 13 67fps 4096 2160 2 45fps 19 25fps 3840 2160 2 61fps 19 25fps 192...

Страница 12: ...a you will easily find out the tilt part in the image through the software and then adjust one or more sets of flange adjustment screws on the camera corresponding to the image 2 Take another image af...

Страница 13: ...d to a telescope or a camera lens Most of the adapters are already included in the package and the rest can be purchased directly from our official website below https astronomy imaging camera com 6 1...

Страница 14: ...s Connection Diagram 1 Connecting without filters 1 Nikon M54 adapter 2 EOS M54 adapter 3 Nikon lens 4 EOS lens 2 Connecting with filters This solution only works for EOS lens 1 New filter Drawer for...

Страница 15: ...ASI2400 Manual 15 6 3 External Device Connection Diagram...

Страница 16: ...ASI2400 Manual 16 7 Mechanical drawing ASI2400MC Pro...

Страница 17: ...e customer service 9 Warranty We provide 2 year warranty for our products We offer repair service or replacement for free if the camera doesn t work within warranty period After the warranty period we...

Отзывы: