background image

30

Operating your hand mixer

Whisk:


ƒ

For whisking eggs, mixed drinks, sauces etc.


ƒ

For mixing batter, dips, puddings, desserts etc.


ƒ

For beating whipped cream, egg white, mousse, puree etc.

Dough hook:


ƒ

For mixing dough


ƒ

For mixing fillings, e.g. minced meat

Operating your hand mixer

4.1 Accessories and range of applications

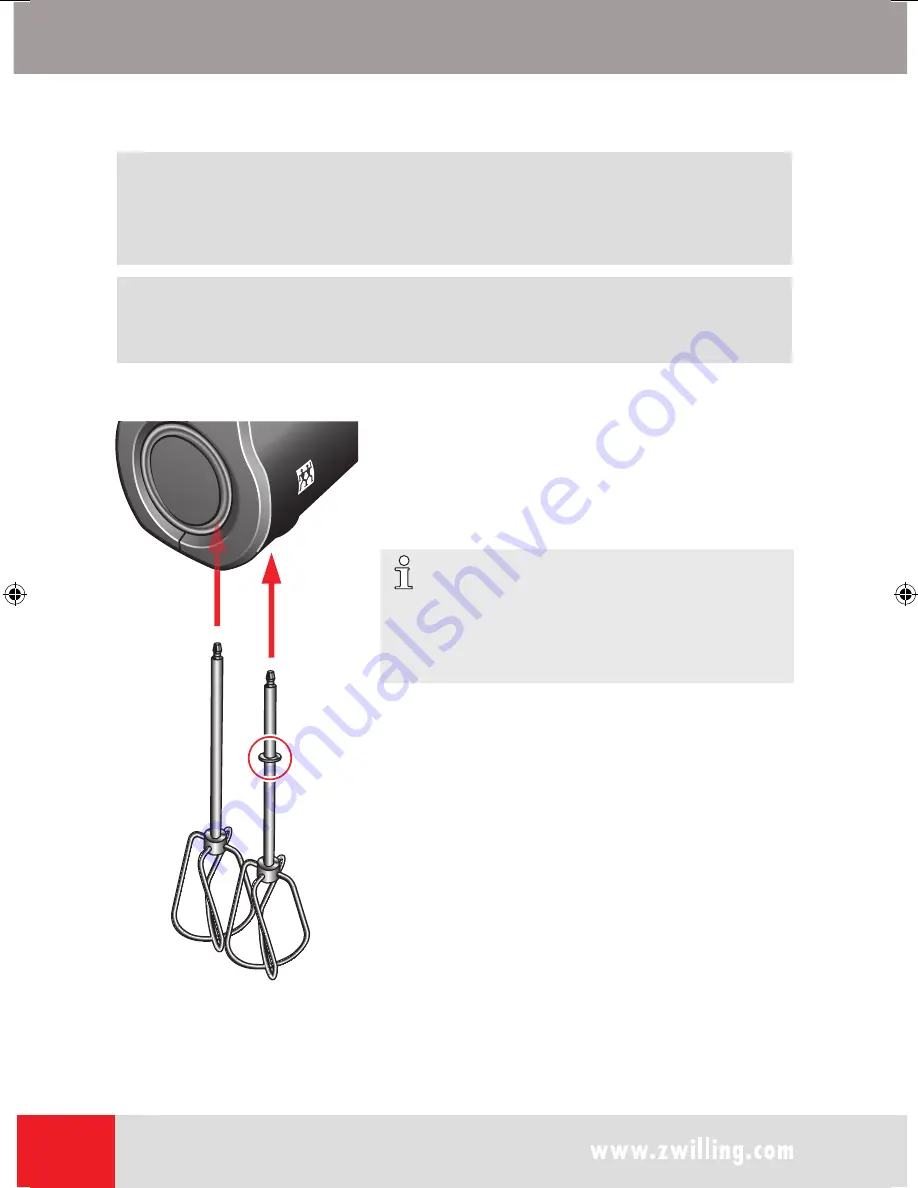
4.2 Attaching accessories

1. Ensure that the plug has been removed from 

the plug socket.

2. 

Set the speed controller to [0] (fig. 2).

3. Guide the accessory into the respective aper-

ture on the bottom of the hand mixer (fig. 3).

IMPORTANT:

Insert the accessory, which is fitted with a spacer 

ring, into the larger aperture on the bottom of 
the hand mixer. It is not possible to insert the 
accessory any other way!

4. Insert the accessory into the aperture until it 

audibly and noticeable clicks into place (fig. 3).


Â

The accessory is ready to use.

Fig. 3: Attaching accessories

ZWILL-43718_Bedienungsanleitung_Handrührgeraet.indb   30

11.07.2018   11:38:39

Содержание 36430-000

Страница 1: ...ZWILLING Hand Mixer Bedienungsanleitung Handr hrger t Operating instructions Hand mixer Manuel d utilisation Batteur lectrique Istruzioni per l uso Sbattitore manuale...

Страница 2: ...2 DE Inhaltsverzeichnis 3 EN Table of Contents 21 FR Sommaire 37 IT Sommario 55...

Страница 3: ...and mixer in detail 27 2 2 Technical specifications 28 3 Before using for the first time 29 3 1 Unpacking 29 3 2 Cleaning accessories 29 4 Operating your hand mixer 30 4 1 Accessories and range of app...

Страница 4: ...is user manual may result in serious inju ry or damage to the hand mixer Read this user manual in its entirety before using the hand mixer Keep this user manual somewhere handy If you pass this hand m...

Страница 5: ...k from rotating accessory parts Insufficient supervision while unplugging the hand mixer from the plug socket Never allow children to play with the hand mixer Cleaning and maintenance of this hand mix...

Страница 6: ...arry this appliance by its power cable Never touch the plug with damp or wet hands Never lift the appliance with damp hands or operate it on a wet surface Never place the hand mixer in water or any li...

Страница 7: ...er touch accessories that are still running Hair mouth tongue hands clothing and jewellery must be kept away from running accessories to prevent injury Do not glue extraneous materials to the applianc...

Страница 8: ...sories or approaching parts that move in use Unplug the appliance before performing work on the appli ance such as cleaning or maintenance as well as when it is not under supervision or in use Only ev...

Страница 9: ...lease button 0 For setting the speed 1 5 E 2 Turbo button For briefly setting speed to maximum 3 Grip For holding and guiding the appliance 4 Power cable with plug For supplying power to the appliance...

Страница 10: ...appliances Fig 2 Speed controller release button and turbo button Description Function E For releasing and attaching accessories 0 Appliance off 1 Minimum speed setting for mixing in dry ingredients a...

Страница 11: ...and 1 Overview and delivery contents and intact IMPORTANT Do not use the hand mixer if parts are missing or damaged Immediately contact the retailer you purchased the hand mixer from or contact custom...

Страница 12: ...ories 1 Ensure that the plug has been removed from the plug socket 2 Set the speed controller to 0 fig 2 3 Guide the accessory into the respective aper ture on the bottom of the hand mixer fig 3 IMPOR...

Страница 13: ...ixer starts working IMPORTANT Begin by mixing ingredients at a low speed before incrementally increasing it to the recommended speed setting for that type of food CAUTION Extended operation leads to d...

Страница 14: ...uld overheating cause the appliance to automatically switch off remove the plug from the plug socket Allow the hand mixer to cool completely and check for possible damage be fore restarting it 4 5 Swi...

Страница 15: ...ve cleaning agents such as thinner alcohol etc to clean the casing 1 Clean accessories with washing up liquid in hot water or in the dishwasher 2 If needed only ever wipe the appliance with a soft sli...

Страница 16: ...with a spacer ring into the larger aperture until it audibly and noticeably clicks into place See 4 2 Attaching accessories The appliance becomes hot while in use and it makes an un pleasant smell The...

Страница 17: ...t with the troubleshooting guide place contact our customer service Zeitlos Service Center c o M R Spedag Group Hirsr tiweg CH 4303 Kaiseraugst Tel 00800 09 34 85 67 This hotline is open from 8 am to...

Страница 18: ...s warranty We reserve the right to make any technical modifications 6 2 Eco friendly disposal CAUTION Correctly disposing of this appliance is an important contribution to protecting the environment...

Страница 19: ...2 0102664Y1_07 18 ZWILLING International GmbH Gruenewalder Strasse 14 22 42657 Solingen Germany www zwilling com...

Отзывы: