background image

FV637 Rev.  A  3/26/2019

Page 5


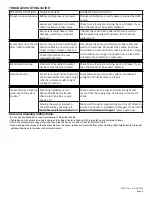
TROUBLESHOOTING GUIDE: 

Care and Cleaning Instructions: 

• 

Do not use any abrasive or chemical cleaners to clean the faucets.

• 

If abrasives or chemicals are used it can lead to dulling of luster, attacking of chrome plating or decorative fi nishes.

• 

ONLY use mildly warm soapy water, and then wipe the device dry with a clean/soft towel or cloth.

• 

Upon cleaning other areas of the restroom be sure the sensor lenses are protected from other cleaning chemicals/solvents to prevent 

potential damages to the sensor and/or electronics.

For further assistance with troubleshooting visit http://www.zurn.com

POTENTIAL SITUATIONS

POSSIBLE CAUSES

SUGGESTED SOLUTION TIPS

Faucet is non-responsive Ba  ery voltage low or no power.

Change out ba  eries or verify power provided by HW6 
or ACA

Sensor and electronic connector 
cable has bent or broken pins.

Check to see if pins are missing, bent, or broken. If yes, 
then the electronic box needs replaced

Sensor lens could have surface 
damage, scratches, or deposit 
build ups.

"Inspect the sensor lens underneath the spout   p. 
May require cleaning with a damp cloth or sensor 
replacement"

Faucet does not ac  vate 
a  er ini  al installa  on

Sensor may not have had enough 

 me to calibrate prior to a user or 

target trying to ini  ate ac  va  on.

Disconnect the sensor and electronic box cables and 
wait for 30 seconds. Reconnect the cables, but allow 
for another 30 seconds before placing hands or a target 
within the sensor range. You should hear a click of the 
solenoid once calibra  on is complete.

Check if protec  ve 

fi

 lm was 

removed from lens.

Water does not stop

Electronics box cable connector 
has bent pins that are shorted

Check to see if pins are missing, bent, or broken. If yes, 
then the electronic box needs replaced.

Ghost Ac  va  on

Sensor lens could be obstructed or 
environmental factors such as high 
re

fl

 ec  ve surfaces and/or bright 

sunlight condi  ons.

Check/clean sensor lens of any debris or buildup If 
sunlight or IR interference is a factor. 

"Sensor faucet is leaking
underneath the sink or
counter"

Moun  ng hardware is not 

 ghtened su

  ciently (faucet 

shank, electronic box, supply 
hoses, etc)

Check and ensure the nuts and joints are   ght and 
secure from the supply stop all the way to the faucet 
shank.

Missing the washer located in 
the solenoid box nut where it 
assembles to the faucet shank.

Make sure the water supply stops are shut o

 . Check to 

ensure the washer is installed or damaged. If not, install 
washer. If a washer is damaged, replace with new.

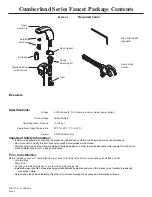
Содержание Cumberland Series

Страница 1: ...warranted for one year We will replace at no costs goods that prove defective provided we are notified in writing of such defect and the goods are returned to us prepaid at Sanford NC with evidence that they have been properly maintained and used in accordance with instructions We shall not be responsible for any labor charges or any loss injury or damages whatsoever including incidental or conseq...

Страница 2: ...dequate water supply for each fixture Flush all water lines prior to making connections Required Tools Cumberland Series Faucet Package Contents Z6956 XL Prior to Installation Before installing your Zurn Cumberland Series Faucet the items listed below should already be installed on site Lavatory sink Drain Line Hot and cold water supply line or pre tempered water supply line Installer Servicer sho...

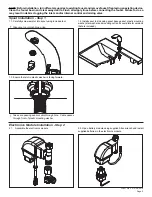
Страница 3: ... washer and mounting nut and cover plate for versions that are included 1 3 Ensure that slot in plastic washer is facing forward 2 1 Assemble the electronics module NOTE Before installation turn off water supplies to existing faucet and remove faucet if replacing an existing device Clean the faucet basin and clear away debris Flush all supply lines before connecting the faucet Failure to do so may...

Страница 4: ...K wire should be connected to the Negative terminal MJ unit sold separately Note Do not connect more than 8 solenoids to a single transformer 2 3 Tighten electronics module assembly to shank and connect water line s 2 4 Ensure that sink is clear of tools debris and is in normal operating condition 2 5 Turn on water supply ies Water supply must be turned on in order for sensor to perform wet calibr...

Страница 5: ...t ac vate a er ini al installa on Sensor may not have had enough me to calibrate prior to a user or target trying to ini ate ac va on Disconnect the sensor and electronic box cables and wait for 30 seconds Reconnect the cables but allow for another 30 seconds before placing hands or a target within the sensor range You should hear a click of the solenoid once calibra on is complete Check if protec...

Страница 6: ...6 XL B L 4 4 Cast Cover Plate w Gasket P6900 CP4 5 8 Cast Cover Plate w Gasket P6900 CP8 6 Mounting Kit P6900 43 7 Filter Kit P6900 120 8 Filter Screen P6900 MV 7 9 Mixing Valve w Filter P6900 XL MV 10 Mixing Tee w Filters and Back Checks P6900 XL MT Description Product No 11 Thermostatic Mixing Valve P6900 TMV 12 Single Stainless Supply Hose XL P6900 SSH 13 Stainless Supply Hoses XL P6900 SSH 2 1...

Отзывы: