17
18
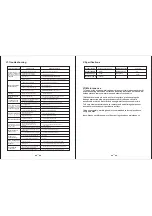
VI.Troubleshooting
Exclusion method
Failure phenomenon
Failure Cause
Check if the socket is charged
Press the reset button
Contact after-sales service to
replace the leakage protection plug
Contact after-sales service to replace the fuse
Screw the bucket cover tightly
Reinstall the seal
Contact the after-sale
s service to replace
t
he
bucket
sewage
Troubleshoot according to the prompt on the
LCD and the voice alarm message
Put the O-ring into the groove correctly
Clean the pipe
Find after-sales troubleshooting
Clean the filter with water
Contact after-sales service
Contact after-sales service
Contact after-sales service
Find after-sales troubleshooting
Find after-sales troubleshooting
Replace
Replace
1.The socket is not powered on
2.Leakage protection plug
reset button is not pressed
3.Leakage protection
plug damaged
4.Fuse is blown
1.Bucket lid not tightened
2.Valve seal damage
Sewage bucket shell broken
Machine malfunction
O-ring not instal
led or misplaced
1.Clogged pipe
2.Po
or pipe sealing
Clogged h
eating water
tank strai
ner filter
Clogged water pipe
1.Heater burned out
2.Damaged control board
1.Damage to the water pipe inside
the machine
2.Loose water pipe in the machine
1.Air purification device damage
2.Activated carbon filter failure
Water purification
bucket leaking
Sewage bucket
leaking
Machine stopped
working
Leakage at the
connection hose
The working head
does not spray water
Water does not heat
Water leakage in
the machine
Exhaust gas
odor is strong
Reinstall the seal
Get an after-sales service to replace
the sewage bucket
3.Rotary cover seal damaged
4.Bucket shell is broken
Tighten connectors and screws
Machineconne
ctor not tightened
or screws not ti
ghtened
Replac
e
filter
deodorization
3.Clogge
d
filter
deodorization
Correctly docked hose and work head,
latch locked
Replace the seal
The connection between the
working head and the hose is
not tight
Sealing ring at the hose joint is aging
Check if there is a seam on the inner thigh
Check whether the package pants are loose
Work head centered on the body's private parts
Need to manually perform 1 stool
process before removing the working head
The fit is not tight
Loose pants
The working head is not centered
on the private part of the body
The volume of poop is small and
does not fall into the stool cavity
Anal flushing
is not clean
VII.Maintenance
7.1Take out the heating water tank partition every time (about one month),
wipe the heating water tank surface and heating water tank partition with
a clean cloth to remove water moss and other attached dirt.
7.2When the machine is not in use for a long time, please unplug the
leakage protection plug, empty the water purification bucket, dirt
bucket, and drain the water in the heating water tank at the same time.
7. 3Every six months time need to replace the deodorizing component
box to achieve the best air purification effect.
7.4Hose assembly, working head is recommended to be replaced once
every 6 months.
Note: Please cut off the power of Host during the above maintenance.
V.Specifications
Product Name
Product Model
Rated Voltage
Maximum power
3RUWDEOH6PDUW%DWK0DFKLQH
=+
220V~
2200W
Rated frequency
Rated current
Use place
50-60HZ
9A
Indoor
After plugging in the
p o w e r, p r e s s t h e
o n / o f f b u t t o n
machine does not
respond
T h e m a c h i n e i s
r u n n i n g a n d t h e
e x c r e m e n t i s n o t
collected properly
L e a k a g e a t t h e
working head and
hose joint
Side leakage when
working head and
body fit


