background image

a3k@zumimall.com

13

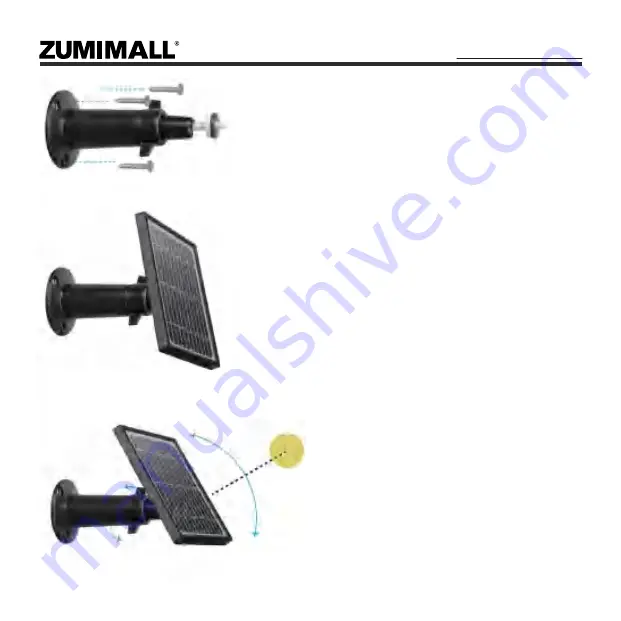
Mount the bracket with the mounting template

and the screws provided in the package

Step 2:

Slot the solar panel into the bracket and

make sure it's secure

Step 3:

Step 4:

Loosen the adjusting control on the bracket

and adjust the angle of the solar panel to

make it receive direct sunlight, and then

retighten the adjusting control to secure your setting

Содержание A3K

Страница 1: ...Get Smarter about your Security QUICK START GUIDE WIRELESS I WIFI I OUTDOOR I SECURITY a3k zumimall com A3KBATTERY POWERED CAMERA...

Страница 2: ......

Страница 3: ...low We will provide you with the best possible solution within 24 hours All your feedback issues or problems help improve our service and product quality Register via link below to get 3 Years Warrant...

Страница 4: ...Camera Installation P6 7 Monitoring Area P7 8 Important Notes P7 9 Device Menu P8 10 Camera Settings P9 11 PIR Body Detection P9 10 11 1 Body Detection Alarm Setting P9 11 2 Alarm Notifications P10 1...

Страница 5: ...ount For Camera 1 Iron Ball Wall Mount 1 Double Sided Adhesive 2 Quick User Guide 1 Screws Set 2 USB Cable 1 1 What s in the Box a3k zumimall com 1 Get Smarter about your Security QUICK START GUIDE WI...

Страница 6: ...on power off Keep pressing for 5 seconds to reset and restart Awaiting Wi Fi connection ready for adding devices Wi Fi connecting Network problem Wi Fi connected camera running normally AP mode 2 Cam...

Страница 7: ...r data and wireless LAN otherwise it will fail to connect the camera 2 Allow ZUMIMALL to receive pushed messages otherwise the phone will not receive alarms when motion is detected 3 Download Install...

Страница 8: ...5 1 1 Insert Mirco SD card NOT included when the camera is off for saving videos caused by motion detection automatically Supports up to128GB 5 1 2 Camera only works with 2 4G Wi Fi not support 5G 4...

Страница 9: ...e reset the device Next Input Wi Fi Password Prepare the Scanning Scan QR Code When Indicator Flashing Slowly in Red Finished Installation When Reaches 100 5 50 Wi Fi Setup Select your Wi Fi network P...

Страница 10: ...the camera with the bracket Step 3 Adjust the viewing angle of the camera Outdoor Metal Mount Step 1 Fix the bracket to where you want to install the camera with the supplied screw Step 2 Connect the...

Страница 11: ...nsfer vents of the projectors etc Keep the camera at least 1 meter away from any wireless devices to avoid interference such as microwave stove Wi Fi routers and etc 8 Important Notes for Reducing Fal...

Страница 12: ...ot Button Body Detection On Off Notification History Cloud Storage Record Video to Phone Two Way Talk Zoom Time Bar History Screenshot Alarm Record Album Date of History Record 5 51 Devices Devices Me...

Страница 13: ...etection Tap on Set it up Select Alarm Setting 5 51 Settings Receive Alert Notifications Device Share Device Information Basic Function Alert Settings SD Card Cloud Storage Service Delete the Device D...

Страница 14: ...lick to Delete History 5 51 060238708 Motion Detection 2020 10 12 15 30 10 Motion Detection 2020 10 12 10 32 12 2020 10 12 15 30 10 2020 10 12 10 32 12 Noise Detection 92db 2020 10 12 10 32 09 2020 10...

Страница 15: ...ttery which can be used for 2 5 months assuming the camera wakes up15 times per day and plays video for 10 minutes 13 2 When the battery level is less than 20 the APP will send you reminding messages...

Страница 16: ...panel only needs a few hours of direct sunlight to sufficiently power your camera daily The amount of energy that the solar panel can produce is affected by weather conditions seasonal changes geograp...

Страница 17: ...ed in the package Step 2 Slot the solar panel into the bracket and make sure it s secure Step 3 Step 4 Loosen the adjusting control on the bracket and adjust the angle of the solar panel to make it re...

Страница 18: ...ase don t install the solar panel completely horizontally Otherwise your solar panel might accumulate dust and other debris easily It s advised to install the solar panel angularly to make it receive...

Страница 19: ...0 10 060552692 Add a Camera 5 51 Devices Devices Messages Me 060238708 2020 10 08 14 50 10 Tips Are you sure you would like to delete this device Ccancl OK 5 48 Devices Devices Messages Tap to add a n...

Страница 20: ...t camera sensitivity to HIGH The moving objects may appear from the corner of camera coverage please adjust the lens angle Adjust the camera alarm sensitivity to Low Make sure motion detection is turn...

Страница 21: ...140MM 140MM 128G...

Страница 22: ...1A 2A phone charger LED turns to be red means your camera is charging correctly Make sure USB power cable and the phone charger both work well Phone system version is too low or too high Make sure to...

Страница 23: ...Please Email us for Better Solution before returning any unqualified product to Amazon a3k zumimall com THANK YOU...

Страница 24: ......

Страница 25: ......

Отзывы: