background image

Configuring BlueDV 

1.


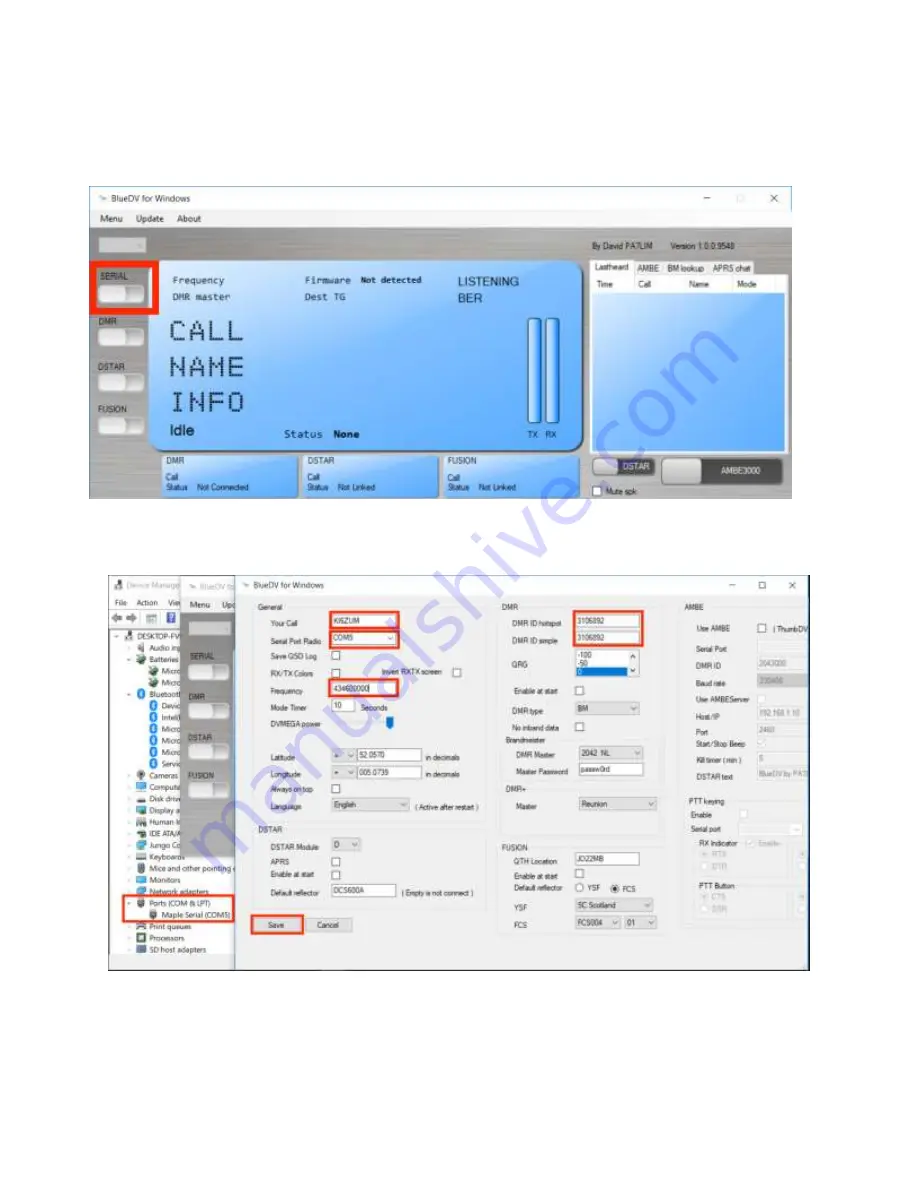
Launch the software and turn off “SERIAL” if it is already enabled. 

2.


Next select “Menu” -> “Setup”.  As a minimum, set “Your Call”, the “Serial Port Radio”, “DMR 
ID” and “Frequency”. Next select “Save” 


3.


NOTE: 

If you reconnect the ZUMspot to another USB port, it may enumerate under a different 

COM port. So whenever you reconnect, double check your “Setup” with the COM port under 
Windows Device Manager.  


Содержание ZUMspot-USB

Страница 1: ...B has all of the capabilities of the regular ZUMspot all packaged up in a nice clear USB dongle case Because of the USB interface it takes up less space It is made to work with a PC but it can also interface with a Raspberry Pi through a USB port ...

Страница 2: ...V 4 Installing device drivers 7 macOS Setup 12 Installing Crossover 12 Installing BlueDV Prerequisites 13 Installing BlueDV 22 Modifying COM Port 27 Finishing the setup of BlueDV 32 Setup Pi Star 35 WiFi 35 Ethernet 38 Configuration 38 Configuration example to enable D Star 39 Finished 40 Support 40 ...

Страница 3: ... for the board have loaded there should be a new COM port displayed Make a note of that port number You may have to manually load the drivers on machines running Windows 7 and earlier or if there is a yellow exclamation point Follow the Installing device drivers section later in this document Windows Software For more information about BlueDV visit the website of David PA7LIM https www pa7lim nl b...

Страница 4: ...ect Menu Setup As a minimum set Your Call the Serial Port Radio DMR ID and Frequency Next select Save 3 NOTE If you reconnect the ZUMspot to another USB port it may enumerate under a different COM port So whenever you reconnect double check your Setup with the COM port under Windows Device Manager ...

Страница 5: ...4 Next turn SERIAL back on 5 If the USB connection to the ZUMspot USB is functional the software should display the Firmware version of the ZUMspot ...

Страница 6: ...6 For DSTAR turn on the DSTAR button select the reflector REF you wish to connect to and then select Link 7 Once connected to the reflector the software will display info when others are transmitting ...

Страница 7: ...he Maple device the device drivers need to be manually installed 2 Download the drivers from GitHub 3 https github com rogerclarkmelbourne Arduino_STM32 archive master zip 4 Extract the files from the zip file and go to the drivers win folder 5 Run the install_drivers bat file ...

Страница 8: ...6 Click Yes to allow the driver installer to run 7 You will see the installing driver s message ...

Страница 9: ...8 Click Yes to allow the second driver installer to run 9 You will see the installing driver s message ...

Страница 10: ...10 When the installation is done Press any key to continue 11 The drivers will now load for the ZUMspot USB When done you should see the Device driver software installed successfully message ...

Страница 11: ...12 Now you should see a Maple Serial com port with no yellow exclamation point ...

Страница 12: ...m products crossover mac 2 Use free trial or enter purchase info 3 Open folder where Crossover was downloaded into Usually it s the Downloads folder 4 Unzip Crossover zip Double click on Crossover zip so that Archive Utility can unzip it if you haven t already 5 Drag the file Crossover app and drop it over Applications This installs Crossover on your Mac ...

Страница 13: ...Installing BlueDV Prerequisites 1 Open Crossover a Click on Finder b Go to the Applications folder c Double click on the Crossover app 2 Click on Install a Windows Application ...

Страница 14: ... tab type in NET 4 5 and select Microsoft NET Framework 4 5 Then press Continue 4 Select New Windows 7 64 bit Bottle Then change bottle name to something like NET for BlueDV or whatever you would like to call it Then press Continue ...

Страница 15: ...5 Press Install 6 Click Next ...

Страница 16: ...7 Click check box to accept license agreement and then click Install 8 Click Finish ...

Страница 17: ...9 Click check box to accept license agreement and then click Install 10 Press Exit ...

Страница 18: ...11 Click Restart Now 12 Click check box to accept license agreement and then click Install 13 Click Finish ...

Страница 19: ...14 Click Restart Now 15 Click Continue 16 Click check box to accept license agreement and then click Install ...

Страница 20: ...17 Click Finish 18 Click Restart Now 19 Click Done to conclude the installation ...

Страница 21: ...20 You should see something like this If so then you have successfully installed NET 4 5 ...

Страница 22: ...are pa7lim nl BlueDV BETA Windows 2 Extract the MSI from the zip file Double click on BlueDV 09548 preBETA zip so that Archive Utility can unzip it 3 Click on Install a Windows Application 4 Under the Select Application tab type in BlueDV and select Unlisted application BlueDV Then press Continue ...

Страница 23: ...5 Click on Choose Installer File 6 Navigate to where you downloaded BlueDV Select the BlueDV MSI file and press Use this Installer Then press Continue ...

Страница 24: ...7 Go to the Select Bottle tab Select the NET for BlueDV bottle from previous steps Then press Continue 8 Press Install ...

Страница 25: ...9 Click on Next 10 Select Just me and then press Continue ...

Страница 26: ...11 Click on Next 12 Press Close on the last pop up window ...

Страница 27: ...d the BlueDV icon to the taskbar by dragging and dropping it there 15 To run BlueDV just click on the icon in the taskbar or double click from within Crossover Modifying COM Port 1 Open Crossover 2 Select the bottle where you installed the NET 4 5 and BlueDV ...

Страница 28: ...3 Double click on Run Command 4 Type in Regedit into the Command section Then click on Run ...

Страница 29: ...5 Within Regedit navigate to HKEY_LOCAL_MACHINE Software Wine Ports 6 Right click For trackpad users press down with two fingers on Ports Then go to New String Value ...

Страница 30: ...7 Type in com1 into the string value 8 Open the Terminal app Easiest way to do it is by clicking on the Spotlight icon on the top right corner of your screen Then type Terminal and then press Enter ...

Страница 31: ...lug in the ZUMspot USB into one of the USB ports on your Mac 11 Go back to Terminal and type in ls dev tty usb and press Enter The following line will show you the full name macOS gives to your ZUMspot Copy that line and paste it into the Value data field Then click OK ...

Страница 32: ... under a different name So always insert it into the same USB port or you will have to go through the previous steps all over again to set it up with a different name Finishing the setup of BlueDV 1 Open BlueDV by clicking on the icon in the taskbar or double click from within Crossover 2 Launch the software and turn off SERIAL if it is already enabled ...

Страница 33: ...et Your Call the Serial Port Radio DMR ID and Frequency Next select Save NOTE If you reconnect the ZUMspot to another USB port it may enumerate under a different COM port If so you will need to update the settings 4 Next turn SERIAL back on ...

Страница 34: ...are should display the Firmware version of the ZUMspot 6 As an example for DSTAR turn on the DSTAR button select the reflector REF you wish to connect to and then select Link 7 Once connected to the reflector the software will display info when others are transmitting ...

Страница 35: ... Pi Star Setup Connect to it When asked for the Wi Fi password type in raspberry After 3 minutes go to your web browser Chrome Firefox etc and connect to the website http pi star for Windows Linux and Android devices http pi star local for OS X and iOS devices You should see this page Go to Configuration You will be asked to put in the default username which is pi star and the default password whi...

Страница 36: ... Select Configure WiFi and then click on Scan for Networks 10 secs Select your WiFi SSID and enter your password ...

Страница 37: ... Click on Save and connect to save the WiFi configuration Reboot your Raspberry Pi Now you can continue on the Configuration section below ...

Страница 38: ...ices You should see this page Go to Configuration You will be asked to put in the default username which is pi star and the default password which is raspberry Configuration Change the Node Callsign to your own set the Radio Modem Type to ZumSpot USB Stick set the System Time Zone to your timezone and set the Dashboard Language to the language you prefer Click Apply Changes when you are done When ...

Страница 39: ...Configuration example to enable D Star Now you can turn on D Star by selecting the D Star Mode switch and clicking Apply Changes ...

Страница 40: ...using Pi Star in this document https amateurradionotes com images 1 Playing_with_Pi Star pdf Support MMDVM Yahoo group https groups yahoo com neo groups mmdvm conversations messages Pi Star support forum https forum pistar uk Pi Star Facebook support group https www facebook com groups pistar Pi Star Wiki http wiki pistar uk ZUM Radio Facebook group https www facebook com groups 249802742395450 ...

Отзывы: