background image

24 Confidential and Proprietary Information of ZTE CORPORATION


Click 

Apply

 to confirm your configuration. 


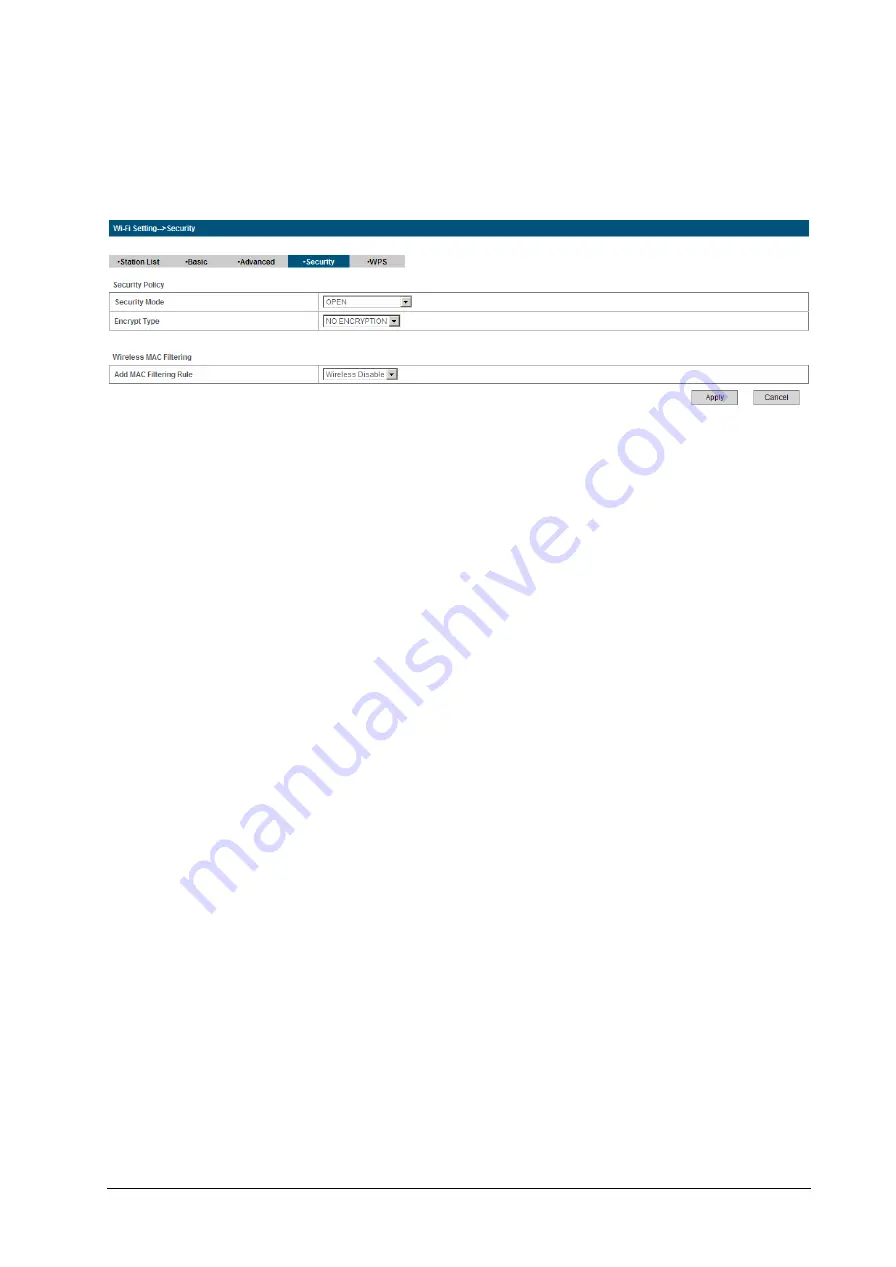
Security 

Select 

Wi-Fi Setting > Security

, the Security parameters are shown in the following figure: 


Unless  one  of  these  encryption  modes  is  selected,  wireless  transmissions  to  and  from  your  wireless 
network can be easily intercepted and interpreted by unauthorized users. 

The security modes are described below: 


Open

: You can authenticate successfully with a SSID, whether it is valid or empty. 


Shared

:  The  WLAN  clients  who  have  the  same  WEP  key  with  wireless  gateway  can  pass  the 

authentication and access the wireless network. 


WEPAUTO

: Select WEP security automatically. 


WPA-PSK

: WPA  Pre-Shared Key,  Enter  the  Pre-Shared  key  as  a  plain text  (ASCII)  pass-phrase  of at 

least 8 characters. 


WPA2-PSK

: It is the securer version of WPA with implementation of the 802.11i standard. 


WPA-PSK/WPA2-PSK

: Apply both the WPA-PSK and WPA2-PSK scheme. 

If  the  Authentication  type  is 

Open

Shared

WEPAUTO, 

the  bottom  part  of  the  configuration  page 

displays parameters as shown. 


WEP Keys

: At most four keys can be set in the blank. Choose the primary key index. The primary key is 

the only key in use at a given time. Whatever keys you enter for an access point, you must also enter the 
same keys for the client adapter in the same order. In other words, WEP key 1 on the AP must match 
WEP key 1 on the client adapter, WEP key 2 on the AP must match WEP key 2 on the client adapter, 
etc. Select 

Hex

 if use 10 or 26 hexadecimal numbers (0

9, a

f or A

F). Select 

ASCII

 if use 5 or 13 

ASCII characters (case-sensitive). 

If  the  Authentication  type  is 

WPA-PSK

  , 

WPA2-PSK 

or

  WPA-PSK/WPA2-PSK 

,  the  bottom  part  of 

the configuration page displays WPA parameters.   


WPA Algorithm

TKIP

AES

 or 

AUTO


Pass phrase

: You can input hexadecimal digits up to 64 characters or input ASCII characters choose a 

length of 63 characters or less. 


Key Renewal Interval

: Define how long the key should be renew. 

You can set 

Wireless MAC Filtering


Wireless Disable

: If disabled, MAC address is not used to control network access. 


Wireless Allow

: Set the MAC address that is allowed to access network. 


Wireless Reject

: Set the MAC address that is not allowed to access network. 

Click 

Apply 

to confirm your configuration. 

Содержание MF25A

Страница 1: ...MF25A User Manual ZTE CORPORATION NO 55 Hi tech Road South ShenZhen P R China Postcode 518057 Tel 86 755 26779999 http www zte com cn E mail mobile zte com cn ...

Страница 2: ... any form or by any means electronic or mechanical including photocopying and microfilm without the prior written permission of ZTE Corporation The manual is published by ZTE Corporation We reserve the right to make modifications on print errors or update specifications without prior notice Version No R1 0 Edition Time Feb 2012 Manual No 079584503XXX ...

Страница 3: ...nal Power 7 Switching on Your Device 7 Power Supply 8 Voice 9 Making a Call 9 Answering a Call 9 Internet Access 10 Preparation 10 Establishing a connection between your device and the client 10 Accessing the Internet 11 Accessing the Internet by Bridge Mode 11 Accessing the Internet by Cable Broadband 11 Accessing the Internet by 3G Gateway 12 Accessing the WebGUI Configuration Page 12 Login 13 O...

Страница 4: ...Advanced 29 Usage of WPS 32 Logout 32 Troubleshooting 33 Technical Parameters 34 Technical Parameters 34 Glossary 35 ...

Страница 5: ...y ZTE Unauthorized accessories may affect the router performance damage the router or cause danger to you Do not attempt to dismantle the router There are no user serviceable parts Do not allow the router or accessories to come into contact with liquid or moisture at any time Do not immerse the router in any liquid Do not place objects on top of the router This may lead to overheating of the devic...

Страница 6: ...Rules Operation is subject to the following two conditions 1 This device may not cause harmful interference and 2 this device must accept any interference received including interference that may cause undesired operation Caution Changes or modifications not expressly approved by the manufacturer could void the user s authority to operate the equipment NOTE This equipment has been tested and found...

Страница 7: ...r as below Adapter mfg ZTE Corp Adapter model STC A2O120150C55 A I P 100 240V 50 60Hz 0 8A O P 12V 1 5A The plug considered as disconnect device of adapter Limited Warranty This warranty does not apply to defects or errors in the Product caused by i Reasonable Router Appearance Disfiguration ii End User s failure to follow ZTE s installation operation or maintenance instructions or procedures iii ...

Страница 8: ...es including but not limited to lost profits interruption of business cost of capital cost of substitute facilities or product or any downtime cost Emergency Call Do not rely on the Router to provide emergency call in all situations Your Router only supports emergency dialing when there is power and connection to the mobile network If the power fails the router can not work If you have no network ...

Страница 9: ...R ON External power supply works normally OFF External power supply is disconnected or power off WIFI ON WLAN works normally with no data transmission Blinking WLAN works normally with data transmission OFF WLAN works abnormally or this WLAN function is disabled PHONE Off Not in use Blinking On Dialing or there is an incoming call the phone is ringing On In calling PPP ON WAN connection establishe...

Страница 10: ...g LAN port is connected Blinking The corresponding LAN port is connected with data transmission Off No network cable connected Interface Description 1 Phone Standard RJ11 connector for Telephone 2 LAN Ethernet connections to computer 3 Reset To restore factory default configurations after pressing for 5 seconds 4 POWER Connection to the external power supply 5 On Off Turn the router On or Off 6 WP...

Страница 11: ...rage You are using the correct U SIM card Connecting to Phone Connect the telephone to the PHONE interface with a phone cable RJ11 Connecting to Computer Connect your computer to the LAN interface with an Ethernet cable RJ45 Notes The router will adapt the Ethernet cable style crossover or straight automatically Connecting with External Power Connect the external power adaptor to a standard power ...

Страница 12: ...ill hear the prompt like The number you have dialed is currently unavailable If the 2G 3G LED is blinking constantly try to move the router to another location The router takes 1 2 minutes to initialize attach to the network and obtain an IP address Power Supply For normal operation connect the router to the external power adapter In case of power failure or when there is no available external pow...

Страница 13: ...n the RF signal is unavailable Change the location of the router and make sure nothing is blocking it Making a Trunk Call If you are making a trunk call add the area code as normal E g 03 9612 3456 Making an International Call If you are making an international call key in the international access code followed by the country code area code and number E g 00 11 64 12 345678 Answering a Call When t...

Страница 14: ...et cable 1 Connect your device and the client with the RJ45 Ethernet cable 2 Power on your device The connection between your device and the client will be established successfully a moment later Via Wi Fi 1 Power on your device directly It will take 1 2 minutes to initialize and then Wi Fi LED is blinking 2 Use your normal Wi Fi application on the client to search the available wireless network N...

Страница 15: ... your device and the client will be established successfully Accessing the Internet Before accessing the internet make sure 1 Switch on the device 2 Establish a connection between your device and the client Accessing the Internet by Bridge Mode 1 Login the WebGUI and set the Operation Mode as Bridge mode 2 Connect the device with LAN Accessing the Internet by Cable Broadband 1 Login the WebGUI and...

Страница 16: ...I and set the Operation Mode as 3G Gateway 2 Set WAN Connection in WebGUI Accessing the WebGUI Configuration Page 1 Make sure the connection between your device and the client is correct 2 Launch the internet browser and enter http 192 168 0 1 in the address bar Notes It is recommended that you use IE 7 0 or later Firefox 3 0 or later Opera 10 0 or later Safari 4 0 or later or Chrome 10 0 or later...

Страница 17: ...red language and input the password the default Password is admin Click Login to log in the device Notes If you check Save after type in password the device will save it Next time when you want to login the device with the same password what you need to do is click Login When you login the following interface appears ...

Страница 18: ...operation in the related areas Index area Show the configuration list for your device Content area Show the detailed configuration System Information Area Show the system status and different kinds of tips Operation Mode When you first login the webGUI you need to choose the operation mode to make the correct setting There are three operation modes ...

Страница 19: ... Apply to finish the setting WAN Connection In Cable Broadband mode Click WAN Connection you can configure how to connect to the Internet The following table just for your reference shows you how to confirm which method you need use to go to Internet WAN Mode Description PPPoE Your service provider gives you the User Name and Password Static Your service provider gives you the static address infor...

Страница 20: ...e are three connection modes Auto Connect The router will automatically connect to WAN when it is powered on On Demand Connect The connection will be established when data transmission is required Router will disconnect from the Internet if there is no data traffic going through during the Max Idle Time Manual Connect Connect to Internet or disconnect from Internet manually ...

Страница 21: ...G Gateway mode Sending new SMS 1 Select SMS New Message to access the following figure 2 Enter the recipient s phone number 3 Enter a message 4 Click Send to send the message Operating Messages in native You can check the messages saved in your device Inbox Select SMS Inbox to access the following figure All the received messages saved in your device will be displayed here Click View to view the s...

Страница 22: ...e displayed here Drafts Select SMS Drafts to access the following figure All the drafts saved in your device will be displayed here Click View to access the edited interface of selected message then click Send to send it Settings Do not modify any settings unless instructed by your service provider Please disconnect the device from the network before change the settings 3G Settings Wireless Info S...

Страница 23: ...work Select the Band Selection Mode is shown in the following figure Automatic Device searches for available network WCDMA Only Device searches for WCDMA network only GSM Only Device searches for GSM network only Click Apply to confirm your configuration APN Setting Select Settings 3G Settings APN Setting the APN parameters are shown in the following figure ...

Страница 24: ...matically obtain parameters Authentication Password Authentication Protocol PAP provides a simple method without encryption for the peer to establish its identity using a 2 way handshake Challenge Handshake Authentication Protocol CHAP is used to periodically verify the identity of the peer using a 3 way handshake User Name User name is used to obtain authentication from the ISP when the connectio...

Страница 25: ...a network WLAN Broadcast Network Name SSID Disable or Enable Default this function If Enable is selected the router broadcasts the SSID and other devices can detect and connect to it AP Isolation When Enabled is selected each of your wireless clients will not be able to communicate with each other BSSID MAC address of the Wi Fi Frequency Channel Choose the appropriate channel to optimize the perfo...

Страница 26: ...outer Only Repeater Mode and Bridge Mode need this The HT physical Mode parameters are shown below Operating Mode In Mixed Mode packets are transmitted with a preamble compatible with the legacy 802 11a g the rest of the packet has a new format In Green Field high throughput packets are transmitted without a legacy compatible part Channel Bandwidth Set the HT physical channel bandwidth Guard Inter...

Страница 27: ...t data flow only minor modifications are recommended TX Power Transmit power should be remained as the value of 100 Short Preamble The length of CRC block in the frames during the wireless communication Shot Slot To indicate that 802 11g is using a shot time slot because there is no legacy station 802 11b present Tx Burst Tx burst allows router to deliver better throughput in the same period and e...

Страница 28: ...page displays parameters as shown WEP Keys At most four keys can be set in the blank Choose the primary key index The primary key is the only key in use at a given time Whatever keys you enter for an access point you must also enter the same keys for the client adapter in the same order In other words WEP key 1 on the AP must match WEP key 1 on the client adapter WEP key 2 on the AP must match WEP...

Страница 29: ...find the PIN code in AP PIN field of WPS Summary the other way is set the client s PIN code in Client PIN field PBC Press the WPS button of the router or select PBC and then click Apply Press WPS button on the client wireless adapter within two minutes and the negotiation process will be established Firewall You may setup firewall rules to protect your network from virus worm and malicious activit...

Страница 30: ...red Dest IP Address Set the destination IP address that will be filtered Source IP Address Set the source IP address that will be filtered Protocol Set which protocol will be used for filtering Dest Port Range Set the destination port numbers that will be filtered Source Port Range Set the source port numbers that will be filtered Action Set how to handle the packet if it matches with the rule Com...

Страница 31: ... the Mac IP Port Filtering area 4 Click Apply in the Mac IP Port Filtering area URL Filtering You can setup content filter to restrict the improper content access Select Firewall URL Filtering the URL Filtering is shown in the following figure Type URL address and then click Add to add the URL address into the filtering list The new URL filtering item will be shown in the Current Webs URL Filters ...

Страница 32: ... to confirm your configuration DMZ You can setup a De militarized Zone DMZ to separate internal network with the Internet Select Firewall DMZ the DMZ setting is shown in the following figure If you select Enable set the DMZ IP Address and then click Apply to confirm your configuration System Security You can configure system firewall to protect AP or router from being attacking Select Firewall Sys...

Страница 33: ...ect Settings Advanced Status the system information is shown in the following figure Management Select Settings Advanced Management the administrator settings information is shown in the following figure You can change the administrator s password Click Apply to confirm your configuration Restore Select Settings Advanced Restore click Restore to set all the settings to their factory default values...

Страница 34: ...e Note Pin Manage can be used in 3G Gateway mode Select Settings Advanced PIN Manage the PIN manage is shown in the following figure If you select Modify the modification parameters are shown in the following figure Type the old PIN code and then type two times the new PIN code Click Apply to confirm your configuration ...

Страница 35: ...AN interface Subnet Mask Subnet mask for the IP address MAC Address MAC address for the LAN interface DHCP Server Enable or disable DHCP Server function DHCP IP Pool Allocate begin and end IP address for IP pool DHCP Lease Time Define how long the leased IP address will be expired and will relocate new IP address Click Apply to confirm your configuration Upgrade Firmware Select Settings Advanced U...

Страница 36: ...ally after WPS has been available Please do the following 1 Start up your device 2 Launch the client device connected to your device 3 Enable the WPS function of your device 4 Enable the WPS function of the client Notes For the detailed operations about the client please refer to the client s instruction Logout Select Logout a pop up window will appear as the following figure shown Click OK to log...

Страница 37: ...nd try again If you are connected to the internet using the 2G GSM network please disconnect this first After dialing the last digit I hear nothing silence When you have finished dialing you can press the key or wait 4 8 seconds to connect the call I can t make or receive a call when I am surfing on the net If you are connected using the 2G GSM network then you cannot surf the net and make a phone...

Страница 38: ...al Parameters Technical Parameters Network Frequency Band EDGE GPRS GSM 850 900 1800 1900MHz HSUPA HSDPA UMTS 850 900 1900 2100MHz Power Adapter Input 100V 240V AC 50 60Hz Output 12V DC 1 5A Data Service HSPA 5 76Mbps UL HSDPA 21Mbps DL Dimensions W H D 150mm 120mm 25mm Weight About 300g ...

Страница 39: ...ral Packet Radio Service HSDPA High Speed Downlink Packet Access HSUPA High Speed Uplink Packet Access IP Internet Protocol LAN Local Area Network LED Light emitting Diode MHz Megahertz MTU Maximum Transmission Unit PDP Packet Data Protocol PIN Personal Identification Number PPP Point to Point Protocol PSTN Public Switched Telephony Network PUK PIN Unlocking Key RSSI Radio Signal Strength Indicato...

Отзывы: