background image


ZTE Blade V2 (A476) Quick Start Guide


ZTE Australia is on Facebook , , Twitter and Instagram   


Copyright © 2015 by ZTE Corporation. AU Ver 1.0 Oct. 2015 

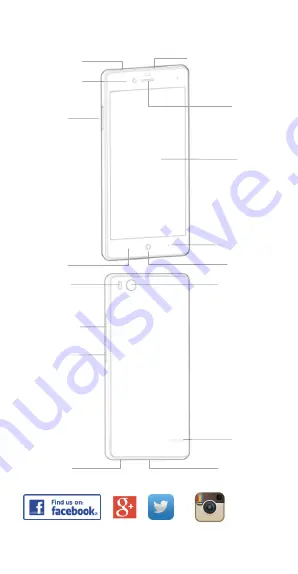
Front camera 
 

Display 


Options key


Home key


Back key


Back camera


Volume keys 


Flashlight 

Power key 

Microphone 

Card tray 
 

Headset jack 

Noise-reduction MIC 

Speaker 

Earpiece 


USB port 

Содержание Blade V2 (A476)

Страница 1: ...book Google Twitter and Instagram Copyright 2015 by ZTE Corporation AU Ver 1 0 Oct 2015 Front camera Display Options key Home key Back key Back camera Volume keys Flashlight Power key Microphone Card tray Headset jack Noise reduction MIC Speaker Earpiece USB port ...

Страница 2: ...o the phone Important Notes 1 Two SIM cards cannot support 3G network at the same time When one SIM card supports 3G network the other SIM card supports GSM network only 2 Only one card supports data service When one card is used for data service the other card cannot be used for data A nano SIM card is a small SIM card Do not use a micro SIM or SIM card adaptor which may damage your device Insert...

Страница 3: ...ent screen Hold down to see the recently used applications Volume Keys Use to control the volume Up and Down Vibrate and Silent mode Media and Earpiece Volumes Phone icon Open the dialler for Calls Contacts Access your Phonebook Contacts Messages Messages app for SMS and MMS Apps Open the Applications menu Switch your device On or Off Press and hold the Power Key to turn on your phone If your scre...

Страница 4: ...gs Battery and check the Percentage box Volume Controls From the Home screen the volume keys control the Ring volume Vibrate and Silent From within a game or media app the volume keys control the media volume If you are on a Call the volume keys control the in call earpeice volume Setting Up for the First Time When you first power on your phone or after a factory reset you need to enter some setti...

Страница 5: ... as it is written The Home Screen Settings Touch the Settings icon on the home screen Screen Locks You can secure your handset with a variety of different screen locks Go to Settings Security Screen Lock to set a Pattern PIN or Password to lock your front screen Change your Ringtone and other Audio Settings Press Settings Sound notification Phone Ringtone Default Notification sound Vibrate mode et...

Страница 6: ... Ringer off Emergency calls only Microphone off muted Battery flat Vibrate on Battery low Speaker on Battery partially drained Connected to Wi Fi network Battery full Wi Fi data in use Battery charging Headset connected Bluetooth on Access the Quick Settings Panel Swipe down from the top of the screen and touch the Quick Setting icon Tap to enable or disable the features ...

Страница 7: ...ading data Call in progress USB tethering is on USB connected Wi Fi hotspot is on Song is playing Bluetooth is on Updates available Making Calls 1 Touch Home Key Touch to open the Dial pad 2 Enter the phone number using the dial pad Touch to delete wrong digits 3 Press Options to add a Pause or Wait if required 4 Press and hold the 0 key to enter the plus symbol for international dialling 5 Touch ...

Страница 8: ... Dialler Options Settings General Quick responses TIP You can silence the incoming ring by pressing either of the Volume keys Messaging Use Messaging to exchange text messages SMS and multimedia messages MMS Open the Messaging Screen Touch in the Home Screen or from Apps The Messaging screen opens where you can create a new message search for messages or open an ongoing message thread 1 Touch to w...

Страница 9: ...Message Details 1 Touch and hold a message in a thread 2 Touch View message details to see the message type sender or receiver time and date Send a Multimedia Message On the Messaging screen touch at the bottom to create a new message Enter the recipient and the text of the message as you do when sending a text message Touch the icon to add an attachment Touch to Send TIPS The default MMS size is ...

Страница 10: ... to reply to the whole group MMS requires the sender and receiver to have an active data account Users without data will not receive the MMS Transfer files to a Computer Connecting to a computer enables you to transfer music pictures and other files to and from your handset There are various ways to do this 1 Connect using a USB lead First time select Built in CDROM to install the handset drivers ...

Отзывы: