Zte Blade A3 Prime Скачать руководство пользователя страница 13


13 

Installing a nano-SIM Card and an 

Optional microSDXC Card 

The nano-SIM card can be installed or removed while the phone is 
turned on. 


WARNING!  

To avoid damage to the phone, do not use any other kind of SIM cards, 
or any non-standard nano-SIM card cut from a SIM card. You can get a 
standard nano-SIM card from your service provider. 
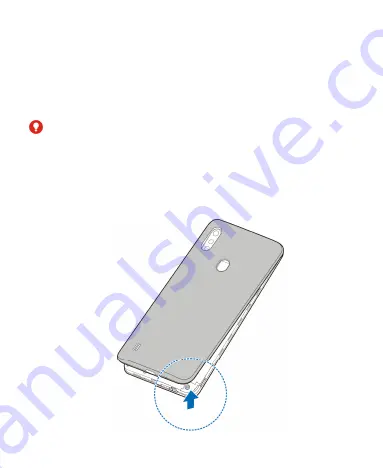
1.


Place your finger in the cut-out at the bottom right of the battery 
cover to lift and remove it.


Содержание Blade A3 Prime

Страница 1: ...User Guide ...

Страница 2: ...ht to make modifications on print errors or update specifications in this manual without prior notice This manual has been designed with the utmost care to ensure the accuracy of its content However all statements information and recommendations contained therein do not constitute a warranty of any kind either expressed or implied We offer self service for our smart terminal device users Please vi...

Страница 3: ...demarks of ZTE Corporation LTE is a trademark of ETSI Android is a trademark of Google LLC The Bluetooth word mark and logos are registered trademarks owned by the Bluetooth SIG Inc and any use of such marks by ZTE Corporation is under license microSDXC Logo is a trademark of SD 3C LLC Other trademarks and trade names are those of their respective owners Version No R1 0 Edition Time May 11 2020 ...

Страница 4: ...g the Screen and Keys 17 Getting to Know the Home Screen 19 Personalizing 21 Changing the System Language 21 Setting the Date and Time 21 Changing the Ringtone Notification Sound or Alarm Sound 22 Turning System Sounds On Off 23 Adjusting Volumes 23 Switching to Silent or Vibration Mode 23 Using Do Not Disturb Mode 24 Applying New Wallpapers 25 Setting the Home Screen Options 26 Changing the Scree...

Страница 5: ...ortcuts 39 Notification Dots App Badges 40 Editing Text 41 Opening and Switching Apps 41 Using Two Apps in Split Screen Mode 42 Uninstalling or Disabling an Application 43 Connecting to Networks and Devices 44 Connecting to Mobile Networks 44 Connecting to Wi Fi 44 Connecting to Bluetooth Devices 47 Connecting to Your Computer via USB 49 Using the microSDXC Card as Portable or Device Storage 50 Sh...

Страница 6: ... Contacts 70 Checking Contact Details 70 Adding a New Contact 70 Importing Exporting and Sharing Contacts 71 Working With Favorite Contacts 72 Managing Contacts With Labels 73 Managing Emergency Contacts and Information 74 Searching for a Contact 75 Editing Contacts 76 Web Accounts 78 Adding or Removing Accounts 78 Configuring Account Sync 79 Email 81 Setting Up the First Email Account 81 Checking...

Страница 7: ...ying to a Message 88 Forwarding a Message 88 Deleting Messages or Conversations 89 Web Browser 90 Opening the Browser 90 Using Multiple Browser Tabs 91 Downloading Files 91 Camera 92 Capturing a Photo 92 Using Manual Camera Mode 95 Recording a Video 95 Customizing Camera and Video Settings 96 YT Music 99 Viewing Your Music Library 99 Playing Music 99 Managing Playlists 101 ...

Страница 8: ...rder 105 Recording a Voice Memo 105 Playing a Voice Memo 106 Trimming a Voice Memo 106 More Apps 107 Calculator 107 Clock 107 File Manager 108 GoogleApps 109 Settings 111 Network Internet 111 Connected Devices 114 Apps Notifications 114 Battery 116 Features 116 Display 117 Sound 117 Storage 117 Privacy 118 Location 118 ...

Страница 9: ...pgrading the Phone Software 125 Troubleshooting 126 For Your Safety 131 General Safety 131 Radio Frequency RF Energy 132 FCC Regulations 134 Hearing Aid Compatibility HAC Regulations for Mobile Phones 135 CTIA Requirements 137 Distractions 138 Product Handling 139 Electrical Safety 144 Radio Frequency Interference 144 Explosive Environments 146 ...

Страница 10: ...10 Getting Started Getting to Know Your Phone ...

Страница 11: ...11 ...

Страница 12: ... application or screen Touch and hold to use the Google Assistant Recent apps key Touch to see recently used applications Touch twice to switch between the two most recent applications Back key Touch to go to the previous screen NOTE You can replace the Home key the Recent apps key and the Back key with the gesture navigation style Swipe up on the home screen and touch Settings Features System nav...

Страница 13: ...the phone is turned on WARNING To avoid damage to the phone do not use any other kind of SIM cards or any non standard nano SIM card cut from a SIM card You can get a standard nano SIM card from your service provider 1 Place your finger in the cut out at the bottom right of the battery cover to lift and remove it ...

Страница 14: ...e card slots NOTE Some applications may require a microSDXC card to work normally and or may store data on the card Therefore it is recommended that you keep a microSDXC card installed and not remove or replace it randomly 3 Replace the cover over the back of the phone and then press down along the edges to secure Make sure there is no gaps around ...

Страница 15: ... remove it 2 Insert the battery by aligning the metal contacts on the battery with the metal contacts in the battery compartment Gently push down on the battery until it clicks into place 3 Replace the cover over the back of the phone and then press down along the edges to secure Make sure there is no gaps around ...

Страница 16: ...rn on find a signal and make a few calls You should fully charge the battery as soon as possible WARNING Use only ZTE approved chargers and USB Type C cables The use of unapproved accessories could damage your phone or cause the battery to explode 1 Connect the adapter to the charging jack ...

Страница 17: ...r prolonged charging Powering Your Phone On Off Press and hold the Power key to turn on your phone To turn it off press and hold the Power key to open the options menu and touch Setting Up Your Phone for the First Time When you first power on your phone after you purchase it or reset it to factory settings see Reset Options you will need to set it up before using it Select the language and then fo...

Страница 18: ...he screen on 2 Swipe up on the screen or Swipe away from at the bottom right of the screen to open the Camera app or Double tap a notification to open the related app NOTE If you have set a fingerprint a face verification an unlock pattern a PIN or a password for your phone see Using Your Fingerprint Use Face Recognition to Unlock the Phone and Protecting Your Phone With Screen Locks you can unloc...

Страница 19: ...19 Getting to Know the Home Screen The home screen is the starting point for your phone s applications functions and menus You can customize your home screen by adding shortcuts folders widgets and more ...

Страница 20: ...and hold an empty area of the home screen 2 Swipe left on the home screen thumbnails and touch To delete a home screen panel 1 Touch and hold an empty area of the home screen 2 Touch on the top right corner of a home screen thumbnail 3 If prompted touch OK The items on the panel will also be removed To adjust the order of a home screen panel 1 Touch and hold an empty area of the home screen 2 Touc...

Страница 21: ... on the home screen and touch Settings System Date time 2 Set the date time time zone and time format To adjust the date and time automatically touch to turn on Use network provided time To adjust the date and time manually touch to turn off Use network provided time and touch Date Time to change the date and time To adjust the time zone automatically touch to turn on Use network provided time zon...

Страница 22: ... up on the home screen and touch Settings Sound Advanced Ringtones 2 Touch Phone ringtone Default notification sound or Default alarm sound 3 Scroll through the list and select the ringtone you d like to use 4 Touch OK NOTES Many applications have their own notification sound settings See Set a Ringtone for a Contact for how to assign a special ringtone to an individual contact When selecting ring...

Страница 23: ...Notification volume and Call volume to adjust the volume for each type of audio Switching to Silent or Vibration Mode You can set the phone to silent or vibration mode by using one of the following methods NOTE Silent and vibration modes will not silence your alarms Press the Volume key and touch or to switch the phone to vibration or silent mode NOTE Press the Volume key and touch to restore soun...

Страница 24: ... limit interruptions with Do Not Disturb mode This mode silences your phone so that it doesn t make sounds or vibrate when you don t want it to Turn on Do Not Disturb Mode 1 Swipe down from the top of the screen with two fingers to access the Quick Settings panel 2 Swipe left and right to find the Do Not Disturb icon and touch it Set Do Not Disturb Mode 1 Swipe up on the home screen and touch Sett...

Страница 25: ...an set a default duration for turning off Do Not Disturb mode Schedules Use schedules to turn on off Do Not Disturb mode automatically Touch an existing schedule to use it or next to it edit or delete it You can also touch Add more to create new schedules Applying New Wallpapers You can set the wallpaper for the home screen and lock screen 1 Touch and hold an empty place on the home screen 2 Touch...

Страница 26: ...icon to the home screen App badge Show or hide notification dots on the app icons Home screen effect Select the home screen transition effect Icon layout Set the maximum number of icons on a home screen panel Themes Select a theme for the icons Display Google app When this option is turned on you can swipe right on the left most home screen panel to use the Google app Changing the Screen Brightnes...

Страница 27: ...NOW and adjust the intensity bar to a comfortable level NOTE If you want the phone to turn on off Night Light automatically touch Schedule to set the start and end time Protecting Your Phone With Screen Locks You can protect your phone by creating a screen lock When it is enabled you can swipe up on the lock screen and then draw a pattern or enter a numeric PIN or password to unlock the phone s sc...

Страница 28: ...the phone is locked and then touch Done NOTE Remember the pattern PIN or password you set Otherwise you will have to upgrade the phone software to use the phone see Upgrading the Phone Software ProtectingYour PhoneWith Screen Pinning You can use the screen pinning feature to keep an app in view so others cannot switch to other apps or access your personal information Turn On Screen Pinning 1 Swipe...

Страница 29: ...mal use touch and hold both the Back key and the Recent apps key 2 If the screen is locked swipe up on the lock screen and draw the pattern enter the PIN password touch the fingerprint sensor with a registered finger or look at the front camera directly if you have set up face authentication Using Your Fingerprint Register a Fingerprint 1 Swipe up on the home screen and touch Settings Security Fin...

Страница 30: ...ment 2 Enter the screen lock pattern PIN or password you set 3 You can set the following fingerprint actions Wake up and unlock your phone Wake up the phone and unlock it with a registered fingerprint Simple touch When the screen is off or locked you can quickly open a selected app with a registered fingerprint Each registered fingerprint can be bound to a different app NOTE You can also use any f...

Страница 31: ... the screen lock pattern PIN or password If you have already set a screen lock draw the pattern or enter the PIN password 3 Read the disclaimer for face recognition and touch ACCEPT 4 Touch CREATE NOW 5 Keep your face 20 cm to 50 cm away from the screen Wait for a moment until the phone has created the face successfully Use Face Recognition to Unlock the Screen After creating your face you can unl...

Страница 32: ...een and touch Settings Security Face authentication 2 Enter the screen lock pattern PIN or password you set 3 You can set the following options Unlock screen Select how the screen is unlocked with your face Bright display If this option is enabled the phone will increase screen brightness automatically in a dim light to help verify your face Delete face data Touch this option and select OK to dele...

Страница 33: ...nd service status icons on the right side Below are some of the icons you may see Indicator What it means LTE connected Do not disturb mode on Vibration only mode on Silent mode on Battery low Battery full Battery charging Alarm set No signal Signal strength Airplane mode Connected to a Wi Fi network Speaker on ...

Страница 34: ...screen provides notification icons on the left Below are some of the icons you may see Indicator What it means New message New message s from the Gmail app New message s from the Email app Missed call Call in progress Low battery Upcoming event New Wi Fi network detected Downloading sending data Song playing YT Music USB tethering on ...

Страница 35: ...rts expandable notifications that let you perform additional actions right from the notification itself To respond to a notification touch it Slide down with one finger to expand certain notifications You can also swipe two fingers vertically or pinch zoom to expand or collapse certain notifications or touch to expand or collapse certain notifications and bundled notifications To remove a notifica...

Страница 36: ...to find all Quick Settings tiles To turn on or off settings quickly From the Quick Settings panel touch a tile to turn its feature on or off Touch and hold certain tiles to access more settings options For example touch and hold the Wi Fi tile to open Wi Fi settings To customize the quick settings panel You can add remove or rearrange the tiles on the Quick Settings panel Touch below the panel and...

Страница 37: ...s 3 Touch and hold a widget or an application icon and drag it to a home screen panel NOTE While holding the shortcut or widget you can drag it to the right edge of the screen to create a new home screen panel and put the item on it Move Shortcuts or Widgets 1 Touch and hold a shortcut or widget on the home screen 2 Drag it to the place you need Remove Shortcuts or Widgets 1 Touch and hold a short...

Страница 38: ...er 3 To add more shortcuts into the folder touch and hold each shortcut and drag it over the folder before releasing it NOTES To remove a shortcut from a folder first touch the folder and then drag the shortcut to the home screen Touch the folder and then touch the name field to rename the folder Rearranging the Primary Shortcuts The home screen includes a customizable primary shortcuts area near ...

Страница 39: ...screen and the app list NOTE Not all apps support the app shortcut feature 1 Touch and hold an app icon on the home screen or the app list 2 From the displayed menu touch the function you want to use offered by the app NOTE You can drag an option with next to it to the home screen to create a home screen shortcut ...

Страница 40: ...to the notification panel To turn on off notification dots for all apps Touch and hold on a blank area of the home screen and touch HOME SETTINGS App badge Advanced Allow notification dots To turn on off notification dots for specific apps 1 Swipe up on the home screen and touch Settings Apps notifications Notifications Advanced 2 Switch on Allow notification dots 3 Touch the Back Key and touch SE...

Страница 41: ...o cut or copy the text to the clipboard Replace text with the clipboard text Select the text you want to replace Then touch Paste Insert clipboard text in the text field Touch the tab below the cursor Then touch Paste Opening and Switching Apps Open an App 1 Swipe up on the home screen 2 Swipe up or down on the screen and touch an app to open it NOTES Drag the slider on the right side of the scree...

Страница 42: ... to remove it from the screen Touch CLEAR ALL to remove all cards Touch the Recent apps key twice to switch to the most recent app you used Using Two Apps in Split Screen Mode You can work with two apps at the same time in split screen mode NOTE Some apps may not support split screen mode 1 Open the first app you want to use and touch the Recent apps key 2 On top of the card of the first app touch...

Страница 43: ...sable or Uninstall 4 Touch OK to uninstall or disable the app NOTES Some preinstalled apps cannot be uninstalled and not all apps can be disabled To find the disabled applications swipe up on the home screen and touch Settings Apps notifications SEE ALL number APPS ALLAPPS Disabled apps You can then touch an application and touch ENABLE to restore it ...

Страница 44: ...ames To connect to the Internet you can use the default Access Point Names APN Swipe up on the home screen and touch Settings Network internet Mobile network Advanced Access Point Names to check the default APN NOTE To set the APN to default settings touch Reset to default Connecting to Wi Fi Wi Fi is a wireless networking technology that can provide Internet access at distances of up to 300 feet ...

Страница 45: ...ly connects to previously used Wi Fi networks when they are in range If you have a QR code for the Wi Fi network touch next to the Password field and scan the QR code to connect Get Notified of Open Networks 1 Swipe up on the home screen and touch Settings Network internet Wi Fi 2 Touch Wi Fi preferences 3 Slide the Wi Fi notification switch to the On position When Wi Fi is on you receive notifica...

Страница 46: ...o the On position 3 At the bottom of the available Wi Fi networks touch Add network 4 Enter the network SSID name If necessary enter security or other network configuration details 5 Touch SAVE Forget a Wi Fi Network You can make your phone forget about the details of a Wi Fi network that you added for example if you don t want the phone to connect to it automatically or if it is a network that yo...

Страница 47: ...the On position if Bluetooth is off 3 Touch Device name 4 Edit the name and touch OK Pair With Another Bluetooth Device 1 Swipe up on the home screen and touch Settings Connected devices Pair new device Your phone automatically turns Bluetooth on and scans for and displays the IDs of all available Bluetooth devices in range 2 Touch the device you want to pair with 3 If necessary confirm that the B...

Страница 48: ...rm a passkey again 1 Swipe up on the home screen and touch Settings Connected devices 2 Ensure that Bluetooth is turned on and touch Previously connected devices 3 In the list of paired devices touch beside the Bluetooth device you want to forget 4 Touch FORGET FORGET DEVICE Send Data via Bluetooth 1 Open the appropriate application and select the file or item you want to share 2 Select the option...

Страница 49: ... Manager app Connecting to Your Computer via USB You can connect your phone to a computer with a USB cable to transfer files in both directions charge the phone or install software to update or repair the phone Connect Your Phone to a Computer via USB 1 Connect your phone to the PC with a USB cable 2 On the window opened touch ALLOW to transfer files DENY to charge the phone or Other USB options t...

Страница 50: ...o that you don t lose them If your microSDXC card is new or doesn t have content you want to keep you can also set it up as extra phone storage and this requires formatting that prevents the microSDXC card from working with other devices CAUTION As part of the device storage the microSDXC card may have data on it that is necessary for some apps to function normally Therefore do not remove or repla...

Страница 51: ...me screen and touch Settings Storage 2 Touch the microSDXC card name in the Portable storage section 3 Touch Format FORMAT SD CARD 4 Touch Done when formatting is finished CAUTION The formatting procedure erases all the data on the microSDXC card after which the files CANNOT be retrieved Set Up the microSDXC Card as Device Storage If you need your microSDXC card to store large applications games a...

Страница 52: ...oSDXC card Select Move content or Move content later Follow the onscreen instructions to continue 5 Touch Done To move data between the phone and the microSDXC card With the microSDXC card as part of the device storage you can move your photos files and other data between the phone and the card any time 1 Swipe up on the home screen and touch Settings Storage 2 To move data from the phone to the m...

Страница 53: ...s Storage 2 Touch your microSDXC card name below Device Storage 3 Touch Eject NOTE Before ejecting the card ensure that you have moved data and apps to the phone 4 Touch EJECT 5 When the screen prompts the card is safely ejected you can remove it from the phone To reformat the microSDXC card as portable storage If you no longer want to use your microSDXC card as device storage you can reformat the...

Страница 54: ...ter NOTE You cannot transfer files between your phone and your computer when the phone is USB tethered 1 Swipe up on the home screen and touch Settings Network internet Hotspot tethering 2 Touch USB tethering or Bluetooth tethering For USB tethering connect your phone to the target device with the supplied USB cable before touching USB tethering For Bluetooth tethering pair your phone with the oth...

Страница 55: ...dialpad Touch to delete incorrect digits letters NOTE As you enter the phone number or the contact name your phone searches for matching information in your contacts If you see the number and contact you want to call touch it to place the call immediately 3 Touch below the keypad to dial the call NOTES To make an international call touch and hold the 0 key to enter the plus symbol Next enter the c...

Страница 56: ...ge Answer a Voice Call To answer an incoming call If the phone screen is active touch ANSWER If the phone screen is locked swipe up on the screen to answer the call NOTES To silence the ringer before answering the call press the Volume key or the Power key For instructions on answering a call with RTT see Answer an RTT Call Reject a Voice Call To reject an incoming voice call If the phone screen i...

Страница 57: ...for a real time conversation NOTES You can use RTT only when the phone is connected to the 4G LTE network or a Wi Fi network with Wi Fi calling enabled Text conversation will be on pause when the RTT call is on hold Some RTT features and settings may not be supported under or across different networks Set Up RTT Work Mode 1 From the home screen touch Settings Accessibility Real time text RTT call ...

Страница 58: ... manually each time before placing the call Place an RTT Call When the RTT operation mode is set as Always visible you can place an RTT call directly 1 Enter the phone number with the dialpad as usual 2 Touch 3 If RTT on Outgoing Call is set as Manual touch RTT Voice call When the call is connected the RTT message screen and keyboard appear automatically Answer an RTT Call Regardless of your RTT o...

Страница 59: ...rty can also make the switch and your phone will show the message screen and keyboard automatically Working With the Call History The call history is a list of all the calls you ve placed received or missed It provides a convenient way to redial a number return a call or add a number to your Contacts To open the call history open the Phone app and touch Call history Place a Call From the Call Hist...

Страница 60: ... Transcript 1 Open the call history 2 Touch a number with below it 3 Touch Call details 4 In the call list touch to check the transcript during that call Take Other Actions on a Call History Entry 1 Open the call history 2 Touch a number and then touch Call details to view more call information While viewing the call details you can Touch Delete to delete the entry Touch Edit number before call to...

Страница 61: ... tab or touch beside a contact in the Contacts tab Checking Voicemail If you have set the phone to divert calls to voicemail callers can leave voicemail messages when they cannot reach you Here s how to check the messages they left 1 From the home screen touch 2 Touch and hold the 1 key in the dialer If prompted enter your voicemail password 3 Follow the voice prompts to listen to and manage your ...

Страница 62: ...to mute or unmute your microphone Touch to turn the speakerphone on or off Touch to switch from voice only calls to RTT Real Time Text calls NOTE RTT only works on 4G LTE network or with Wi Fi calling Touch Swap or the held call near the top of the screen to put the caller you are speaking to on hold and switch to the other call that has been put on hold Touch to merge the separate calls into a si...

Страница 63: ...l feature is available you can switch between two calls or set up a conference call NOTES Options and interface will vary The three way call feature needs network support and may result in additional charges Please contact your service provider for more information Three way call feature is not available when you have an ongoing RTT call Switch Between Current Calls When you re on a call you can p...

Страница 64: ... caller To switch between two calls If the second call is an incoming call touch Swap or the held call near the top of the screen Set Up a Conference Call With this feature you can talk to two people at the same time 1 Place the first call 2 Once you have established the connection touch and dial the second number 3 When you re connected to the second party touch If one of the people you called ha...

Страница 65: ...splay Options You can set the order of the contacts displayed in the Contacts tab of the Phone app 1 From the home screen touch Settings Display options 2 Touch Sort by or Name format to set the order of the contacts and the format of the contact names Set Sounds and Vibration Set the sound and vibration for incoming calls as well as dialpad sounds 1 From the home screen touch Settings Sounds and ...

Страница 66: ... 1 From the home screen touch Settings Answer and end calls 2 Touch Power button ends call or Vibrate when call is answered Set Speed Dial You can touch and hold the 1 9 keys from the dialer to call the corresponding speed dial number The number 1 key is reserved to speed dial your voicemail To assign a speed dial key 1 From the home screen touch Settings Speed dial 2 Touch a speed dial entry 3 To...

Страница 67: ...nders Forward Incoming Calls The call forwarding feature allows you to forward your incoming calls to another phone number 1 From the home screen touch Settings Call settings Call forwarding 2 Touch an available option to enable or disable it Block Certain Numbers The call blocking feature allows you to forbid calls and messages from certain numbers 1 From the home screen touch Settings Blocked nu...

Страница 68: ...s Touch Visual voicemail to activate or turn off visual voicemail Touch Change PIN when visual voicemail is enabled to change the PIN for accessing your voicemail Touch Advanced Settings to select the voicemail service provider or edit the voicemail number Set Real Time Text RTT Options When you are connected to the 4G LTE network or a Wi Fi network with Wi Fi calling enabled from the home screen ...

Страница 69: ...hone it will help you hear more clearly during the phone call 1 From the home screen touch Settings Accessibility 2 Touch Hearing aids to turn on off hearing aid compatibility CAUTION Do not turn on the Hearing aids option unless you use a hearing aid with a telecoil Using this setting without a hearing aid or with a hearing aid without a telecoil may be harmful to your hearing ...

Страница 70: ...list to view all your contacts 3 Touch a contact to view its details Adding a New Contact 1 From the home screen touch 2 Touch to add a new contact 3 Enter the contact name phone numbers and email addresses Touch More fields to enter other information If you have multiple account types associated with your phone touch Saving to and select an account If a sync account is selected the contacts can b...

Страница 71: ...oSDXC Card or Phone Storage 1 From the home screen touch 2 Touch Settings Import vcf file 3 If prompted select the account the contacts will be imported to 4 Navigate to the folder where the file is and touch the file Export Contacts to the microSDXC Card or Phone Storage 1 From the home screen touch 2 Touch Settings Export Export to vcf file 3 The phone will prompt you with the name of the vCard ...

Страница 72: ... few selected contacts touch and hold one in the contact list and then touch the other ones you need After the selection touch and choose how to share them Working With Favorite Contacts You can mark contacts as favorite to put them at the top of the contacts list Add a Contact to Favorites 1 From the home screen touch 2 Touch a contact and then touch at the top of the screen Remove a Contact From...

Страница 73: ...end message Send email Or touch the label and touch Multi select check the contacts you need and touch Send message Send email Set Up a New Label 1 From the home screen touch 2 Touch Create label 3 Enter the label name and touch OK 4 Touch ADD CONTACTS or and select the contact you wish to add the label to To add multiple contacts touch and hold one contact to select it Then touch the others conta...

Страница 74: ... Contacts and Information You can set up your In Case of Emergency ICE contacts and your medical information for medical personnel to access even when the phone is locked Add Emergency Contacts You can add up to five contacts as emergency contacts 1 From the home screen touch In Case of Emergency contacts 2 Touch and from the contact list touch the contact you wish to be an emergency contact To ad...

Страница 75: ...ck key Edit Emergency Information 1 From the home screen touch In Case of Emergency contacts My Emergency Information 2 Enter your name health record allergies current medications and other information that you think hospital personnel need to know in the corresponding fields 3 Touch Searching for a Contact 1 From the home screen touch 2 Touch to search 3 Enter the contact name or other informatio...

Страница 76: ...hear the ringtone 1 From the home screen touch 2 Touch a contact you want to set a ringtone for and then touch More fields Default ringtone 3 Select a ringtone you like and touch OK 4 Touch SAVE NOTE When selecting ringtones touch Add ringtone to select an audio file in your phone or microSDXC card Delete Contacts 1 From the home screen touch 2 Touch and hold the contact you want to remove 3 Check...

Страница 77: ...ect it 3 Touch to select the duplicate contact s 4 Touch Link 5 Touch LINK to confirm All selected contacts are merged into one entry in the contacts list Separate Contact Information If contact information was linked in error you can separate the information back into individual contacts on your phone 1 From the home screen touch 2 Touch a linked contact you want to separate 3 Touch View linked c...

Страница 78: ...ter the information about the account Most accounts require a username and password but the details may vary You may also need to obtain some information from IT support or your system administrator When the account is successfully added it is displayed in the Accounts menu in Settings Remove an Account Removing an account will delete it and all information associated with it such as emails and co...

Страница 79: ... OK When automatic sync is turned on changes you make to information on your phone or on the web are automatically synced with each other When automatic sync is turned off you need to sync manually to collect emails updates or other recent information Sync Manually 1 Swipe up on the home screen and touch Settings Accounts 2 Touch the account you want to sync 3 Touch Account sync Sync now ...

Страница 80: ... sync screen appears showing a list of information the account can sync 4 When auto sync data is enabled switch items on or off as you need The enabled types of information will be kept in sync automatically between the phone and the web When auto sync data is disabled touch a listing to sync that type of information between the phone and the web ...

Страница 81: ... SETUP or if automatic setup fails 3 Follow the on screen instructions to finish the setup Your phone will show the inbox of the email account and start to download email messages Checking Your Emails Your phone can automatically check for new emails at the interval you set when setting up the account You can also check new emails manually by dragging down on the message list Touch LOAD MORE at th...

Страница 82: ...l recipients of the original message touch To forward the email to someone else touch 3 Edit your message and touch Mark an Email as Unread You can return a read email to the unread state for example to remind yourself to read it again later You can also mark a batch of emails as unread While reading a message touch Mark unread While in a message list for instance the inbox touch the sender icon o...

Страница 83: ...t you want to use for sending the message 2 Enter a contact name or email address in the To field Separate each recipient with a space You can also touch to select recipients from your contacts or history NOTE To send a carbon copy or blind carbon copy to other recipients touch beside the To field to open the Cc Bcc fields and enter the contact names or email addresses 3 Enter the email subject an...

Страница 84: ...s you did with the first one Edit an Email Account You can change a number of settings for an account The options you can configure depend on the type of account 1 Open the Email app 2 Touch Settings and touch the account whose settings you want to change 3 Make the changes you want and touch or the Back key when you finish Remove an Email Account 1 Open the Email app 2 Touch Settings and touch th...

Страница 85: ...anging General Email Settings General settings apply to all email accounts you add 1 Open the Email app 2 Touch Settings General settings 3 Make the changes you want and touch or the Back key when you finish ...

Страница 86: ...ssage Touch to search for a message using keywords Touch an existing conversation to open the exchanged messages Sending a Message 1 On the Conversations screen touch Start chat 2 Add recipients in one of the following ways Manually enter the recipient s number or the contact name If the phone presents a few suggestions touch the one you want to add Touch a contact listed below the To field To add...

Страница 87: ...ake a picture To record a video touch Video to start and touch Attach to stop and add the video to the message 5 Touch NOTES If you add two or more recipients the message can be sent as a group MMS where everyone can reply and see each other s messages For group message settings touch Settings Advanced Group messaging from the Messages screen You can also include email addresses as recipients for ...

Страница 88: ... to reply to 2 Type your reply in the text field at the bottom You can touch or if you want to reply with an MMS 3 Touch Forwarding a Message 1 On the Messages screen touch the conversation that has the message s you want to forward 2 Touch and hold one message you want to forward and then touch Forward 3 Touch the conversation you d like to forward the message s to or touch New message to enter n...

Страница 89: ...ges screen touch a conversation 2 Touch and hold the message you want to delete 3 Touch Delete Delete Message Conversations 1 On the Messages screen touch and hold the conversation you want to delete 2 If there are more conversations you want to delete touch them one by one 3 Touch Delete ...

Страница 90: ... touch a web link for example in an email or a text message 1 Open the Chrome app 2 Touch the address box at the top 3 Enter the address URL of a web page or enter terms you want to search for 4 Touch a URL or search suggestion or touch the enter key on the keyboard to open the web page or search results NOTE Touch the Back key or to go to the previous or the next web page ...

Страница 91: ... the number of currently active browser windows Opened web pages will be listed Swipe up and down to see them all 2 Touch a thumbnail to switch to that tab NOTE Swipe a thumbnail horizontally or touch to close the tab Downloading Files 1 Touch and hold an image or a link to a file or to another web page 2 In the menu that opens touch Download image or Download link The downloaded files are saved t...

Страница 92: ...ternal storage You can copy them to your computer or access them in the Photos app Capturing a Photo 1 Touch on the home screen 2 Aim the camera at the subject and make any necessary adjustment PHOTO auto camera mode is used by default 3 Touch the area where you want the camera to focus or leave the camera to autofocus on the center of the image ...

Страница 93: ...93 Number Function 1 Change the flash setting 2 Change the camera settings 3 View pictures and videos you have taken 4 Capture a photo ...

Страница 94: ...ING Keep a safe distance when using the flash Do not point the flash toward the eyes of people or animals NOTES You can pinch or spread your fingers on the screen to zoom in or zoom out before taking a picture In PHOTO auto camera mode when you touch the screen to focus the exposure bar appears beside the focus point You can drag up or down to adjust the exposure ...

Страница 95: ... hold the circle to lock exposure Drag the blue square to any area on the screen that you want to focus on Touch and hold it to lock or unlock the focus Touch the icons near the bottom of the preview area and drag the sliders to adjust ISO exposure white balance and interval for taking consecutive shots 3 Touch to take the photo Recording a Video 1 From the home screen touch VIDEO 2 Aim the camera...

Страница 96: ...review area Adjust the time interval Then touch to begin recording and to stop You can also touch to save the frame as a photo Customizing Camera and Video Settings Before capturing a photo or video you can touch to open the following options NOTE Some camera and video options will change in different camera modes Options in Photo Mode Back Camera Resolution Set the resolution for your photo Timer...

Страница 97: ... Mirror image When enabled allows you to capture a photo that is the same as the viewfinder preview Volume key Assign the function of the Volume key Options in Video Mode Front or Back Camera and Timelapse Mode Video quality Set the quality for your video Options in Manual Mode Back Camera Resolution Set the resolution for your photo Timer Set a time delay before the camera takes a picture automat...

Страница 98: ...tion data in your captured photos and videos Anti banding Set the anti banding value when you take pictures or videos of TV or computer screens to avoid stripes on the screen Save location Change the storage location for captured photos and videos Help Enable the Help icon on the viewfinder screen or touch More to view help details Restore defaults Restore default camera and video settings ...

Страница 99: ...ic library is displayed You can touch Songs to view all your audio files or touch Albums or Artists to browse collections of specific artists or albums You can also touch Playlists to view all your playlists NOTE If you exit the playback screen while an audio file is being played its name and player controls are shown at the bottom of the screen in the YT Music app Touch the area to restore the pl...

Страница 100: ... artwork if available 3 Drag the slider to jump to any part of the song 4 Check the current playlist and toggle shuffle and repeat 5 Playback control Skip songs or pause and resume playback 6 Access additional options for the current song 7 Switch to landscape display ...

Страница 101: ...ry touch Add to playlist next to a song to add it to a playlist or create a new playlist In the Playlist section of the music library touch next to the playlist name to play the list add the songs to other playlists edit the playlist or delete it Touch a playlist to view its content You can then touch next to a song and select Remove from playlist to take the song off the playlist ...

Страница 102: ... or change video player settings Playing and Controlling Videos Touch a video in the video library to play it Touch the screen to show the playback controls You can control the video and audio or carry out other operations Touch or to skip to the previous or the next video Touch to pause Touch to fit the video to the full screen Touch to play the video in picture in picture mode where the video pl...

Страница 103: ...or out Managing Video Files Delete or Share Videos 1 In the video library touch and hold a video 2 Touch other videos you want to delete or share if necessary 3 Touch OK to delete or to share Trim a Video 1 Touch a video to start playing it 2 Touch Trim 3 Drag the two tabs on the progress bar to select the portion you want to keep You can touch to preview the selected portion 4 If necessary touch ...

Страница 104: ...h and hold the video you want to rename 2 Touch Rename 3 Type the new video name and touch OK View Details of a Video 1 Touch and hold the video for which you want to view details 2 Touch Details 3 Touch OK to close the window ...

Страница 105: ...g Touch or to pause or continue the recording Touch or to add an empty tag or photo tag to the recording NOTE If ringtone and notification sounds are enabled before the recording they will be temporarily turned off during it to avoid interference Your phone will still vibrate for calls and notifications 4 Touch DONE to stop recording 5 Edit the file name and touch SAVE to save the recording If you...

Страница 106: ...TE Touch View tag to check all time tags You can touch after an empty tag to add an image or text touch an image to delete it or replace it with another image or touch and hold a tag to delete it Trimming a Voice Memo 1 While playing a recording touch to open the editing screen 2 Drag or to trim the recording You can touch to preview the trimmed recording 3 Touch TRIM 4 Edit the new file name and ...

Страница 107: ... phone to landscape view Clock Swipe up on the home screen and touch Clock The Clock app allows you to check local time in places around the world set alarms and use timers Set a New Alarm 1 Open the Clock app and touch the Alarm tab 2 Touch a default alarm to configure it or touch at the bottom of the screen to create a new alarm 3 Set up the alarm options such as time repeat snooze alarm rington...

Страница 108: ...lets you check local times for cities around the world Touch to add a new city Use Stopwatch and Countdown 1 Open the Clock app and touch Stopwatch or Timer 2 Use the stopwatch to record lap times up to 100 laps or use the countdown feature to set a time and count down to zero Configure the Clock App Settings Open the clock app and touch to access options for alarms and timers File Manager Quickly...

Страница 109: ...a new folder in the current directory Touch to search for a file or folder by name Touch Sort by to change the order of the items in the list Touch in the root directory and switch on Show local hidden files to display hidden system files and folders Google Apps NOTE Google services may not be available in certain region Calendar Keep track of life s important events with Google Calendar synced ac...

Страница 110: ...ace and find your way in the world News Comprehensive up to date news coverage aggregated from sources all over the world by Google News Photos Manage photos on the phone and your Google account Play Movies TV Purchase download and watch movies and TV shows Play Store Buy and download apps games and more from the Google Play store YouTube Watch video clips from YouTube com or upload your own and s...

Страница 111: ...to Wi Fi Mobile Network Open Settings and touch Network internet Mobile network to control mobile data use and configure access point names see Connecting to Mobile Networks Data Usage Open Settings and touch Network internet Data usage to check and manage mobile data use You can view Wi Fi data usage as well Data Saver Enable Data saver which prevents apps from using data connection in the backgr...

Страница 112: ...a warning limit Set the data usage cycle data warning data limit and alert Wi Fi data usage View the Wi Fi usage of apps NOTE The data usage is measured by your phone and your carrier s data usage accounting may differ Hotspot Tethering Open Settings and touch Network internet Hotspot tethering to share your phone s mobile data connection with PCs or other devices See Sharing Mobile Data Through T...

Страница 113: ...nd other institutions to let people access local network resources when not on campus or when connected to a wireless network Depending on the type of VPN you are using you may be required to enter your login credentials or install security certificates before you can connect to your VPN You can get this information from your network administrator Private DNS Open Settings and touch Network intern...

Страница 114: ...ing to Bluetooth Devices When your phone is connected to a computer via USB you can also touch Connected devices USB to manage the USB connection mode See Connecting to Your Computer via USB Apps Notifications App Info Open Settings and touch Apps notifications to see recently opened apps Touch SEE ALL number APPS to see all apps installed on your phone and manage them Touch an app to see its info...

Страница 115: ... web browsing messaging etc Touch Opening links to set instant apps options or touch an installed app to check its supported links and set whether to open the links in the app and clear the app s defaults Permission Manager Open Settings and touch Apps notifications Permission manager to check and change the apps permissions to access certain data on the phone WARNING Changing the app permissions ...

Страница 116: ...Features The following features are available System navigation Change the navigation bar style for the phone and learn how to use One handed mode When the system navigation is set to Virtual navigation you can touch and hold the Back key to turn on one handed mode Record screen Set the video quality and the touch interaction options for screen recording NOTE To record the screen and save it as a ...

Страница 117: ...t or Vibration Mode set Do Not Disturb options see Using Do Not Disturb Mode set up sound for calls notifications and alarms see Changing the Ringtone Notification Sound andAlarm Sound or select system sounds see Turning System Sounds On Off Storage Open Settings and touch Storage to check memory information for your microSDXC card and phone storage You can choose the default location for new data...

Страница 118: ...n to manage location services to help your phone and apps determine your location To use location related applications such as finding your location on Google Maps you must have location services turned on You can also check the apps that recently requested your location data manage location permission for each app turn on off Wi Fi and Bluetooth scanning and control other location related service...

Страница 119: ...ion is available when unlock pattern is set Automatically lock Set the time needed for the lock protection to be activated after the screen turns off This option is available when unlock pattern PIN or password is set Power button instantly locks Lock protection is activated immediately when you press the Power key This option is available when unlock pattern PIN or password is set Fingerprint Ena...

Страница 120: ...ntial passwords in a safe place for future use If you enter the wrong SIM PIN more times than allowed your nano SIM card will be locked and you cannot access the mobile network Contact your operator for a PIN Unlock Key PUK to restore the nano SIM card Encryption credentials Check the encryption status of your phone and set the credential storage options Trust agents Activate or deactivate trust a...

Страница 121: ...en they become available view update history or use Software Upgrade Assistant installed on your computer to install updates to the phone via a USB cable see Connecting to Your Computer via USB Digital Wellbeing Parental Controls Open Settings and touch Digital Wellbeing parental controls to improve your digital wellbeing and balance your child s screen time Touch Show your data to get information...

Страница 122: ...con in the app list Display or hide the Digital Wellbeing app in the app list In the Parental controls section touch Set up parental controls to add content restrictions and set other limits for your child with the Family Link app Google Open Settings and touch Google to manage settings for Google apps and services System Languages Input Open Settings and touch System Languages input to configure ...

Страница 123: ...multi selection for sharing and deletion Backup Open Settings and touch System Backup to manage data backup options To easily restore or switch devices at any time you can enable automatic backup to Google Drive of important data You need to sign in to your Google account to use this feature Reset Options Open Settings and touch System Reset options to reset network settings app preferences system...

Страница 124: ... to create more user accounts If you want users to add more users when the phone is locked switch on Add users from lock screen Anyone can then open the Quick Settings panel from the lock screen and touch Add user to create new users or profiles NOTE When a guest user has finished using your phone they can touch Remove guest in the Multiple users menu to delete all their data from your phone About...

Страница 125: ...ss upgrade package offered by your mobile service provider 3 Use your PC to download and upgrade package to your microSDXC card and install it to your phone from the card NOTE Visit the ZTE official handset service support website Z Community https community zteusa com to learn more about the above upgrade methods as well as which phones and methods are supported ...

Страница 126: ...eak at your current location for example in a basement or near a tall building because wireless transmissions cannot effectively reach it Move to a location where the network signal can be properly received The network is busy at the current time for example during peak times there may be too much network traffic to handle additional calls Avoid using the phone at such times or try again after wai...

Страница 127: ...one line Unable to select certain features Your service provider does not support these features or you have not applied for services that provide these features Contact your service provider Cannot charge the battery The battery or battery charger is damaged Contact the dealer The phone s temperature is below 32 F 0 C or higher than 95 F 35 C Adjust the battery charging environment to avoid extre...

Страница 128: ...r off the phone The battery is depleted In high temperature environments battery life will be shortened Contact the dealer to change a new battery If you are not able to connect to the network the phone will continue to send out signals as it attempts to locate a base station Doing so consumes battery power and will consequently shorten standby time Change your location to one where the network is...

Страница 129: ...o clean the nano SIM card contacts Unable to connect to the network The nano SIM card is invalid Contact your service provider You are not within the network s service area Check the service area with your service provider Poor signal Move to an open space or if you are inside a building move closer to a window Cannot answer incoming calls You have activated the Call blocking feature Disable this ...

Страница 130: ...vice provider If the service provider provides the nano SIM card s PUK code use the PUK code to unlock the nano SIM card Phone crashes reboots freeze or cannot be powered on Some third party software is not compatible with your phone Uninstall the software that may cause the problem Upgrade the phone software Reset the phone to factory status ...

Страница 131: ...sound To prevent possible hearing damage do not listen at high volume levels for long periods Exercise caution when holding your phone near your ear while the loudspeaker is in use Avoid contact with anything magnetic Keep away from pacemakers and other electronic medical devices Turn off when asked to in hospitals and medical facilities Turn off when told to on aircraft and at airports Turn off w...

Страница 132: ...hone is designed and manufactured not to exceed the emission limits for exposure to radio frequency RF energy set by the Federal Communications Commission of the United States During SAR testing this device was set to transmit at its highest certified power level in all tested frequency bands and placed in positions that simulate RF exposure in usage against the head with no separation and near th...

Страница 133: ...ll reported SAR levels evaluated as in compliance with the FCC RF exposure guidelines SAR information on this model phone is on file with the FCC and can be found under the Display Grant section of www fcc gov oet ea fccid after searching on FCC ID SRQ Z5157V For this device the highest reported SAR value for usage against the head is 1 20 W kg and for usage near the body is 1 14 W kg While there ...

Страница 134: ...se limits are designed to provide reasonable protection against harmful interference in a residential installation This equipment generates uses and can radiate radio frequency energy and if not installed and used in accordance with the instructions may cause harmful interference to radio communications However there is no guarantee that interference will not occur in a particular installation If ...

Страница 135: ...interference with hearing aids or cochlear implants digital wireless phones sometimes do because of electromagnetic energy emitted by the phone s antenna backlight or other components Your phone is compliant with FCC HAC regulations ANSI C63 19 2011 While some wireless phones are used near some hearing devices hearing aids and cochlear implants users may detect a buzzing humming or whining noise S...

Страница 136: ... using your hearing aid or cochlear implant to determine if you hear any interfering noise Consult your service provider or the manufacturer of this phone for information on hearing aid compatibility If you have questions about return or exchange policies consult your service provider or phone retailer M Ratings Phones rated M3 or M4 meet FCC requirements and are likely to generate less interferen...

Страница 137: ...ly use the battery for the device for which it is specified Only use the battery with a charging system that has been qualified with the system per CTIA Certification Requirements for Battery System Compliance to IEEE 1725 Use of an unqualified battery or charger may present a risk of fire explosion leakage or other hazards Do not short circuit the phone or allow metallic conductive objects to con...

Страница 138: ...tified adapters products that bear the USB IF logo or products that have completed the USB IF compliance program Distractions Driving Full attention must be given to driving at all times in order to reduce the risk of an accident Using a phone while driving even with a hands free kit can cause distraction and lead to an accident You must comply with local laws and regulations restricting the use o...

Страница 139: ...the phone s reaction to your operations or interfere with the image quality Clean your phone and its accessories with a soft material such as cleaning cloth for eyeglass lenses Do not use alcohol or other corrosive substances for cleaning or allow them to get inside Do not expose your phone or its accessories to open flames or lit tobacco products Do not expose your phone or its accessories to liq...

Страница 140: ...other hazards The recommended operating temperatures are 0 C to 35 C and the storage temperatures are 20 C to 45 C Extreme temperatures can damage the device and reduce the charging capacity and lifespan of your device and battery Do not place the device or the battery in or near heating equipment such as microwave ovens stoves or radiators Keep the device and the battery away from excessive heat ...

Страница 141: ...aste There is a risk of explosion if the wrong battery model is replaced WARNING If the battery is broken you should avoid contact with the contents inside If they contaminate the skin immediately rinse with plenty of water and seek medical help when necessary Small Children Do not leave your phone and its accessories within the reach of small children or allow them to play with it They could hurt...

Страница 142: ...force and serious injury could result Store the phone in a safe and secure area before driving your vehicle Seizures Blackouts The phone can produce a bright or flashing light A small percentage of people may be susceptible to blackouts or seizures even if they have never had one before when exposed to flashing lights or light patterns such as when playing games or watching video If you have exper...

Страница 143: ... Take frequent breaks to stretch and relax Emergency Calls This phone like any other wireless phone operates using radio signals which cannot guarantee connection in all conditions Therefore you must never rely solely on any wireless phone for emergency communications Loud Noise This phone is capable of producing loud noises which may damage your hearing Turn down the volume before using headphone...

Страница 144: ...empt to disassemble the phone or its accessories Only qualified personnel can service or repair the phone or its accessories If your phone or its accessories has been submerged in water punctured or subjected to a severe fall do not use it until you have taken it to be checked at an authorized service center Radio Frequency Interference General Statement on Interference Care must be taken when usi...

Страница 145: ...nd on the type of hearing device and the distance from the interference source Increasing the separation between them may reduce the interference You may also consult your hearing aid manufacturer to discuss alternatives Medical Equipment Turn off your wireless device when you are requested to do so in hospitals clinics or healthcare facilities These requests are designed to prevent possible inter...

Страница 146: ...ve atmospheres obey all posted signs to turn off wireless devices such as your phone or other radio equipment Areas with potentially explosive atmospheres include fueling areas below decks on boats fuel or chemical transfer or storage facilities and areas where the air contains chemicals or particles such as grain dust or metal powders Blasting Caps and Areas Power off your mobile phone or wireles...

Отзывы: