background image


7    

ZOTAC ZBOX nano

Rear view

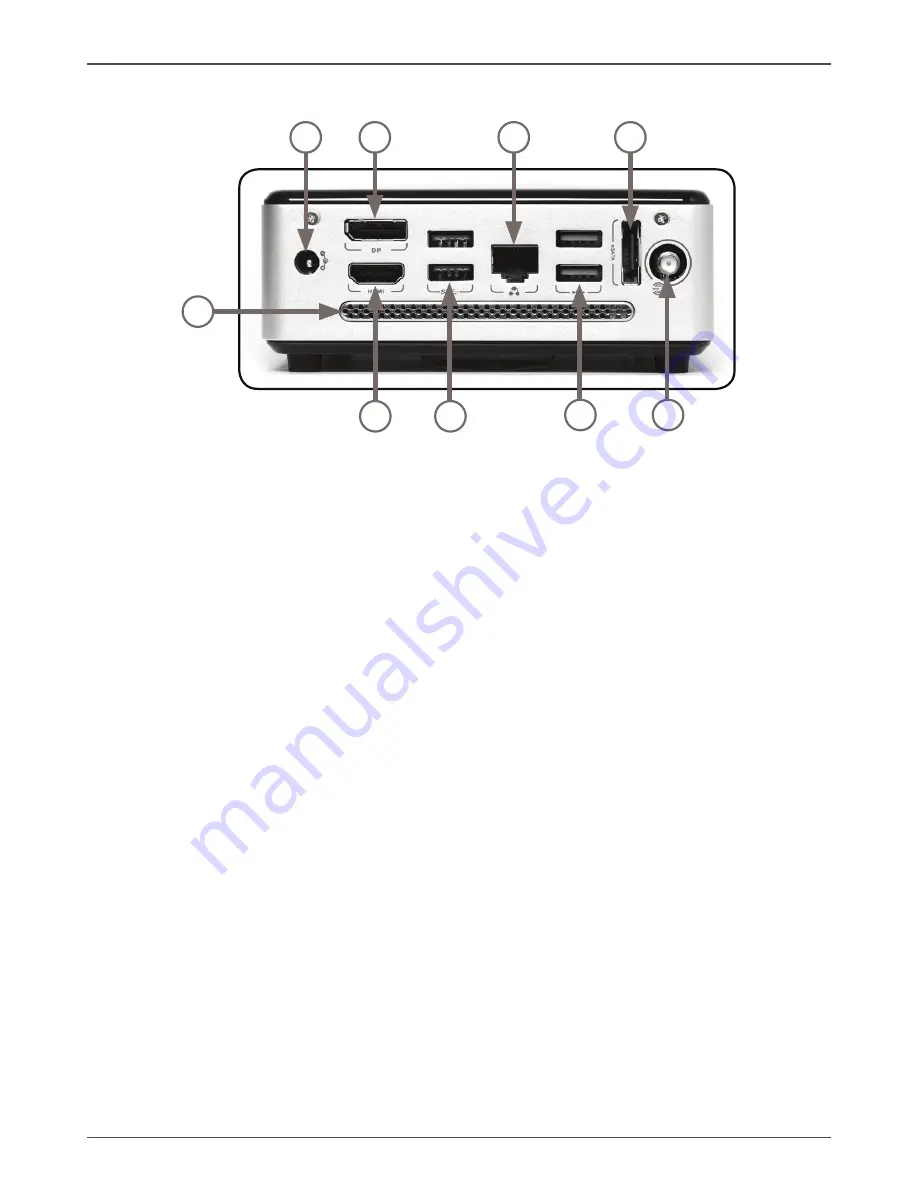
Refer to the diagram below to identify the components on this side of the system.

1. Power input (DC19V)

The supplied power adapter converts AC power to DC power for use with this jack. 

Power supplied through this jack supplies power to the mini-PC. To prevent damage 

to the mini-PC, always use the supplied power adapter.

2. HDMI output

The HDMI (High Definition Multimedia Interface) output supports Full HD 1080p 

displays such as an HDTV or monitor.

3. DisplayPort

DisplayPort supports both external (box-to-box) and internal (laptop LCD panel) 

display connections.

4. USB 3.0 ports

The USB 3.0 ports support the SuperSpeed USB 3.0 devices and are backwards 

compatible with USB 2.0/1.1 devices. Use the ports for USB 3.0 devices for 

maximum performance with USB 3.0 compatible devices.

5. Ethernet port

The eight-pin RJ-45 LAN port supports standard Ethernet cable for connection to a 

local area network (LAN) with speeds of 10/100/1000Mbps.

6. USB 2.0 ports 

The USB (Universal Serial Bus) ports are compatible with USB devices such as 

keyboards, mice, cameras and hard disk drives.

7. eSATA port

The external SATA port is compatible with e.SATA devices such as external hard 
drives and Blu-ray drives.

8. WiFi antenna connector

The WiFi antenna connector supports WiFi antenna module.

9. Ventilation area

The ventilation area is designed for cooling.

1

2

3

4

5

7

6

9

8

Содержание Zbox Nano AD12

Страница 1: ......

Страница 2: ...t be reg istered trademarks or copyrights of their respective companies and are used for identification purposes only All trademarks are the property of their respective owners Every effort has been m...

Страница 3: ...the ZOTAC ZBOX nano 12 Installing a memory module 13 Installing a hard disk 14 Connecting a SPDIF cable 15 Setting up the ZOTAC ZBOX nano 16 Positioning the ZOTAC ZBOX nano 18 Mounting the ZOTAC ZBOX...

Страница 4: ...ports Four USB 2 0 ports two USB 3 0 ports Storage support SATA 6 0 Gb s transfer rates Supports one 2 5 inch SATA HDD or SSD support the device with max 9 5mm height One eSATA port Network support Gi...

Страница 5: ...his product in environments with ambient temperatures between 0 and 35 If you use an extension cord please use the UL listed cord and make sure that the total ampere rating of the devices plugged into...

Страница 6: ...X nano Please contact your retailer If any of the below items are damaged or missed Package contents 1 x ZOTAC ZBOX nano mini PC 1 x ZOTAC VESA mount 4 x Mount screws 1 x AC Adapter 1 x Power Cord 1 x...

Страница 7: ...The headphone SPDIF jack 3 5mm is used to connect the system s audio out signal to amplified speakers or headphones It also supports SPDIF output with the headphone SPDIF adapter included in the pack...

Страница 8: ...SB 3 0 ports The USB 3 0 ports support the SuperSpeed USB 3 0 devices and are backwards compatible with USB 2 0 1 1 devices Use the ports for USB 3 0 devices for maximum performance with USB 3 0 compa...

Страница 9: ...to enter the BIOS SETUP UTILITY 2 Use the arrow keys to navigate to the Advanced menu and select Onboard Device Config BIOS settings of specific functions ZOTAC ZBOX nano has some specific functions...

Страница 10: ...9 ZOTAC ZBOX nano 3 Press Enter to display the Onboard Device Control and navigate to Backlight Control 4 Press Enter and select Disabled...

Страница 11: ...ice Config and press Enter 2 Use the arrow keys to enter the item Rear USB2 0 Charge hotplug Top Bottom Front USB2 0 Charge hotplug and select Enabled How to disable CIR controller for internal IR rec...

Страница 12: ...11 ZOTAC ZBOX nano 2 Enter CIR Controller and select Disabled Enabled enable the internal IR receiver default Disabled disable the internal IR receiver...

Страница 13: ...ZBOX nano Please follow the instructions below to remove the cover of the ZOTAC ZBOX nano before customizing 1 Remove the four screws securing the bottom cover into place 2 Gently remove the cover fro...

Страница 14: ...alling a memory module 1 Locate the SO DIMM memory slot and insert a SO DIMM memory module into the slot at a 45 degree angle 2 Gently press down on the memory module until it locks into place by the...

Страница 15: ...o a 2 5 inch SATA hard disk with 2 screws 3 Insert the hard disk into the socket and gently slide into the connector Installing a hard disk 1 Locate the hard disk bracket remove the 2 screws and remov...

Страница 16: ...tall the screws of the hard disk bracket Connecting a SPDIF cable 1 Connect the SPDIF cable to the headphone SPDIF adapter correctly 2 Locate the front panel and connect the headphone SPDIF adapter to...

Страница 17: ...the DP port 2 Connecting USB 3 0 device Connect USB 3 0 devices such as external hard drives SSDs and flash drives to the USB 3 0 port 3 Connecting USB 2 0 device Connect USB 2 0 devices like wired wi...

Страница 18: ...end to a HDMI compatible display such as an HDTV or monitor When both the HDMI and the DP are connected the audio output is from HDMI by default 7 Connecting to a home network Connect one end of a ne...

Страница 19: ...se use connectors and cables that are appropriate in size to avoid interference Mounting the ZOTAC ZBOX nano to a LCD monitor The ZOTAC ZBOX nano is monitor mountable using the included VESA mount 1 S...

Страница 20: ...r External USB IR receiver 2 External USB IR receiver please connect the external USB IR receiver to the USB2 0 port IR receiver Users can control the LCD monitor TV by either IR receiver or external...

Страница 21: ...Buttons VOLUME UP DOWN CHANNEL UP DOWN MUTE Playback Buttons RECORD PAUSE STOP REW PLAY FWD SKIP REPLAY Numeric Keypad 1 2 3 4 5 6 7 8 9 0 CLEAR ENTER Teletext Buttons T RED GREEN YELLOW BLUE TELETEX...

Страница 22: ...w on the rear cover of the remote control and push the cover as the arrow direction 3 Gently press down on the CR2032 lithium cells and reinstall the rear cover 2 Remove the rear cover and insert the...

Страница 23: ...tion source drive connection Installing system drivers Before you can use the full features of the ZOTAC ZBOX nano the system drivers must be installed The following types of operating systems are sup...

Страница 24: ...n without encryption might be visible to others Note 2 Enter the network security key if necessary Configuring wired connection Using a static IP 1 Right click the network icon in the notification are...

Страница 25: ...t 9 Enter your User name and Password Click Next 10 Click Finish to finish the configuration 11 Enter your user name and password Click Connect to connect to the internet Contact your internet Service...

Страница 26: ......

Отзывы: