background image


15    

ZOTAC ZBOX

Using your ZOTAC ZBOX

Configuring wireless connection

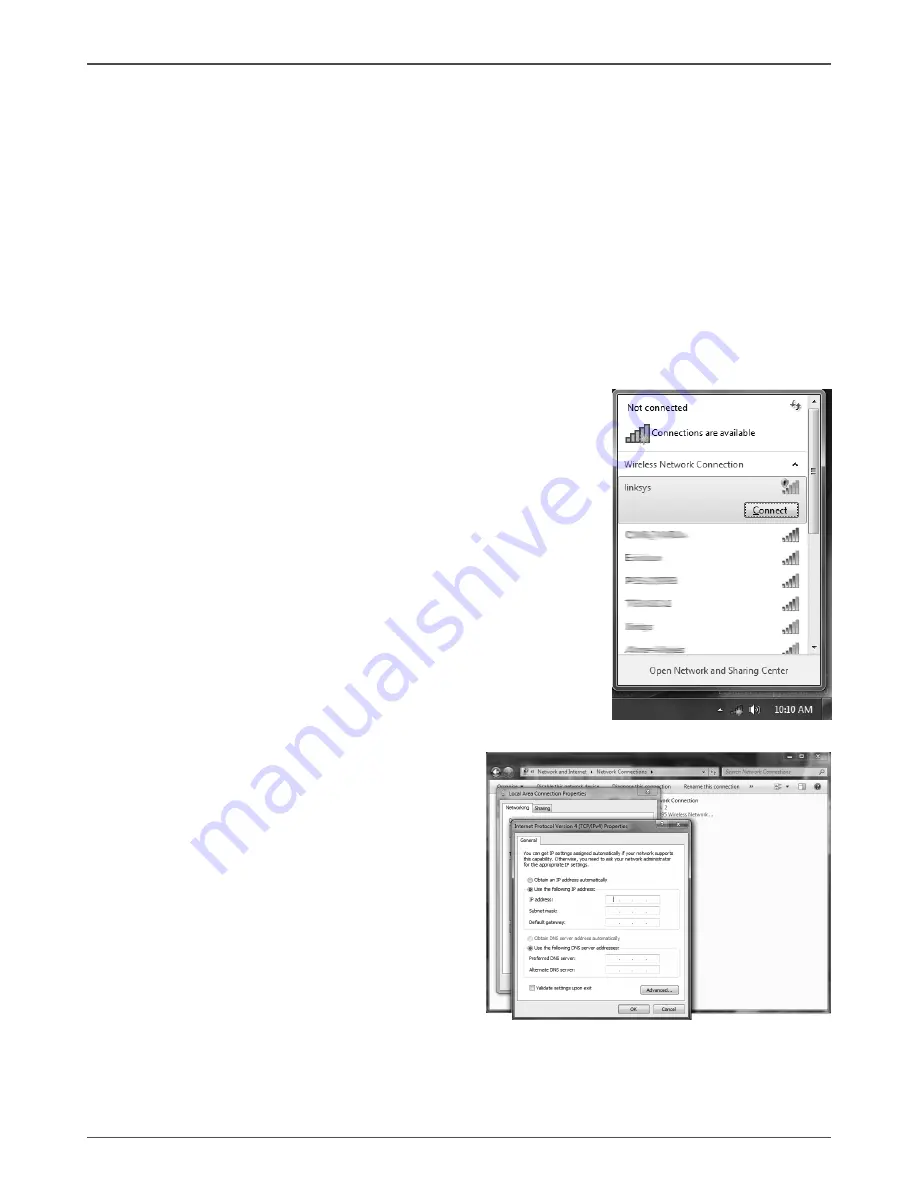
To connect to a wireless network, follow the instructions below:
1.  Double-click the crossed wireless network icon (pic) on 

       the notification area.

2.  Select the wireless network you want to connect to 
       from the list and click Connect.
3.  After connection was established, you will see 
       Connected.


For security concerns, Do NOT connect to an 

       unsecured network, otherwise, the transmitted 
       information without encryption might be visible to 
       others.


Enter the network security key if necessary.

Configuring wired connection

Using a static IP

1.  Right-click the network icon on the 

       notification area and select Open 

       Network Connections.
2.  Right-click Local Area Connection and 
       select Properties.
3.  Highlight Internet protocol (TCP/IP) and 
       click Properties.
4.  Select Use the following IP address.
5.  Enter your IP address, subnet mask and 
       Default gateway.
6.  If needed, enter the preferred DNS server address.

7.  After entering all of the related values, click OK to finish the configuration.

        • Realtek PCIE network Driver
        • Atheros Wireless driver

 Each driver must be installed individually to ensure proper operation of the 

      ZOTAC ZBOX.
3.    Select the driver you want to install. The driver installer should launch.
4.    Follow the onscreen instructions to install the drivers.
5.    Restart the system.

Содержание ZBOX miniHTPC

Страница 1: ......

Страница 2: ...y not be reg istered trademarks or copyrights of their respective companies and are used for identification purposes only All trademarks are the property of their respective owners Every effort has be...

Страница 3: ...le 8 Removing the memory module 9 Installing a hard disk 10 Removing a hard disk 11 Positioning your ZOTAC ZBOX 12 Installing the stand 12 Installing your ZOTAC ZBOX to a monitor 12 Setting up your ZO...

Страница 4: ...e q Onboard Serial ATA v Independent DMA operation on one port data transfer rates of 3 Gb s v Support one ESATA port v Support one 2 5 inch SATA HDD or SSD q Network support v Gigabit 10 100 1000Mbps...

Страница 5: ...s between 0 and 35 If you use an extension cord please use the UL listed cord and make sure that the total ampere rating of the devices plugged into the extension cord does not exceed its ampere ratin...

Страница 6: ...ing illustration displays the package contents of your new ZOTAC ZBOX If any of the below items is damaged or missed contact your retailer Package contents 1 x ZOTAC ZBOX 1 x Stand 1 x VESA mount 1 x...

Страница 7: ...ot The built in memory card reader reads MMC SD SDHC MS MS Pro XD cards used in devices like digital cameras MP3 players mobile phones and PDAs 4 USB port The USB Universal Serial Bus port is compatib...

Страница 8: ...e eight pin RJ 45 LAN port supports standard Ethernet cable for connection to a local network 4 DVI port The DVI port supports connection to analog monitors and displays 5 HDMI port The HDMI High Defi...

Страница 9: ...ustomizing the ZOTAC ZBOX Before installing hardware please follow the instructions below to remove the cover of your ZOTAC ZBOX 1 Remove the two screws securing the bottom cover into place 2 Gently r...

Страница 10: ...odule 1 Remove the cover of your ZOTAC ZBOX 2 Gently press the two arms securing the memory in the socket as shown in the image below to release the memory module 3 The memory module can be easily tak...

Страница 11: ...OTAC ZBOX 2 Unscrew and remove the screw from the hard disk bracket and raise the lid as shown in the image below 3 Insert a 2 5 inch SATA hard disk into the socket at a 45 degree angle 4 Gently press...

Страница 12: ...a hard disk 1 Remove the cover of your ZOTAC ZBOX 2 Unscrew and remove the screw from the hard disk bracket and raise the lid as shown in the image below 3 Gently remove the hard disk from the socket...

Страница 13: ...four screws HNM M4x8 2 Place your ZOTAC ZBOX on the VESA mount noting the correct alignment and then secure the PC to the VESA mount with a coin To fasten the VESA mount your monitor must comply with...

Страница 14: ...ar panel and the other End to a hub or switch 3 Connecting to a DVI or VGA display Connect one end of a DVI VGA cable to an HDTV or monitor and the other end to the DVI port on the system rear panel I...

Страница 15: ...em 5 Install system drivers to gain full functionality of the ZOTAC ZBOX hardware and features Installing system drivers Before you can use the full features of the ZOTAC ZBOX the system drivers must...

Страница 16: ...d connection Using a static IP 1 Right click the network icon on the notification area and select Open Network Connections 2 Right click Local Area Connection and select Properties 3 Highlight Interne...

Страница 17: ...ct Connect to the Internet and click Next 6 Select Set up my connec tion manually 7 Select your connection type and click Next 8 Enter your ISP Name and click Next 9 Enter your User name and Password...

Страница 18: ......

Отзывы: