background image

ZOTAC ZBOX


5    

Welcome

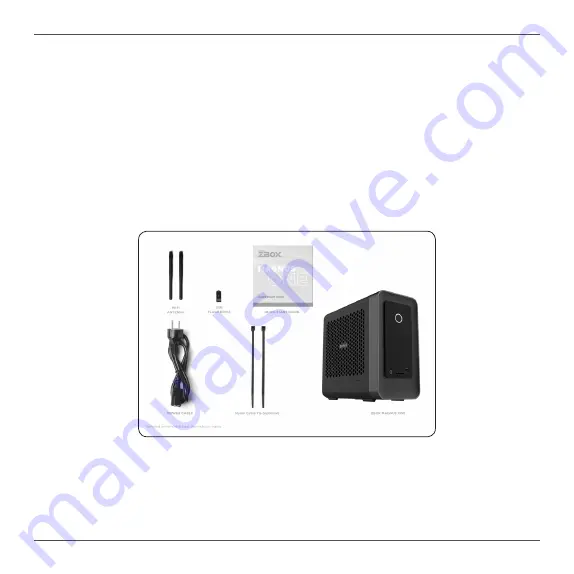
Congratulations on your purchase of the ZOTAC ZBOX. The following illustration displays the pack-

age contents of your new ZOTAC ZBOX. If any of the below items are damaged or missing, contact 

your retailer.

Package contents


•  1 x ZOTAC ZBOX


•  1 x Power Cord


•  2 x Nylon Cable Tie (optional)


•  2 x Antenna


•  1 x USB flash drive with Windows drivers


•  1 x 

Quick Start Guide & Warranty Card

Содержание ZBOX MAGNUS ONE

Страница 1: ......

Страница 2: ...registered trademarks or copyrights of their respective companies and are used for identification purposes only All trademarks are the property of their respective owners Every effort has been made to...

Страница 3: ...Installing a memory module 12 Installing M 2 SSD and Optane memory modules 14 Installing a hard disk SSD 17 Setting up your ZOTAC ZBOX 19 Installing drivers and software 21 Installing an operating sys...

Страница 4: ...Two DDR4 2933 2666 SODIMM slots v Up to 64 GB of memory q USB Ports v Four USB 3 1 GEN2 10 Gbps v Four USB 3 0 5 Gbps One Type C and three Type A q Onboard Serial ATA v SATA 6 0 Gb s transfer rates v...

Страница 5: ...tem for ventilation Never insert objects of any kind into the ventilation openings Use this product in environments with ambient temperatures between 0 and 35 Care during use Do not walk on the power...

Страница 6: ...tion displays the pack age contents of your new ZOTAC ZBOX If any of the below items are damaged or missing contact your retailer Package contents 1 x ZOTAC ZBOX 1 x Power Cord 2 x Nylon Cable Tie opt...

Страница 7: ...ompatible with SD SDHC SDXC cards used in devices like digital cameras MP3 players mobile phones and PDAs 4 Power LED The Power LED is always ON when power is on 5 WiFi LED The WiFi LED is always ON w...

Страница 8: ...e this port for USB 3 1 devices for maximum performance with USB 3 1 compatible devices 4 USB 3 0 ports The USB 3 0 port supports the SuperSpeed USB 3 0 devices and is backwards compatible with USB 2...

Страница 9: ...e instructions below to remove the cover of your ZOTAC ZBOX 1 Place the ZOTAC ZBOX upright on a flat surface 2 Locate the two thumb screws and remove 3 Press down on the arrow of the top cover and sli...

Страница 10: ...ZOTAC ZBOX 9 4 Lift and remove the two side covers...

Страница 11: ...g a graphics card optional 1 Remove the screw from the PCB bracket tool required not included 2 Connect the power cables to the graphics card Graphics card compatibility Power up to 220W Width dual sl...

Страница 12: ...ZOTAC ZBOX 11 3 Insert the graphics card into the available PCIE slot 4 Bind the cables to the small bracket with a nylon cable tie optional 5 Install the screw to secure the graphics card...

Страница 13: ...ZOTAC ZBOX 12 Installing a memory module 1 Lay the ZOTAC ZBOX on a flat surface with the right side upwards 2 Gently push down on the memory retainer clips to the open position...

Страница 14: ...s two DDR4 SO DIMM memory modules You must install at least one module for the system to function 3 Insert a SO DIMM memory module into the slot 4 Gently push the SO DIMM memory module down into the s...

Страница 15: ...d Optance memory accordingly M 2 PCIe x4 SSD Optane memory slot 22 42 22 80 22 110 M 2 PCIe x4 SATAIII SSD slot 22 42 22 80 This is example to install a M 2 PCIe x4 SATA SSD module similar steps for i...

Страница 16: ...ZOTAC ZBOX 15 2 Remove the hard disk bracket 3 Locate the M 2 PCIe x4 SATA SSD slot and remove the screw from the screw bolt tool required not included...

Страница 17: ...16 4 Attach the screw to the M 2 PCIe x4 SATA SSD module 5 Insert the M 2 PCIe x4 SATA SSD module into the slot at a 45 degree angle 6 Gently press down on the M 2 PCIe x4 SATA SSD module and install...

Страница 18: ...ZOTAC ZBOX 17 Installing a hard disk SSD 1 Locate the 2 5 inch SATA hard disk SSD and the hard disk bracket 2 Install the hard disk SSD to the hard disk bracket...

Страница 19: ...ZOTAC ZBOX 18 3 Insert the hard disk bracket into the SATA slot 4 Reinstall the thumb screw...

Страница 20: ...nector 2 Connecting to a network device Connect one end of a network cable to the LAN port on the system rear panel and the other End to a hub or switch The LAN port marked with K is for Killer Ethern...

Страница 21: ...an HDMI cable to the HDMI port on the system rear panel and the other end to a HDMI compatible display such as an HDTV or monitor 6 Connecting to DisplayPort displays Connect the DisplayPort connector...

Страница 22: ...een directions to install the operating system 5 Install system drivers to gain full functionality of the ZOTAC ZBOX hardware and features Installing system drivers Before you can use the full feature...

Страница 23: ...iver Bluetooth Driver Intel Management Engine CardReader Driver Each driver must be installed individually to ensure proper operation of the ZOTAC ZBOX 3 Select the driver you want to install The driv...

Страница 24: ...nter Before you can use the full feature of Killer LAN please follow the instructions below to install the Killer Control Center 1 Run Killer Wireless Network Driver click Next when the following dial...

Страница 25: ...ZOTAC ZBOX 24 3 Click Install to begin the installation Please make sure that the network is connected before the installation 4 Check before Download Killer Control Center and click Finish...

Страница 26: ...ZOTAC ZBOX 25 5 Click Get to download the Killer Control Center 6 When the installation is complete click Launch to run the Killer Control Center...

Страница 27: ...ZOTAC ZBOX 26 7 Killer Control Center displays as below...

Страница 28: ...oncerns Do NOT connect to an unsecured network otherwise the transmitted information without encryption might be visible to others Note 2 Enter the network security key if necessary Configuring audio...

Страница 29: ...cluded in the driver DVD and USB flash drive X OptaneMemory SetupOptaneMemory exe Enabling Intel Optane memory Please follow the recommended procedure to enable Optane memory as listed below X your dr...

Страница 30: ...ZOTAC ZBOX 29...

Страница 31: ...ZOTAC ZBOX 30...

Страница 32: ...ZOTAC ZBOX 31...

Страница 33: ...ZOTAC ZBOX 32 3 Restart the system the following dialog box will display Click Yes 4 When the Intel Optane Memory interface displays click Enable...

Страница 34: ...ZOTAC ZBOX 33...

Страница 35: ...ZOTAC ZBOX 34 6 When the Optane Memory is successfully enabled the created Intel Optane information will show in Device Manager Disk drives 5 Click Restart to complete enabling the Optane Memory...

Страница 36: ...ZOTAC ZBOX 35 Disabling Intel Optane memory 1 Double click the Intel icon in the lower right corner of the desktop 2 When the Intel Optane Memory interface displays click Disable...

Страница 37: ...ZBOX 36 4 When the Optane Memory is successfully disabled the disabled Intel Optane information will show in Device Manager Disk drives 3 Click Restart to complete disabling the Optane Memory 209 MB4...

Страница 38: ......

Отзывы: