background image


13    

ZOTAC ZBOX

Setting up your ZOTAC ZBOX

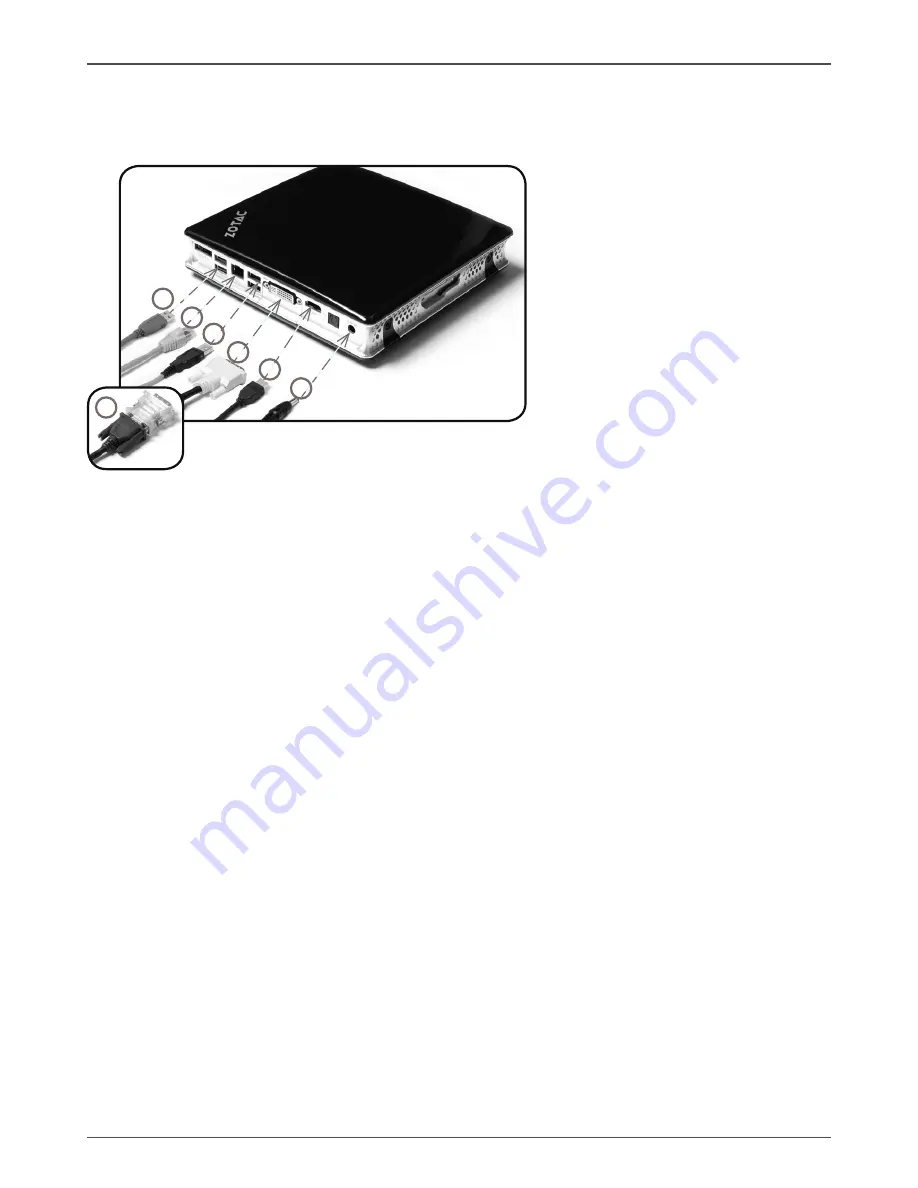
You need to connect peripherals before using your ZOTAC ZBOX.

1. Connecting to USB 3.0 devices

Connect USB 3.0 devices such as external hard drives, SSDs and flash drives to 

the USB 3.0 port on the system rear panel.

2. Connecting to a network device

Connect one end of a network cable to the LAN port on the system rear panel and 
the other End to a hub or switch.

3

Connecting to USB 2.0 devices

Connect USB devices like wired/wireless keyboards (varying with areas), mouse 
devices and printers to the USB ports on the system rear panel.

4. Connecting to a DVI or VGA display

Connect one end of a DVI/VGA cable to an HDTV or monitor, and the other end 

to the DVI port on the system rear panel. If using a VGA connection, please use 

included DVI-to-VGA adapter.

5. Connecting to an HDMI display

Connect one end of an HDMI cable to the HDMI port on the system rear panel and 

the other end to a HDMI-compatible display such as an HDTV or monitor.

6. Turning on the system

Connect the supplied AC adapter to the DC IN jack on the system rear panel and 

then press the power switch on the front panel to turn on the system.


When your ZOTAC ZBOX is not in use, unplug the power adapter or switch off the

 AC outlet to save on power consumption.

1

2

3

4

5

6

4

Содержание ZBOX HD-ID41

Страница 1: ......

Страница 2: ...reg istered trademarks or copyrights of their respective companies and are used for identification purposes only All trademarks are the property of their respective owners Every effort has been made...

Страница 3: ...memory module 9 Installing a hard disk 10 Removing a hard disk 11 Positioning your ZOTAC ZBOX 12 Installing the stand 12 Installing your ZOTAC ZBOX to a monitor 12 Setting up your ZOTAC ZBOX 13 Instal...

Страница 4: ...ration on one port data transfer rates of 3 Gb s v Support one ESATA port v Support one 2 5 inch SATA HDD or SSD q Onboard LAN RTL8111 series v Supports 10 100 1000 Mbps operation v Supports IEEE 802...

Страница 5: ...s product in environments with ambient temperatures between 0 and 35 If you use an extension cord please use the UL listed cord and make sure that the total ampere rating of the devices plugged into t...

Страница 6: ...the package contents of your new ZOTAC ZBOX If any of the below items is damaged or missed contact your retailer Package contents 1 x ZOTAC ZBOX 1 x Stand 1 x VESA mount 1 x AC Adapter 1 x Power Cord...

Страница 7: ...encing voice narrations or simple audio recordings 3 Memory card slot The built in memory card reader reads MMC SD SDHC MS MS Pro XD cards used in devices like digital cameras MP3 players mobile phon...

Страница 8: ...l Bus port is compatible with USB devices such as key boards mice cameras and hard disk drives 5 DVI VGA port The DVI VGA port supports connection to analog monitors and displays 6 HDMI port The HDMI...

Страница 9: ...remove the cover of your ZOTAC ZBOX 1 Unscrew 2 Gently remove the cover as the image below Installing a memory module 1 Locate the SO DIMM memory slots and insert a SO DIMM memory module into the slot...

Страница 10: ...ocate the SO DIMM memory slot and gently press the two arms securing the memory module outwards as shown in the image below to release the memory module 2 Remove the memory module from the slot at a 4...

Страница 11: ...ate the hard disk bracket and remove the thumb screw 2 Lift up on the plastic flap 3 Insert a 2 5 inch SATA hard disk into the bracket at a 45 degree angle and gently slide into the connector 4 Lower...

Страница 12: ...ZBOX Removing a hard disk 1 Locate the hard disk bracket and remove the thumb screw 2 Lift up on the plastic flap 3 Remove the hard disk from the bracket at a 45 degree angle close and screw the plas...

Страница 13: ...on the VESA mount noting the correct alignment and then secure the PC to the VESA mount with a coin To fasten the VESA mount your monitor must comply with VESA75 Or VESA100 standard Mechanical Loading...

Страница 14: ...SB ports on the system rear panel 4 Connecting to a DVI or VGA display Connect one end of a DVI VGA cable to an HDTV or monitor and the other end to the DVI port on the system rear panel If using a VG...

Страница 15: ...tem 5 Install system drivers to gain full functionality of the ZOTAC ZBOX hardware and features Installing system drivers Before you can use the full features of the ZOTAC ZBOX the system drivers must...

Страница 16: ...a static IP 1 Right click the network icon on the notification area and select Open Network Connections 2 Right click Local Area Connection and select Properties 3 Highlight Internet protocol TCP IP...

Страница 17: ...nd Password Click Next 10 Click Finish to finish the configuration 11 Enter your user name and password Click Connect to connect to the internet Contact your internet Service Provider ISP if you have...

Страница 18: ...2 9 1 MA 1 6 9 0 0 5 0 F...

Отзывы: