background image

37

3

M

G

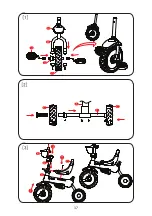
1.Insert the front frok into the main body.

2.Remove the screw from the handlebar(G),then insert it into the 
front fork,tighten it with screw(20N*M). 
3.Remove the screw from the main body(A),insert the seat(O) on the
main body,then screw up(20N*M).
4.Remove the front screw from the handlebar, insert the front 
basket(M) to the handlebar, and tighten it with screw(3N*M).

H

click

press and hold

pop-up

I

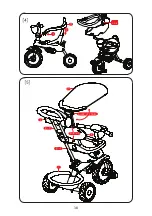
1.Insert the front protectiong ring(B) into the handlebar stem, and push the back 
parts onto the seats(H). Ensure both the front and back have securely  lacked into
pasition.


1.Insert the head rest(K) into the back of the seat, make sure the button is pop-up.

2.Open the canopy(P) by press and hold the button, then insert the canopy(P)
into the head rest.

Make sure the button on canopy (P) is pop-up.

3.Remove the screw from the bottom pushbar(E-1),and insert the top pushbar(E-2)
into the bottom pushbar,then tighten them with screw(10N*M).
4.Insert the rear basket(I) into the back of the main body.Make sure the rear
basket locks into the position on the rear axle(F) and main body.
5.Place the bag(L) on the top pushbar(E-2), and put the string of the bag(L)
on the pushbar(E-2)’s hook.

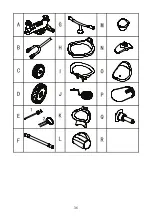
L

Rear axle

Main body

Front fork
Rear wheel 
Front wheel
  Pushbar (bottom)
  Pushbar (top)

Pedal

Head rest

Front basket

Clutch

Q

J

F

1.Insert the clutch (Q) and pedal (J) into the front wheel(D), unscrew the front fork(B),

then insert the front wheel(D) into the front fork,finally close the plastic,and 
screw on (3N*M).
2.Place the fender.

1.Remove the screw of main body, insert the rear axle (F) into the main body,

then screw on.
2.Remove the plastic of the rear axle, insert the rear wheel(C) into rear axle,
then insert the plastic.Finally, screw on the plastic with rear axle(3N*M).

Handlebar
Protection ring

Rear basket

Bag

Fender

Seat
Canopy

7811 ASSEMBLE INSTRUCTION

Содержание zooGO B-T7811

Страница 1: ...EM NO 7811 CHILDREN TRICYCLE 2 nd ion t le ed use an ng TRICYCLE INNER STANDRAD 1 EN71 1 2011 T KOLKA l TROJKOLKA l TRICYCLE DREIRAD l TRICICLO l TRIKOLESNIK ROWEREK TR JKO OWY l TRICIKLI zooGO B T781...

Страница 2: ......

Страница 3: ...CZ 4 SK 8 EN 12 DE 16 IT 20 SLO 24 PL 28 HU 32...

Страница 4: ...plastov pojist ky ze zadn n pravy Nasu te zadn n pravu do hlavn ho r mu a za roubujte 2 Nasu te zadn kola C na zadn n pravu vlo te plastov pojistky a p i roubujte 3N M Obr zek 3 1 Nasu te p edn vidlic...

Страница 5: ...edstavovat riziko Trojkolka by m la b t pe liv kontrolov na 5 Nen povoleno op tovn rozlo en a slo en 6 Vyhn te se pou v n v mokr m chladn m a hork m prost ed 7 Vyhn te se sr ce s jin mi tvrd mi v cmi...

Страница 6: ...ate n ho osv tlen je nebezpe n 18 V p pad n hodn ho a nebo prudk ho oto en d tek b hem pou v n m e doj t ke zvrhnut nebezpe razu 19 D t zkou ej c vyl zt i st t na d tk ch m e zp sobit p evrhnut t kolk...

Страница 7: ...u s n vodem k pou it kter je sou st t chto z ru n ch podm nek Spot ebitel nen opr vn n prov d t na v robku jak koliv zm ny 7 Na mechanick po kozen p i nespr vn m u v n v robku zejm na po kr b n ohnut...

Страница 8: ...y z hlavn ho r mu a zo zadnej n pravy F Odstr te plastov poistky zo zadnej n pravy Nasu te zadn n pravu do hlavn ho r mu a zaskrutkujte 2 Nasu te zadn koles C na zadn n pravu vlo te plastov poistky a...

Страница 9: ...3 Bez kontroly pred pou it m by mohlo d js k ohrozeniu die a a 4 Nespr vne zostavenie m e predstavova riziko Trojkolka by sa mala starostlivo kontrolova 5 Nie je povolen op tovn rozlo enie a zlo enie...

Страница 10: ...enn ho svetla Pou vanie za nedostato n ho osvetlenia je nebezpe n 18 V pr pade n hodn ho alebo prudk ho oto enia riadidiel po as pou vania m e d js k prevrhnutiu nebezpe enstvo razu 19 Die a sk aj ce...

Страница 11: ...ou t chto z ru n ch podmienok Spotrebite nie je opr vnen vykon va na v robku ak ko vek zmeny 7 Na mechanick po kodenia pri nespr vnom pou van v robku najm po krabanie ohnutie zlomenie kon trukcie ale...

Страница 12: ...rews from the main frame and rear axle F Remove the plastic locking devices from the rear axle Affix the rear axle onto the main frame and screw together 2 Affix the rear wheel C to the rear axle inse...

Страница 13: ...s are correctly affixed before use 3 Failure to do this check each time you use it could endanger your child 4 Incorrect assembly may represent a risk You should carefully check your tricycle 5 You sh...

Страница 14: ...uct is intended for use in daylight Use in insufficient light is dangerous 18 An accidental and or sharp turn of the handlebars during use may overturn the tricycle injury risk 19 A child trying to cl...

Страница 15: ...e cleaning and use instructions in compliance with the instruction manual that forms part of these warranty terms and conditions The consumer is prohibited to make any changes to the product 7 Warrant...

Страница 16: ...rachse ab Schieben Sie nun die Hinterachse in den Hauptrahmen und schrauben Sie sie fest 2 Stecken Sie die Hinterr der C auf die Hinterachse auf legen Sie die Kunststoffsicherungen ein und schrauben S...

Страница 17: ...Sie sich vor jeder Verwendung dass alle Teile richtig befestigt sind 3 Ohne diese Kontrolle vor der Verwendung k nnte das Kind gef hrdet sein 4 Ein falsches Zusammensetzen kann ein Risiko bedeuten Das...

Страница 18: ...Benutzung bei unzureichenden Lichtverh ltnissen ist gef hrlich 18 Bei einer zuf lligen und oder heftigen Drehung des Lenkers w hrend der Benutzung kann das Dreirad umkippen Unfallgefahr 19 Wenn das K...

Страница 19: ...ung nicht in Einklang mit der Gebrauchsanleitung vorgeht die Teil dieser Garantiebedingungen ist Der Verbraucher ist nicht berechtigt am Produkt irgendwelche nderungen vorzunehmen 7 Mechanische Besch...

Страница 20: ...o posteriore F Togliere i sistemi di bloc caggio in plastica dal mandrino posteriore Inserire il mandrino posteriore nel telaio e avvitare 2 Inserire le ruote posteriori C sul mandrino posteriore mett...

Страница 21: ...tere in pericolo il bambino 4 Un montaggio scorretto pu rappresentare un rischio Il triciclo deve essere attenta mente controllato 5 Non consentito il ripetuto montaggio e smontaggio 6 Evitare l uso i...

Страница 22: ...giorno pericoloso usarlo con luce insufficiente 18 Una rotazione accidentale e o brusca del manubrio durante il moto pu provocare il capovolgimento pericolo di lesioni 19 Un bambino che tenta di salir...

Страница 23: ...tto non rispettano le istruzioni di montaggio d uso di manu tenzione e di pulizia che fanno parte della presente garanzia L acquirente non autorizzato ad eseguire alcuna modifica sul prodotto 7 La gar...

Страница 24: ...blatnik Slika 2 1 Odvijte vijake z glavnega okvirja in s strani osi F Snemite plasti ne varovalke iz zadnje osi Zadnjo os namestite v glavni okvir in privijte 2 Nataknite zadnja kolesa C na zadnjo os...

Страница 25: ...iti 3 Brez temeljitega pregleda izdelka se lahko otrok pri igri po koduje 4 Nepravilno sestavljen izdelek lahko pomeni nevarnost Trikolesnik vedno temeljito preglejte 5 Ne razstavljajte in ponovno ne...

Страница 26: ...n za uporabo podnevi Uporaba brez ustrezne osvetlitve je nevarna 18 V primeru slu ajnega in ali ostrega obra anja ro ajev med uporabo lahko pride do padca nevarnost po kodb 19 Otrok ki posku a zlesti...

Страница 27: ...estavni del garancijskih pogojev Uporabnik nima pravice do izvajanja spre memb na izdelku 7 Reklamacija v okviru garancije ne velja in ne bo sprejeta v kolikor pride do po kodbe zaradi mehanskih udarc...

Страница 28: ...o tylna w ramie g wnej i przykr ci 2 Umie ci ko a tylne C na osi tylnej w o y plastikowe zabezpieczenia i przykr ci 3N M Ilustracja 3 1 Umie ci wide ki przednie na ramie g wnej 2 Wykr ci rub z kierow...

Страница 29: ...nowne rozmontowywanie i zamontowywanie 6 Unika u ytkowania w mokrym zimnym i gor cym rodowisku 7 Unika zderzania z innymi twardymi przedmiotami 8 Unika czyszczenia powierzchni lakierowanych mokr cierk...

Страница 30: ...ietleniu jest niebezpieczne 18 W wypadku przypadkowego i lub gwa townego obr cenia kierownicy podczas jazdy mo e doj do przewr cenia rowerka ryzyko urazu 19 Dziecko pr buj ce wysi lub sta na kierownic...

Страница 31: ...nowi c cz integraln warunk w gwarancji U ytkownik nie jest uprawni ony do dokonywania jakichkolwiek zmian i przer bek na wyrobie 7 Gwarancja nie obejmuje uszkodze maj cych miejsce wskutek niew a ciweg...

Страница 32: ...ol tsa el a m anyag biztos t ko kat a h ts tengelyr l Cs sztassa a h ts tengelyt a f v zba majd csavarozza a hely re 2 Cs sztassa a h ts kerekeket C a h ts tengelyre illessze be a m anyag biztos t kok...

Страница 33: ...elmulasztja vesz lynek teszi ki a gyermek t 4 A helytelen sszeszerel s kock zatot jelenthet A triciklit gondosan le kell ellen rizni 5 Az jb li sz t s sszeszerel s tilos 6 Ne haszn lja nedves h v s v...

Страница 34: ...ja A term k nem megfelel l t si viszonyok melletti haszn lata vesz lyes 18 V letlenszer s vagy hirtelen korm nyr nt s eset n a j rm felborulhat s r l svesz ly 19 A korm nyra felm szni fel llni k v n g...

Страница 35: ...tmutat jelen j t ll si felt telek r sz t k pez rendelkez seit A fogyaszt nem hajthat v gre a term ken semmilyen talak t sokat 7 A j t ll s nem vonatkozik a term k helytelen haszn lat b l ered mechanik...

Страница 36: ...Rear axle Main body Front fork Rear wheel Front wheel Pushbar bottom Pushbar top Pedal Head rest Front basket Clutch Handlebar Protection ring Rear basket Bag Fender Seat Canopy 7811 ASSEMBLE INSTRUCT...

Страница 37: ...crew on 2 Remove the plastic of the rear axle insert the rear wheel C into rear axle then insert the plastic Finally screw on the plastic with rear axle 3N M Q J F 1 Insert the clutch Q and pedal J in...

Страница 38: ...e front protectiong ring B into the handlebar stem and push the back parts onto the seats H Ensure both the front and back have securely lacked into pasition press and hold pop up I 1 Insert the head...

Страница 39: ......
Страница 40: ...Distributor v R Baby Direkt s r o Masarykova 118 664 42 Mod ice Tel 547 422 742 44 Fax 547 422 746 E mail prodej babydirekt cz www zopadesign com...

Отзывы: