Zoom Yes Скачать руководство пользователя страница 27

Zoom User Manual V1.0 

26 


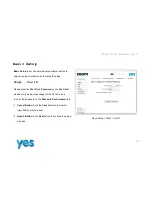
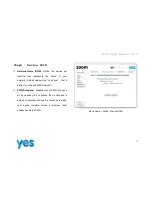
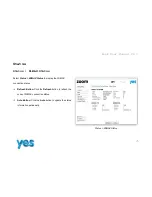
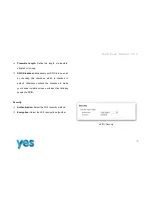
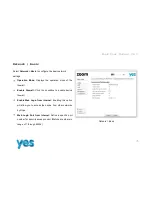
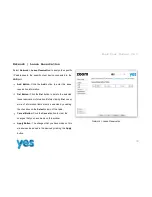
Status | Device Status 

Select 

Status > Device Status

 to display the status of device 

system uptime and WAN information. 


Refresh Button:

 Click the 

Refresh

 button to update the 

current device status. 


Auto Button:

 Click the 

Auto

 button to update the status 

information periodically.


Status > Device Status


Содержание Yes

Страница 1: ...Zoom WIMAX WIFI Gateway ...

Страница 2: ...se 4 Prerequisite Skills and Knowledge 4 Conventions Used in this Document 5 Chapter 1 Introduction 6 Product Overview 6 Product Package 7 Connectors 8 LED Indicators 10 Chapter 2 Installation 11 Chapter 3 Web Interface 15 Chapter 4 Reference manual 18 Contents ...

Страница 3: ...face Introduction 19 Basic Setup 20 Step1 Yes ID 20 Step2 Device SSID 21 Confirmation Step3 23 Complete Step4 24 Status 25 Status WiMAX Status 25 Status Device Status 26 Status Lease Status 27 WiFi 28 VoIP 33 Network 34 Network Basic 35 ...

Страница 4: ...er 38 Network Lease Reservation 40 Network Port Forwarding 41 Management 42 Management Password 42 Management Device Time 44 Management Device Name 45 Management Device Name 46 Control Panel 47 Control Panel Software 47 Control Panel Dynamic DNS 49 Control Panel About 53 ...

Страница 5: ...etworking LAN concepts and wireless Internet access infrastructures In addition you should be familiar with the following Hardware installers should have a working knowledge of basic electronics and mechanical assembly and should understand related local building codes Network administrators should have a solid understanding of software installation procedures for network operating systems under M...

Страница 6: ...ortant information that should be observed Additional information that may be helpful but which is not required bold Menu commands buttons and input fields are displayed in bold code File names directory names form names and system generated output such as error messages are displayed in constant width type value Placeholder for certain values e g user inputs value Input field format limitations a...

Страница 7: ...MAX and WIFI Gateway is an all in one device that integrates WiMAX Wi Fi and VoIP service Compliant with IEEE 802 16e WiMAX standard and Wi Fi 802 11b g n Zoom provides extended coverage and high performance wireless connectivity with minimized capital expenses Product Overview Chapter 1 Introduction ...

Страница 8: ...7 Product Package Item Qty 1 Zoom WIMAX and WIFI Gateway 1 2 User Manual 1 3 Power Adapter 1 4 RJ 45 Ethernet cable 1 If any of the items mentioned above are missing or damaged please contact our customer support immediately ...

Страница 9: ...en press the WPS button on the client you wish to connect within 2 minutes 2 RESET Button Reboot Reset Press and hold the Reset button for less than 5 seconds to reboot the device Or press and hold the Reset button for more than 5 seconds to reset IP address device name and login password settings of device to factory default 3 Telephone Port RJ 11 Connect your telephone to the device using an RJ ...

Страница 10: ...N Port RJ 45 This port is for connecting the device to your PC or other network equipment such as hubs or switches with an RJ 45 Ethernet cable 5 DC 12V Port Power Adapter Socket Connect the power adapter provided with the device ...

Страница 11: ...ff VoIP disable Not registered or RJ11 not connected On Device registered and on hook VoIP Flashing Device registered and off hook Off Wi Fi disable On Wi Fi enable Wi Fi Flashing Data Packet Transmit Off WPS Off WPS lights up when button is pressed Wi Fi WPS On WPB lights off when release WPS button Flashing Scanning until Network entry successfully WiMAX Signal Strength On Displays Signal Streng...

Страница 12: ... RJ 45 Ethernet cable that is supplied Step 3 Connect a standard telephone to the device VoIP port using a standard phone cable Step 4 Insert the power cord into the device s DC 12V power jack Step 5 Insert the power cord into power outlet Step 6 The device will start the boot process Please wait for a few seconds to let the boot process complete Chapter 2 Installation Installation ...

Страница 13: ...Zoom User Manual V1 0 12 Step 7 Select Local Area Connection Status from the Windows task bar and click Properties Local Area Connection Status ...

Страница 14: ...Zoom User Manual V1 0 13 Step 8 Double click on the Internet Protocol TCP IP Local Area Connection Properties ...

Страница 15: ...essfully This can be verified by observing the signal strength LEDs Please refer to Visual Indications section in Chapter 1 of this manual to find the location of these LEDs on the device At least one of these LEDs should be glowing continuously to confirm the successful connection to the Base Station Now you can start browsing the Internet Internet Protocol TCP IP Properties ...

Страница 16: ...0 15 Please follow the steps below to configure your device through the web interface Step 1 Open the Web browser and enter the default IP address of the device which is http 192 168 1 1 Web Browser Chapter 3 Web Interface ...

Страница 17: ...Zoom User Manual V1 0 16 Step 2 Enter the administrator login password to access web management interface The default Password is admin Welcome Page ...

Страница 18: ...Zoom User Manual V1 0 17 Step 3 The page shown here will be displayed on your browser after login You can now configure the device settings User Interface ...

Страница 19: ...nu Items Sub Items Menu Items Sub Items Basic Setup VoIP Control Panel Software Dynamic DNS About Status WiMAX Status Device Status Lease Staus Network Basic Internet Protocol DHCP Server Lease Reservation Port Forwarding Reboot Logout Reconnect WiFi Management Password Device Time Device Name Restore To Factory Chapter 4 Reference manual Please click Apply button every time the settings are chang...

Страница 20: ...ttons in the lower left corner Clicking Reboot will restart your device Click the Logout button to logout from the web interface When the Reconnect button is clicked the device will attempt reconnection to the Base Station Wi Fi Indicator VoIP Indicator WiMAX Signal Indicator UI Introduction ...

Страница 21: ...ps Step1 Yes ID Please enter the Yes ID and Password on the Yes Card provided in the product package for the first time And re enter the password on the Password Confirmation field Cancel Button Click the Cancel button to clear all input fields on this window Next Button Click Next button to continue the setup process Basic Setup Step1 Yes ID ...

Страница 22: ...your network Default value will be Yes Zoom last 6 digits of your device MAC Address SSID Broadcast Broadcast your SSID into open air by checking this checkbox that is checked in default Otherwise uncheck the checkbox to make your device invisible unless a wireless client already knows the SSID Basic Setup Step2 Device SSID ...

Страница 23: ...haracters or 64 hex digits Back Button Click Back button to go back to the previous setup process Next Button Click Next button to continue the setup process Basic Setup Step2 Device SSID WPA Key Be aware that other computer in the same range of your wireless network would be able to see your network if you enable SSID Broadcast so we strongly recommend you to enable the security option at the sam...

Страница 24: ...ation Step3 You can double confirm the input data in the previous setup process here Back Button Click Back button to go back to the previous setup process Done Button Click Done button to finish setup process Basic Setup Confirmation ...

Страница 25: ...Zoom User Manual V1 0 24 Complete Step4 The setup wizard is complete You can view the status by clicking on the Status page link in blue to redirect to the Status page Basic Setup Complete ...

Страница 26: ... Select Status WiMAX Status to display the WiMAX connection status Refresh Button Click the Refresh button to refresh the current WiMAX connection status Auto Button Click the Auto button to update the status information periodically Status WiMAX Status ...

Страница 27: ...us Device Status to display the status of device system uptime and WAN information Refresh Button Click the Refresh button to update the current device status Auto Button Click the Auto button to update the status information periodically Status Device Status ...

Страница 28: ... status of client host PC such as host name host PC s MAC address IP address and remaining lease time Refresh Button Click the Refresh button to display the updated information of the client host PC Auto Button Click the Auto button to refresh the information automatically Status Lease Status ...

Страница 29: ...nterface status Enable or disable the Wi Fi interface by clicking this button Network Name SSID Define the service set identifier that represents the name of your network Default value will be Yes Zoom last 6 digits of your device MAC Address Radio Channel Select the appropriate channel for your Wi Fi network WiFi ...

Страница 30: ...t the channel bandwidth for 802 11n only Transmit Power Select the Wi Fi transmit power from the drop down menu RTS Threshold Specify the packet size threshold of the device by changing the request to send RTS value Range 256 to 2432 CTS Protection Mode Set Clear to send CTS protection mode to Auto to ensures computers on a network can connect to a wireless router when many communications devices ...

Страница 31: ...dcast your SSID into open air by checking this checkbox which is checked in default Otherwise uncheck the checkbox to make your device invisible unless a wireless client already knows the SSID Security Authentication Select the Wi Fi security method Encryption Select the Wi Fi encryption algorithm WiFi Security ...

Страница 32: ...ble to disable access control ACL feature Allow To create a MAC filter list that allows the specific clients to have access to the wireless network Insert Button Click Insert to add MAC address up to 10 to the list Del Button Click Del to remove MAC address from the list WiFi Access Control List WiFi Access Control List Allow ...

Страница 33: ... Click Insert to add MAC address up to 10 to the list Del Button Click Del to remove MAC address from the list Cancel Button Click the Cancel button to clear the changes that you have made on this window Apply Button The changes that you have made on this window can be saved in the device by clicking the Apply button WiFi Access Control List Deny ...

Страница 34: ...ine1 Check on this checkbox to enable VoIP feature or uncheck it to disabled Cancel Button Click the Cancel button to clear the changes that you have made on this window Apply Button The changes that you have made on this window can be saved in the device by clicking the Apply button VoIP ...

Страница 35: ...ernet To enable this function follow the procedures below Step 1 Go to Network Then click Basic Step 2 Ensure that Enable Web Login from Internet is checked Step 3 Specify the Web Login Port from Internet to use Default is 8080 Step 4 When done click Apply to save the settings Enabling Web Login from Internet may expose Zoom to unauthorized access ...

Страница 36: ...de of the firewall Enable Firewall Click the checkbox to enable device firewall Enable Web Login from Internet Enabling this option will allow you to access the device from other networks by https Web Login Port from Internet Define a specific port number for security access control Matches numbers in range of 1 through 65536 Network Basic ...

Страница 37: ... The IP address of DMZ should be entered here Cancel Button Click the Cancel button to clear the changes that you have made on this window Apply Button The changes that you have made on this window can be saved in the device by clicking the Apply button The firewall feature can be used to block unauthorized access while allowing only the authorized communications from the Internet This feature als...

Страница 38: ...connection mode of the device to the WiMAX network Host Name Enter the host name provided by your service provider optional Cancel Button Click the Cancel button to clear the changes that you have made on this window Apply Button The changes that you have made on this window can be saved in the device by clicking the Apply button Network Internet Protocol ...

Страница 39: ...ment of IP address for the devices connected to the LAN Port of the device Enable DHCP Server Enable DHCP Server by clicking on the checkbox DHCP Server IP address Enter the IP address for device s DHCP server DHCP Starting IP address DHCP Ending IP address Define the IP address range that will be supported by the DHCP server DHCP Lease Time Specify the IP address renewal time Network DHCP Server ...

Страница 40: ...l V1 0 39 Cancel Button Click the Cancel button to clear the changes that you have made on this window Apply Button The changes that you have made on this window can be saved in the device by clicking the Apply button ...

Страница 41: ...on Del Button Click the Del button to delete the selected lease reservation information Before clicking Del one or more of information items must be selected by enabling the checkbox on the Select column of the table Cancel Button Click the Cancel button to clear the changes that you have made on this window Apply Button The changes that you have made on this window can be saved in the device by c...

Страница 42: ... please select TCP or UDP and then enter port and IP information such as WAN port range LAN IP address and LAN port range Del Button Click the Del button to delete the selected port forwarding rule Cancel Button Click the Cancel button to clear the changes that you have made on this window Apply Button The changes that you have made on this window can be saved in the device by clicking the Apply b...

Страница 43: ...n Password Enter a new password Confirm New Login Password Re enter the new password to confirm Cancel Button Click the Cancel button to clear the changes that you have made on this window Apply Button The changes that you have made on this window can be saved in the device by clicking the Apply button Management Password ...

Страница 44: ... IP address device name and login password to factory default Please see Connector section in CHAPTER 1 of this document to find the location of Reset button on the device Factory default password The factory default password is admin We strongly recommend you to change the login credential for device security ...

Страница 45: ... for your location from the drop down menu Auto Adjust for Daylight Saving Time You may enable this option if your location observes Daylight Savings Time Cancel Button Click the Cancel button to clear the changes that you have made on this window Apply Button The changes that you have made on this window can be saved in the device by clicking the Apply button Management Device Time ...

Страница 46: ...e on the address bar The default name is Yes Zoom last 6 digits of your device MAC Address Device Name Displays the current device name New Device Name Enter a new device name for your device Cancel Button Click the Cancel button to clear the changes that you have made on this window Apply Button The changes that you have made on this window can be saved in the device by clicking the Apply button ...

Страница 47: ...ment Device Name Select Management Restore To Factory to clear all users configuration and restore to factory default settings Apply Click the Apply button to reset the device settings to factory default Management Restore To Factory ...

Страница 48: ...PKG Click Browse button to select the IPKG file and then click Upgrade button to install the selected IPKG Or click the Remove button to delete the IPKG file Configuration Backup Configuration Enter the full file path or locate the backup file which you want to restore by clicking on Browse button and click Restore button to restore Control Panel Software ...

Страница 49: ...Zoom User Manual V1 0 48 the selected backup file Otherwise click on Browse button to select where you want to save your backup file and click on Save button to save the backup file ...

Страница 50: ...an internet device such as the Zoom to be remotely reachable by the user although it does not have a fixed IP address It allows the user to create a friendly URL address example zoom ddnsservice com for easy access to the Zoom remotely Below is a list of DDNS service providers supported on the Zoom www dyndns org www dyns cx www zoneedit com ...

Страница 51: ...ice providers Then follow the procedures below to set up the DDNS on Zoom Step 1 Go to Control Panel Then click Dynamic DNS Step 2 Ensure that Enable DDNS is checked Step 3 Select the DDNS Service Provider and then fill up the DDNS User Name Password and Host Name Step 4 When done click Apply to save the settings ...

Страница 52: ...S and Web Login from Internet Step 1 On the browser type in the user selected URL together with https and port number into the address bar example https zoom ddnsservice com 8080 Step 2 You will need to click allow on the warning message displayed on the browser to accept the device certificate Step 3 Browser will load the login page Step 4 Log into Zoom as per normal ...

Страница 53: ... order to keep the domain name associated DDNS Service Provider Select the address of DDNS service provider from the drop down menu Cancel Button Click the Cancel button to clear the changes that you have made on this window Apply Button The changes that you have made on this window can be saved in the device by clicking the Apply button Control Panel Dynamic DNS ...

Страница 54: ...rol Panel About Select Control Panel About to display the basic information about the device Service Provider Product Name WAN port MAC address LAN Port MAC address Model ID Device hardware version and Serial ID Control Panel About ...

Отзывы: