background image

25

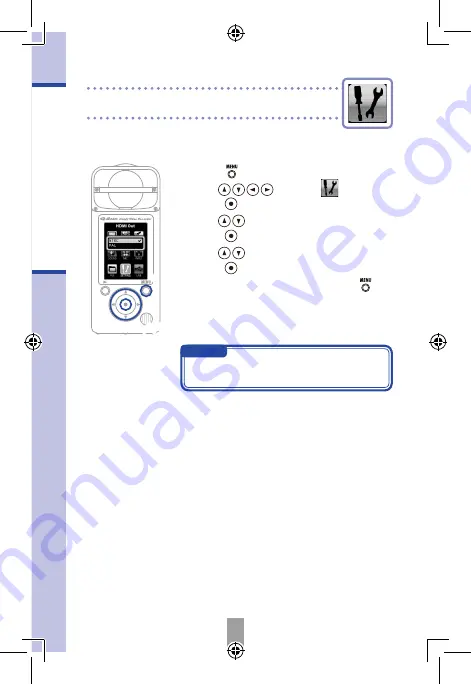
Setting HDMI video output

Setting HDMI video output

Set the HDMI video output format to suit the TV.

2,3,4

1

NOTE

NTSC is used in North America. Most 

other English-speaking regions use PAL.

1. 

Press   to open the Main Menu.

2. 

Use 

 to select

SETTING

and  

press  .

3. 

Use 

 to select 

HDMI Out

 and  

press  .

4. 

Use 

 to select 

NTSC

 or 

PAL

 and  

press  .

5. 

After completing the setting, press  .

Содержание Q2HD

Страница 1: ...User Guide Safety and Operation Precautions must be read before using the unit Q2HD ZOOM CORPORATION Copying or reproduction of this User Guide in part or in whole without permission is prohibited ...

Страница 2: ...cluded SD card from the computer and double click the HandyShare installer on it If your computer does not already have QuickTime installed follow the instructions that appear on your screen after starting HandyShare to install it HandyShare software for video editing and sharing User Guide this manual SD card Note Use alkaline batteries or rechargeable NiMH batteries ...

Страница 3: ...he unit Recording time or remaining recordable time for video or audio The icon appears when an SD card is loaded in the unit no icon if no SD card is loaded Input volume level Mic angle setting Image size frame rate during video recording Lo cut filter setting Recording level setting Sound quality when recording audio or video Scene setting for video recording Current operation status ...

Страница 4: ...ections Sound from the camera side of the unit can be recorded in mono or in stereo with a maximum width of 150º Play and pause recorded video and audio View video and information about operation Open various setting menus Select items and adjust the volume Listen to startup and shutdown sounds and recorded audio ...

Страница 5: ...d reader USB mic or web camera Connect to an iPad to use as a USB mic A ZOOM AD 17 AC adapter sold separately can also be connected here Output digital video and audio to an HDMI TV or other compatible device Attach a strap to help prevent acci dental dropping Delete recorded video and audio Turn the power ON and OFF Insert an SD SDHC or SDXC card into this slot ...

Страница 6: ...accurately Setting the battery type Note Use alkaline batteries or rechargeable NiMH batteries 1 5 2 3 4 1 5 1 Press to open the Main Menu 2 Use to select SETTING and press 3 Use to select Set Date and press 4 Use to set the current date and time 5 After completing the setting press 1 Press to open the Main Menu 2 Use to select SETTING and press 3 Use to select Battery and press 4 Use to set the b...

Страница 7: ... SD card s write protection switch is ON the card cannot be formatted 2 3 4 1 1 Press to open the Main Menu 2 Use to select SETTING and press 3 Use to select SD Format and press 4 Use to select Yes to format or No to cancel and press Select Yes to start formatting Select No to return to the SETTING menu 5 After formatting completes Done appears on screen and the SETTING menu reopens ...

Страница 8: ...MI outputs 2 3 4 2 3 4 1 5 1 5 1 Press to open the Main Menu 2 Use to select INPUT and press 3 Use to select Sound Monitor and press 4 Use to select On or Off and press 5 After completing the setting press NOTE Use the windscreen included in the APQ 2HD accessory package to further reduce noise 1 Press to open the Main Menu 2 Use to select INPUT and press 3 Use to select Lo Cut and press 4 Use to ...

Страница 9: ... mic sensitivity to suit the recording conditions 1 Using the Auto Gain setting 2 3 4 1 1 Press to open the Main Menu 2 Use to select INPUT and press 3 Use to select Auto Gain and press 4 Use to set the mic sensitivity and press Off Use the MIC GAIN dial to adjust manually Concert Use for band performances concerts and other loud situations Solo Use for solo performances and other quiet situations...

Страница 10: ...s and on stages with bright lights Video scene setting 2 3 1 4 1 Press to open the Main Menu 2 Use to select SCENE and press 3 Use to set the mode and press Auto Adjusts to lighting conditions automatically Concert lighting Best for concerts and other situations with bright lights Night Best for nighttime and other dark situations 4 After completing the setting press ...

Страница 11: ...Main uses File size HD1080 30 1920 x 1080 30 HD TV playback Larger HD720 60 1280 x 720 60 Recording fast movement HD720 30 1280 x 720 30 HD TV and computer playback WVGA 60 800 x 480 60 Saving SD card space and recording fast movement WVGA 30 800 x 480 30 Saving SD card space Smaller 1 Press to open the Main Menu 2 Use to select VIDEO and press 3 Use to select the video quality and frame rate and ...

Страница 12: ... quality is important The higher the sampling frequency kHz and bit rate values the better the audio quality Larger PCM 96 16 PCM 48 24 PCM 44 1 24 PCM 48 16 PCM 44 1 16 AAC 320kbps Record in a compressed AAC format when you need to save SD card space The higher the bit rate kbps value the better the audio quality AAC 256kbps AAC 192kbps AAC 128kbps AAC 64kbps Smaller 1 Press to open the Main Menu...

Страница 13: ... You can also use to set the mic angle while recording or using the USB mic function Setting the mic angle 1 Press to open the Main Menu 2 Use to select MIC and press 3 Use to set the mic angle MONO Record in mono 30 60 90 120 150 Record using the set stereo width 4 After completing the setting press ...

Страница 14: ...on screen Audio only To set whether to record video with audio or audio only use CAMERA Use to zoom in and out and use to adjust the monitoring volume Zoom in and out Adjust the volume NOTE If the transfer speed to the card is not fast enough during video audio recording Low Speed Card appears on the screen and recording stops To avoid this we recommend using cards that are Class 4 or faster Infor...

Страница 15: ...er buttons 2 1 2 NOTE Only files that have been recorded with the can be played back on it During video playback press and hold to show the video in landscape view In this mode use to adjust the volume and to search forward backward Press and hold again to return to vertical display Adjust the volume Press and hold during playback to search backward forward Press to pause during playback and resta...

Страница 16: ... of open space on the media card 1 Press while the file that you want to delete is playing If you press this when on the main operation screen the last recorded or played file will be selected for deletion 2 When the confirmation screen opens select Yes to delete the recording or No to cancel and then press 1 2 ...

Страница 17: ...ssage Press again to open the file selection screen 2 Use to select a recording that you want to delete and press 3 Repeat step 2 as many times as necessary to select more files to delete To delete all files on the card press 4 Press when you are done selecting files 5 When the confirmation screen opens select Yes to delete the recordings or No to cancel and then press ...

Страница 18: ...nd press 3 Thumbnails of the recorded files are shown Use to select the file that you want to edit and press 4 The editing menu opens Use to select the item you want and press See the following page for the editing options 5 After editing a confirmation screen opens Select Yes to execute the change or No to cancel and then press 6 When you are done editing press ...

Страница 19: ...y pause Confirm the file dividing point INFORMATION about the file Return to the editing menu TRIM partial deletion Move trim points to set how much of the file beginning end to delete Switch between beginning and end trim points Play pause Confirm the trim points ...

Страница 20: ... or off on page 7 This unit can be connected to various external devices as needed Connect to a computer by USB to use as a card reader USB mic or Web camera Use a USB cable to connect to a computer or iPad See Connecting by USB on page 20 NOTE Some TVs might not support the audio format and correct playback might not be possible Connecting external devices The HDMI uses a Type C Mini connector Wh...

Страница 21: ... a USB mic you can use the INPUT functions and adjust the mic angle Using with a computer as a card reader or USB mic 1 Connect the recorder to a Windows PC or Macintosh with a USB cable 2 Press to turn it on The USB operation screen will appear 3 To use as a card reader use to select the card icon and press To use as a USB mic select the mic icon and press The computer should recognize the record...

Страница 22: ...able 2 Press to turn it on The USB operation screen will appear 3 Use to select the video icon and press 4 After the connects to the computer you can use it as a web camera for video streaming and other applications 5 When you have finished using the recorder with the computer unmount the unit from the computer before disconnecting the USB cable 3 ...

Страница 23: ... can simultaneously transmit video and audio of up to HD720p and 48kHz 16bit WAV quality Computer playback cannot be output from the A driver stored on the included SD card is necessary to use the unit as a web camera This driver can also be down loaded from www zoom co jp When connected as a web camera you can use the INPUT functions set the scene type and adjust the mic angle You cannot however ...

Страница 24: ...r with an iPad by USB cable The iPad should recognize the recorder 5 When you have finished disconnect the USB cable You can use this recorder as a USB mic by connecting it to an iPad using an Apple Camera Connection Kit If the does not have batteries or enough remaining battery charge it cannot be used as a USB mic with an iPad While using the recorder as a USB mic you can use INPUT functions and...

Страница 25: ...ING and press 3 Use to select Backlight and press 2 3 4 5 1 Adjusting the display brightness Brightness Power saving 4 Use to select Brightness and press 5 Use to set the brightness and press Set the power saving mode 4 Use to select Power Saving and press 5 Use to select On or Off and press NOTE When on the display will darken if no operation has occurred for 30 seconds When using an AC adapter t...

Страница 26: ...format to suit the TV 2 3 4 1 NOTE NTSC is used in North America Most other English speaking regions use PAL 1 Press to open the Main Menu 2 Use to select SETTING and press 3 Use to select HDMI Out and press 4 Use to select NTSC or PAL and press 5 After completing the setting press ...

Страница 27: ... defaults Restoring default settings 1 Press to open the Main Menu 2 Use to select SETTING and press 3 Use to select Reset and press 4 Use to select Yes to reset or No to cancel and press 5 After resetting completes Done appears and the SETTING menu reopens 2 3 2 3 1 4 1 5 1 Press to open the Main Menu 2 Use to select SETTING and press 3 Use to select Information and press 4 Check the information ...

Страница 28: ...co jp 1 directory on the SD card 2 Insert the SD card into the unit s card slot 3 While pressing and holding press until the unit starts and the FIRMWARE UPDATE screen opens 4 If the version upgrade shown is the one desired select Yes and press 5 When Complete appears after the version upgrade completes press ...

Страница 29: ...this device This indicates something that could cause serious injury or death WARNING This indicates something that could cause bodily injury or damage to property CAUTION You might need this User Guide in the future Always keep it in a place where you can access it easily This must be done This must not be done WARNING CAUTION Operation environment Do not use in places that become extremely hot o...

Страница 30: ...cur in a particular installation If this equipment does cause harmful interference to radio or television reception which can be determined by turn ing the equipment off and on the user is encouraged to try to correct the interference by one or more of the following measures Reorient or relocate the receiving antenna Increase the separation between the equipment and the receiver Connect the equipm...

Страница 31: ......

Страница 32: ...ZOOM CORPORATION 4 4 3 Kanda Surugadai Chiyoda ku Tokyo 101 0062 Japan www zoom co jp Q2HD 5000 1 ...

Отзывы: