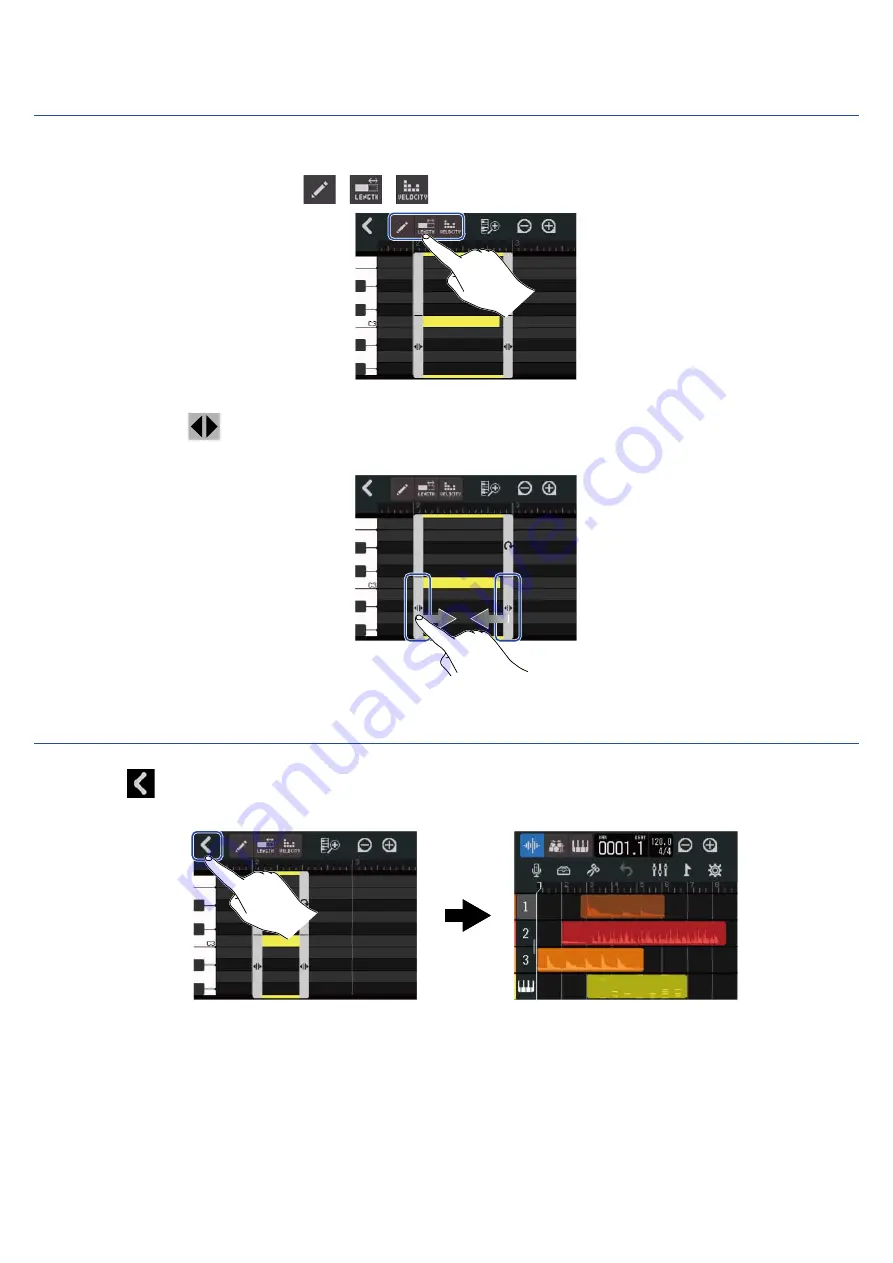
Zoom MultiTrak R12 Скачать руководство пользователя страница 114

Trimming regions

Regions can be trimmed to delete unwanted parts.

1.

On the Piano Roll Screen, tap 

/

/

 to turn them off.

2.

Drag left/right 

 at the bottom left/right of the region to set the range.

Set these to leave the necessary part. Parts outside the selected range will be cut.

Completing editing

1.

1. Tap 

 on the Piano Roll Screen.

The Track View Screen will reopen.

114

Содержание MultiTrak R12

Страница 1: ...ission is prohibited Product names registered trademarks and company names in this document are the property of their respective companies All trademarks and registered trademarks in this document are...

Страница 2: ...iPad iPadOS and Mac are trademarks of Apple Inc App Store is a service mark of Apple Inc iOS is a trademark or registered trademark of Cisco Systems Inc USA The SD SDHC and SDXC logos are trademarks R...

Страница 3: ...ts 33 Opening projects 38 Changing project settings 40 Opening the screen where various project settings can be made 40 Changing project tempos 41 Changing project time signatures 42 Setting the click...

Страница 4: ...ating projects 141 Checking project information 142 Deleting projects 143 Rendering projects as WAV les 144 Saving projects to USB ash drives 146 Importing projects from USB ash drives 147 Using as an...

Страница 5: ...ing microSD cards 179 Checking microSD card information 179 Testing microSD card performance 180 Formatting microSD cards 182 Using as a card reader 184 Restoring default setting values 187 Managing t...

Страница 6: ...own as waveforms while synthesizer regions are shown as performance data MIDI notes Moreover WAV and MIDI les on microSD cards and USB ash drives can be added as regions Snapping This function aligns...

Страница 7: ...ck Hi Z switch Turn Hi Z on o for INPUT 1 Turn this on as necessary for the connected guitar or bass Input PEAK indicators GAIN knobs Use the input GAIN knobs to adjust input signals Adjust these so t...

Страница 8: ...d Press to skip forward one bar Press and hold to search forward Press this to stop recording and playback Press when stopped to move the recording playback position to the beginning of the project Pr...

Страница 9: ...Bottom Battery compartment cover Open this when installing or removing AA batteries 9...

Страница 10: ...Side microSD card slot This supports cards that meet microSDHC microSDXC speci cations 10...

Страница 11: ...12 and in the settings le in the project folder on the microSD card USB Type C port Using this projects can be copied to and imported from USB ash drives USB MIDI keyboards can also be connected and u...

Страница 12: ...nser mic is connected turn on phantom power Enabling tracks for recording Guitars basses and other instruments When directly connecting a guitar or bass with passive pickups use INPUT 1 and set to ON...

Страница 13: ...ded during operation Track View Screen This is the normal recording editing screen Since recorded waveforms and their positions can be examined easily this is useful for thinking about song structure...

Страница 14: ...egions are shown as notes See Editing regions for details about region operations including moving adding deleting and dividing them NOTE The maximum numbers of regions in a single project are as foll...

Страница 15: ...Slide up down left or right to show tracks that were hidden and to change the part of the timeline that is visible 15...

Страница 16: ...indicators Peak indicators These retain the peak levels of input playback signals for a set amount of time after fader adjustment Track level meters These show the input playback signal levels after...

Страница 17: ...MASTER fader and level meters This shows the MASTER fader position and MASTER track levels EFFECT fader and level meters This shows the EFFECT fader position and EFFECT track levels 17...

Страница 18: ...elected track type can be switched Audio tracks Rhythm track Synth track Level Meter View Screen only Recording playback time This shows the time in minutes and seconds of the recording playback posit...

Страница 19: ...election Screen When the track type is this opens the Synth Type Selection Screen Edit button When the track type is or this opens the Wave Editor Screen When the track type is this opens the Piano Ro...

Страница 20: ...and Level Meter View Screen This opens the Level Meter View Screen This opens the Track View Screen Marker button This opens the Marker Menu Project Settings button This opens the Project Settings Sc...

Страница 21: ...p a value you want to set The current setting value is shown in blue Tap Change settings Tap and to change settings Slide Adjust While touching a slider move it horizontally to adjust the setting valu...

Страница 22: ...touching the display slide vertically to scroll Returning to the previous screen Home Screen Track View Screen Level Meter View Screen Tap at the top left of the screen To return to the Home Screen t...

Страница 23: ...yboard to input characters Character input area A cursor shows the input position Move cursor Keyboard Use to input characters Switch between uppercase and lowercase Cancel input This reopens the prev...

Страница 24: ...speci cations are supported Always make certain that the power is o when inserting or removing a microSD card Inserting or removing a card while the power is on could result in data loss When insertin...

Страница 25: ...tors and headphones can be connected to check the sound Use OUTPUT to adjust the OUTPUT volume Use PHONES to adjust the headphone volume NOTE Turn powered monitors o before connecting them HINT The OU...

Страница 26: ...artment cover on the bottom Then insert 4 AA batteries NOTE Use only one type of battery alkaline NiMH or lithium at a time The remaining battery charge is shown on the display Control Bar overview Se...

Страница 27: ...r AD 17 to the USB port Type C Then plug the AC adapter into an outlet USB Type C Using other power supplies The R12 can be operated using bus power from a computer connected to the USB port Type C A...

Страница 28: ...s the R12 power on opening the Projects Screen Opening projects or Home Screen Home Screen overview on the touchscreen The rst time the power is turned on after purchase as well as after the R12 has b...

Страница 29: ...card is inserted properly Inserting microSD cards If Invalid SD card appears on the display the card is not formatted correctly Format the microSD card Formatting microSD cards or load a di erent micr...

Страница 30: ...he displayed date format to use mm dd yy month day year dd mm yy day month year yy mm dd year month day 3 Tap Done This con rms the set date and time and opens the Projects Screen Create a new project...

Страница 31: ...HINT The date and time setting can also be changed later from the Menu screen Setting the date and time 31...

Страница 32: ...ects Screen Tap a project to select it for recording playback and editing New projects can also be created on the Projects Screen Follow these steps to open the Projects Screen 1 Tap on the Home Scree...

Страница 33: ...at the following times When the Projects Screen is opened from another screen When recording completes When the power is turned o When a new project is created When the Project Settings Screen is clos...

Страница 34: ...names can be changed later Changing project names Tap Details to set the bit depth before creating a project Creating empty projects using speci c settings Projects can be made after setting the temp...

Страница 35: ...ures Tempo This changes the setting of the tempo used for the entire song 40 0 250 0 Changing project tempos Time Signature This changes the setting of the time signature used for the entire song Chan...

Страница 36: ...ZOOM9999 Tap to create a project with an edited name That name will be saved and used when creating new projects adding consecutive numbers in a 01 format automatically to the ends of their names Pro...

Страница 37: ...ettings made on the Details Screen are saved The same settings will be used when creating new projects later Tapping Create on the Projects Screen without making settings on the Details Screen will cr...

Страница 38: ...cts Screen 2 Tap the desired project to select it The selected project will be framed in blue HINT Tap project name order or date and time used order to change the order shown 3 Tap Open The project s...

Страница 39: ...se After repairing a project a warning mark will be added to the original invalid project and a new repaired project will be created on the Projects Screen Opening projects Repaired project Original i...

Страница 40: ...t settings can be made during playback Playing projects Opening the screen where various project settings can be made 1 Tap on the Home Screen Track View Screen Level Meter View Screen Track View Scre...

Страница 41: ...ill be shared by the e ects When the Project Settings Screen is open tapping multiple times will also set the tempo The tempo will be calculated from the intervals between taps tap tempo If the projec...

Страница 42: ...he desired Time Signature setting on the Project Settings Screen Opening the screen where various project settings can be made HINT The options are 4 4 3 4 and 6 8 Tapping the tempo time signature in...

Страница 43: ...nt on o setting and adjustable volume Using the click metronome Set whether the click is used during recording and playback 1 Tap On or O for Click on the Project Settings Screen Opening the screen wh...

Страница 44: ...ere various project settings can be made Setting Explanation O This turns o the precount On This turns on the precount HINT The number of beats in the precount depends on the time signature setting Ch...

Страница 45: ...d Sound setting on the Project Settings Screen Opening the screen where various project settings can be made Setting Explanation Bell Metronome sound with bell on accents Click Metronome sound click o...

Страница 46: ...can be made HINT This can be set from 0 to 100 Use to set the click output s PHONES The sound is output only from the PHONES jack The balance with other output can also be adjusted Adjusting the volum...

Страница 47: ...oject Settings Screen Opening the screen where various project settings can be made Set the output destination for each track to MASTER or CLICK MASTER The sound is output from both the OUTPUT and PHO...

Страница 48: ...djusted 1 Set to PHONES When set to OUTPUT PHONES the balance adjusted using the track faders is output to both the OUTPUT and PHONES jacks 2 Turn to adjust the balance Turn right to increase the CLIC...

Страница 49: ...On notes and regions will be aligned to ruler increments when moved Control Bar overview 1 Tap On or O for Snap on the Project Settings Screen Opening the screen where various project settings can be...

Страница 50: ...ne Enabling tracks for recording 3 Play the open string that you want to tune and adjust its pitch The pitch detuning with the nearest note name or string number will be shown Using the chromatic tune...

Страница 51: ...guitar tuning with a 7th string B E A D G B E Bass Standard bass guitar tuning with a 5th string B E A D G Open A Open A tuning open strings play A chord E A E A C E Open D Open D tuning open strings...

Страница 52: ...NOTE This can be set from 435Hz to 445Hz Using at tunings All strings can be tuned down from standard tuning by 1 3 semitones 1 Tap or on the Tuner Screen Using the tuner NOTE This can be set from 0 t...

Страница 53: ...ower on Turning the power on Create a new project Creating new projects or open a project Opening projects Make input settings Adjusting input levels Making track settings Record Select tracks to reco...

Страница 54: ...XLR connectors INPUT 1 and 2 support phantom power 48V When connecting a condenser mic that requires phantom power turn phantom power on Enabling tracks for recording NOTE When connecting devices tha...

Страница 55: ...struments Guitars basses synthesizers and other electronic instruments can be connected to INPUT 1 and 2 using cables with standard 1 4 inch plugs When directly connecting a guitar or bass with passiv...

Страница 56: ...will be recorded Track types can be checked on the Track View Screen 1 Tap on the Home Screen Track View Screen Level Meter View Screen Track View Screen Level Meter View Screen This opens the Input R...

Страница 57: ...the tracks armed for recording inputs are shown along with the input phantom power settings NOTE The input signals selected this way will also be sent to the MASTER tracks By connecting a MIDI keyboar...

Страница 58: ...eir input levels Adjust them so that their indicators do not light HINT If the sound distorts even after lowering the input level try changing mic positions and adjusting the output levels of connecte...

Страница 59: ...ducing input signals that have high levels Gate This cuts input signals with low levels reducing background noise The compressor and limiter lower input signals with high levels according to the param...

Страница 60: ...input signal exceeds the threshold level Gate This adjusts the speed that the e ect is deactivated after the input signal exceeds the threshold level Release Time Comp Limiter This adjusts how quickly...

Страница 61: ...settings can be made separately for each input 4 Tap the desired setting Setting Explanation O This turns the Comp Limiter Gate o No settings can be made from step 2 Compressor This selects the compre...

Страница 62: ...dBFS for the compressor and limiter This can be set from 80 to 2 dBFS for the noise gate 6 Slide the Attack Time slider or tap and to adjust the attack time HINT This can be set from 1 to 4 ms 7 Slide...

Страница 63: ...s a rhythm or synthesizer track the track number will be replaced with a rhythm or synthesizer track icon Setting Explanation Audio track Sound input through an INPUT jack can be recorded and played b...

Страница 64: ...NOTE Each project can only have one set synthesizer track If a synthesizer track already exists and has a region a new synthesizer track cannot be set 64...

Страница 65: ...itor panning and stereo links can be set 1 Double tap the header for the track that you want to set 2 Tap Track Settings This opens the Track Settings Screen HINT Tap at the top of the screen to open...

Страница 66: ...On a Track Settings Screen Opening Track Settings Screens slide the Pan slider or tap NOTE The setting range is L100 left Center R100 right This panning adjustment only a ects the monitoring signal I...

Страница 67: ...sliders or tap High This adjusts the boost cut of high frequency equalization Type shelving Gain range 12 dB 12 dB Frequency 10 kHz Middle This adjusts the boost cut of mid frequency equalization Typ...

Страница 68: ...handled as a stereo sound This will record the tracks as stereo data which is convenient when editing for example Stereo Link function 1 On a Track Settings Screen Opening Track Settings Screens tap O...

Страница 69: ...mount the e ect is applied can be adjusted by setting the level sent to the e ect send level Reverb delay and other individual e ects as well as patch memories can be selected When a patch memory is s...

Страница 70: ...desired patch memory and tap See Editing patch memories for details about how to edit patch memories 3 Slide the Send Level slider or tap and This adjusts the send level for the selected track 4 Slide...

Страница 71: ...5 Use the EFFECT fader to adjust the e ect level of all tracks NOTE To record a ected sounds use insert input e ects 71...

Страница 72: ...track to which the insert input e ect will be assigned NOTE E ects can only be used on audio tracks 2 Tap in the Control Bar 3 On the E ect Screen select a patch memory and tap The Track View Screen...

Страница 73: ...rameters of the e ects Adjusting e ect parameters Tuner button Tap this to use the tuner Using the tuner Patch memory On O button Tap this to turn the patch memory on o On O Select previous patch memo...

Страница 74: ...een See Character Input Screen overview for editing procedures Select next patch memory HINT The content of edited patch memories will be saved automatically Turning patch memories on o 1 Tap On or O...

Страница 75: ...reen Then tap the desired e ect to select it E ect on o Tap this to turn the e ect on o E ect adjustment parameters Slide the patch memory sliders or tap and to adjust the parameters NOTE Three e ects...

Страница 76: ...ing it copy it to an empty patch memory 1 Tap on the patch memory Edit Screen Opening the patch memory Edit Screen This opens a patch memory list 2 Tap the name of the copy destination patch memory 3...

Страница 77: ...ning the patch memory Edit Screen This opens the Character Input Screen 2 Input the patch memory name See Character Input Screen overview for how to input characters 3 When Done appears tap Close This...

Страница 78: ...Changing patch memory levels 1 On the patch memory Edit Screen Opening the patch memory Edit Screen slide the Patch Level slider or tap and NOTE This can be set from 0 to 120 78...

Страница 79: ...tor lights during recording Pressing when a screen other than the Track View Screen or Level Meter View Screen is open will open one of those screens 2 Press to stop NOTE A project can have a maximum...

Страница 80: ...ons can be tapped to switch to the Track View Screen and Level Meter View Screen Control Bar overview Press to move to the next marker or to move to the previous marker Using markers If undo is used w...

Страница 81: ...hythm loops can be assigned to it as desired and played back 1 Tap the track on which you want to place a rhythm loop on the Track View Screen This highlights the tapped track 2 Tap This changes the t...

Страница 82: ...5 Tap for the rhythm loop you want to add The selected rhythm will be added to the rhythm track NOTE The rhythm loop will be added to the selected track from the playback position Rhythm loops are au...

Страница 83: ...th Note Beats 168 Neo Soul 90 Pop Rock 136 Modern 80 s 100 Retro Rock 110 80 s Pop 118 Hard Rock 80 Synthpop 120 Punk Rock 130 Big Room House 128 Funk Rock 95 Tech House 125 Britpop 80 Dubstep 140 Ind...

Страница 84: ...12 the keyboard can be played to record the selected synthesizer sound Using MIDI keyboards Selecting the synth sound 1 On the Track View Screen tap the track you want to record the synth on This high...

Страница 85: ...8 notes can be output at a time 8 voice polyphony The range is C0 E8 When notes are output the red indicators above the keyboard light 5 Tap a synth name to select it The tapped synth will be selecte...

Страница 86: ...red Enabling tracks for recording 3 Press Recording will start from the current playback position 4 Play the MIDI keyboard The MIDI keyboard performance will be recorded as MIDI data on the synth trac...

Страница 87: ...d Press and hold Move playback position forward backward Press Stop Press or Return to beginning Press when stopped Adjust track volume Move channel fader Adjust master track volume Move MASTER fader...

Страница 88: ...orizontally Tap to zoom out on the timeline display This enables showing many bars at the same time Tap to zoom in on the timeline display This enables displaying more detail Move playback position Sl...

Страница 89: ...Markers can be used to make identifying the overall structure of a song easier and are convenient when editing and mixing down Editing regions Use the Track View Screen to move delete copy paste loop...

Страница 90: ...ghlights that region and opens the Option Menu at the top of the screen 2 Tap Select 3 Tap the other regions that you want to move The selected regions will be highlighted Tapping a selected region wi...

Страница 91: ...back repeatedly 1 On the Track View Screen tap the region you want to loop This highlights the selected region 2 Drag the right edge of the region Dragging right will increase the number of loops whi...

Страница 92: ...notes manually Editing notes synth regions 1 On the Track View Screen double tap an area with no region on the synth track The Option Menu will open at the top of the screen 2 Tap Create Region An emp...

Страница 93: ...or USB ash drive in advance When loading from a microSD card Put the les in the AUDIO folder on the microSD card Folder and le structure on microSD cards When loading from a USB ash drive Put the les...

Страница 94: ...load from a microSD card or USB Memory to load from a USB ash drive HINT When loading from a USB ash drive connect it to the USB port Connecting USB ash drives 6 Tap to preview the le you want to loa...

Страница 95: ...uld be exceeded Total number of audio and rhythm regions 50 Synth regions 80 8 Input the le name of the loaded WAV le See Character Input Screen overview for how to input characters NOTE If Project wa...

Страница 96: ...e in advance When loading from a microSD card Put the les in the MIDI folder on the microSD card Folder and le structure on microSD cards When loading from a USB ash drive Put the les in the ZOOM_R12...

Страница 97: ...of each channel will be automatically assigned from their program change numbers The notes in the synth regions that have been loaded using Ch All cannot be edited Ch All cannot be selected if the sy...

Страница 98: ...le you want to load This completes loading the track and opens the Track View Screen NOTE An error message will appear if it cannot be loaded Select a di erent le Loading is not possible if the maxim...

Страница 99: ...cations 1 On the Track View Screen double tap the region that you want to copy and paste This highlights that region and opens the Option Menu at the top of the screen 2 Tap Copy The selected region w...

Страница 100: ...en at the top of the screen 5 Tap Paste This pastes the copied region at the playback position The playback position will move to the end of the pasted region Tap anywhere else to close the Option Men...

Страница 101: ...tap the region that you want to delete This highlights that region and opens the Option Menu at the top of the screen 2 Tap Delete 3 Tap Execute The selected region will be deleted Tap Cancel to canc...

Страница 102: ...te This highlights that region and opens the Option Menu at the top of the screen 2 Tap Select 3 Tap the other regions that you want to delete The selected regions will be highlighted Tapping a select...

Страница 103: ...5 Tap Execute The selected region will be deleted Tap Cancel to cancel deletion and return to the previous screen 103...

Страница 104: ...move the playback position to where you want to split the region 2 Double tap the region that you want to split This highlights that region and opens the Option Menu at the top of the screen 3 Tap Sp...

Страница 105: ...the Waveform Editing Screen 1 Tap the audio or rhythm region with the waveform that you want to edit to select it This highlights that region 2 Tap in the Control Bar The Waveform Editing Screen for t...

Страница 106: ...1 On the Waveform Editing Screen drag left right at the bottom left and right of the region to set the range Set these to leave the necessary part Parts outside the selected range will be cut 2 Tap T...

Страница 107: ...pitches Regions that have had lengths changed can be saved as new audio data 1 On the Waveform Editing Screen tap to turn this function on is o 2 Drag left and right to adjust the length of the region...

Страница 108: ...Input the le name of the edited audio le See Character Input Screen overview for how to input characters 5 When Done appears tap Close The le with the changed length will be assigned to the track 108...

Страница 109: ...Completing editing 1 Tap on the Waveform Editing Screen The Track View Screen will reopen 109...

Страница 110: ...ning the Piano Role Screen 1 On the Track View Screen tap the header of the synth track with the MIDI notes you want to edit This highlights the track header 2 Tap in the Control Bar The Piano Roll Sc...

Страница 111: ...l to add a region and note at that position HINT The pitch of the note will be the same as on the piano keyboard shown at the left edge Scroll up down to raise lower the octave When the place where a...

Страница 112: ...Changing note lengths 1 On the Piano Roll Screen tap to turn this function on is o 2 Tap a note and slide it left right to change its length HINT The shortest length is a 32nd note 112...

Страница 113: ...Screen tap to turn this function on is o 2 Tap the note for which you want to adjust the velocity A Velocity Slider will appear at the top of the screen 3 Slide the slider or tap and to adjust the vel...

Страница 114: ...Roll Screen tap to turn them o 2 Drag left right at the bottom left right of the region to set the range Set these to leave the necessary part Parts outside the selected range will be cut Completing...

Страница 115: ...will also be deleted 1 Double tap the header of the track that you want to delete on the Track View Screen The Option Menu will open at the top of the screen 2 Tap Delete 3 Tap Execute This will dele...

Страница 116: ...ing the currently selected sound That synth track will be converted to an audio track and the exported audio le will be assigned to it 1 On the Track View Screen double tap the header of the synth tra...

Страница 117: ...Input the name of the audio le to be exported See Character Input Screen overview for how to input characters 6 When Done appears tap Close This converts the synth track to an audio track and reopens...

Страница 118: ...the microSD card 1 On the Track View Screen double tap the header of the track that you want to export as a WAV or MIDI le The Option Menu will open at the top of the screen 2 Tap Export 3 Slide the...

Страница 119: ...the name of the WAV or MIDI le to be exported See Character Input Screen overview for how to input characters 6 When Done appears tap Close This exports the track as a WAV or MIDI le and reopens the T...

Страница 120: ...Reordering tracks 1 Tap the header of the track that you want to reorder on the Track View Screen This highlights the tapped track header 2 Drag it to the desired position 120...

Страница 121: ...Control Bar ruler Adding markers 1 On the Track View Screen move the playback position to where you want to add a marker HINT The playback position can be moved in ruler increments by pressing and 2 T...

Страница 122: ...rkers can be moved one bar at a time If another marker already exists movement will stop at the bar next to it 4 Tap a marker name in the Marker Menu 5 Change the marker name as necessary See Characte...

Страница 123: ...e playback position can be moved in ruler increments by pressing and 2 Tap This opens the Marker Menu at the top of the screen 3 Tap to move the marker Tap anywhere else to close the Marker Menu HINT...

Страница 124: ...creen move the playback position to the marker you want to rename HINT The playback position can be moved in ruler increments by pressing and 2 Tap This opens the Marker Menu at the top of the screen...

Страница 125: ...ame See Character Input Screen overview for how to input characters HINT Marker names can use a maximum of 10 characters 5 When Done appears tap Close This changes the marker name and returns to the T...

Страница 126: ...o delete HINT The playback position can be moved in ruler increments by pressing and 2 Tap This opens the Marker Menu at the top of the screen 3 Tap Delete 4 Tap Execute Tap Cancel to cancel deletion...

Страница 127: ...ing to the Level Meter View Screen Switching to the Track View Screen Checking track levels The levels of all tracks the overall level and the send e ect level can be checked at a glance on the Level...

Страница 128: ...g the track numbers right on the Track View Screen This opens the mixer 2 Tap This mutes that track and lights Multiple tracks can be muted at the same time Slide up and down on the screen to mute oth...

Страница 129: ...y their signals 1 Drag the track numbers right on the Track View Screen This opens the mixer 2 Tap This mutes all other tracks and lights Multiple tracks can be soloed simultaneously Slide up and down...

Страница 130: ...racks and use the EFFECT fader for the send e ect level and the MASTER fader for the overall level Check the levels on the Level Meter View Screen Levels and fader positions of individual tracks Overa...

Страница 131: ...lign the physical fader position with the current fader position Then the position of the physical fader will start adjusting the level Track faders These show the current fader position settings Trac...

Страница 132: ...layback sounds can be adjusted See Adjusting panning for monitoring for operation details Adjusting EQ The frequency bands of individual tracks can be boost cut See Adjusting EQ for details about oper...

Страница 133: ...wing format Sample rate 44 1 kHz Bit depth As set during project creation Creating empty projects using speci c settings 1 Tap on the Level Meter View Screen will light 2 Press This starts mixdown fro...

Страница 134: ...aved on it and loaded from it Audio data and MIDI les can also be loaded from it Conduct these operations from the Project Option Screen Folder and le structure on microSD cards When recording with th...

Страница 135: ...settings are saved in this le DATA folder Data necessary for the project structure are saved in this folder AUDIO folder This stores WAV les to be added to projects Put WAV les that you want to load...

Страница 136: ...der for saving projects This stores projects saved on the USB ash drive Save projects that you want to load in the R12 here Project folders These contain project recording data and settings AUDIO fold...

Страница 137: ...port Use USB ash drives that are compatible with USB Type C USB Type C NOTE Never disconnect a USB ash drive when data is being transferred To connect a USB ash drive while an AC adapter is connected...

Страница 138: ...e Screen Track View Screen Level Meter View Screen Track View Screen Level Meter View Screen This opens the Project Settings Screen 2 Tap Projects on the Project Settings Screen This opens the Project...

Страница 139: ...4 Tap Option This opens the Project Option Screen for the selected project 139...

Страница 140: ...nge the project name See Character Input Screen overview for how to input characters NOTE An error message will appear if the same name already exists after changing a project name If this happens cha...

Страница 141: ...en overview for how to input characters NOTE An error message will appear if the same name already exists after changing a project name If this happens change the project name Duplication is not possi...

Страница 142: ...ng the Project Option Menu of the project with information that you want to check This opens the project Information Screen where you can check the following information Item Explanation Date Time Dat...

Страница 143: ...Menu Opening the Project Option Menu of the project that you want to delete 2 Tap Execute Tap Cancel to cancel deletion and return to the previous screen 3 When Done appears tap Close This deletes the...

Страница 144: ...epth As set during project creation Creating empty projects using speci c settings NOTE To render to a USB ash drive connect it to the USB Type C port Connecting USB ash drives 1 Tap Rendering on the...

Страница 145: ...me See Character Input Screen overview for how to input characters NOTE An error message will appear if a le with the same name already exists If this happens change the le name Exporting is not possi...

Страница 146: ...Menu of the project that you want to save This opens the Project Name Input Screen 3 Input the project name See Character Input Screen overview for how to input characters NOTE An error message will...

Страница 147: ...Type C port Connecting USB ash drives 2 Tap on the Projects Screen Opening projects 3 Tap the project that you want to import 4 Input the project name See Character Input Screen overview for how to i...

Страница 148: ...5 When Done appears tap Close This completes importing and reopens the Import Screen shown in step 3 148...

Страница 149: ...smartphone or tablet Installing drivers Windows computers 1 Download the R12 Driver to the computer from zoomcorp com NOTE The latest R12 Driver can be downloaded from the above website 2 Launch the...

Страница 150: ...de to select it Setting Explanation 2In 2Out This mode sends a stereo signal that is a mix of all tracks 2In 2Out iPad Use this to connect a smartphone tablet with a 2 in 2 out setting Use AA batterie...

Страница 151: ...transfer When connecting to a computer set the R12 as the sound device Use a Lightning to USB 3 Camera Adapter to connect to an iOS iPadOS device with a lighting connector HINT To make sound monitori...

Страница 152: ...audio interface Level Meter View Screen 2 Tap Execute This disables the audio interface function and opens the Settings Screen Tap Cancel to return to the previous screen 3 Disconnect the USB cable c...

Страница 153: ...ing recorded by the R12 before sending it to the computer smartphone or tablet This enables monitoring without latency direct monitoring 1 Tap on the audio interface Level Meter View Screen Tapping th...

Страница 154: ...ablets the direct monitoring sound is from the post fader mix so fader adjustments will a ect the volume In 2In 2Out mode Connecting computers smartphones and tablets can be used to balance the levels...

Страница 155: ...mix or stream it on the computer 1 Tap on the audio interface Level Meter View Screen Tapping this switches the setting Setting Explanation This turns o the Loopback function This turns on the Loopba...

Страница 156: ...4Out mode Connecting computers smartphones and tablets 2 Tap Tapping this switches the setting Setting Explanation This turns o the control surface function This turns on the control surface function...

Страница 157: ...tton and fader functions Button fader Explanation Channel faders Adjust volumes of corresponding tracks Master fader Adjust master volume Search backward Search forward Stop Start playback Record Scre...

Страница 158: ...to a playlist and played back in order This is convenient for live performances and output to an external recorder for example Creating playlists 1 Tap Seq Play on the Projects Screen Opening project...

Страница 159: ...t Screen overview for how to input characters 5 When Done appears tap Close The Playlist Editing Screen opens 6 Tap Add Project 7 Tap the project you want to add to the playlist and tap Add The select...

Страница 160: ...8 Repeat step 7 to create the playlist When nished tap The new playlist will be added to the Seq Play Screen 160...

Страница 161: ...set to pause after they are played 1 Tap the playlist that you want to edit on the Seq Play Screen Creating playlists 2 Tap Edit The Playlist Editing Screen for the selected playlist opens 3 Edit the...

Страница 162: ...st Tap Execute to con rm deletion Tap Cancel to cancel deletion Pause setting Playlist playback can be set to pause after speci c projects complete playing Tap this icon to switch the setting Continue...

Страница 163: ...1 Tap the playlist that you want to delete on the Seq Play Screen Creating playlists 2 Tap Delete 3 Tap Execute The selected playlist will be deleted Tap Cancel to cancel deletion and return to the p...

Страница 164: ...icons shown on the Seq Play Screen can be changed 1 Tap the playlist with the icon color that you want to change on the Seq Play Screen Creating playlists 2 Tap Color 3 Touch the color that you want t...

Страница 165: ...ylists 2 Tap Play This opens the Sequence Playback Screen The projects that have been added to the playlist will be shown in a list and played in the order on the screen NOTE End of List will appear a...

Страница 166: ...d forward Press and hold Play previous next project Press Return to beginning Press when stopped Adjust track volume Move channel fader Adjust master track volume Move MASTER fader Adjust send e ect v...

Страница 167: ...tings button This opens the Projects Settings Screen where the following settings can be made Output destination of each track Setting tracks for output as MASTER and CLICK signals Click sound Changin...

Страница 168: ...Playback will automatically pause at this point 168...

Страница 169: ...ne as well as to edit and back up patch memories for example HINT Download Guitar Lab from the ZOOM website zoomcorp com https zoomcorp com See the app manual for setting and operation procedures Conn...

Страница 170: ...connect the R12 and the computer USB Type C NOTE Use a USB Type C cable that supports data transfer The R12 can be operated using USB bus power 4 Launch Guitar Lab on the computer 5 Tap an input to s...

Страница 171: ...Disconnecting from the computer 1 Tap on the Guitar Lab Screen 2 Tap Execute Tap Cancel to return to the previous screen 3 Disconnect the USB cable connecting the R12 and the computer 171...

Страница 172: ...e the manual included with the MIDI keyboard for details about its settings USB Type C NOTE The USB Type C port supplies 5 V 500 mA power Synth sounds can be played with the MIDI keyboard at the follo...

Страница 173: ...ojects Screen Opening projects 2 Tap On or O for Auto Power O Setting Explanation O The power will not turn o automatically On The power will automatically turn o if it is unused for 10 hours NOTE Und...

Страница 174: ...Setting the date and time Set the date and time added to recording les 1 Tap on the Projects Screen Opening projects 2 Tap Date Time 3 Tap to set the date and time 174...

Страница 175: ...h year yy mm dd year month day 5 Tap This con rms the set date and time and returns to the previous screen NOTE If power is not supplied by an AC adapter for a long time date and time settings will be...

Страница 176: ...ectly so that the amount of remaining battery charge can be shown accurately on the screen 1 Tap on the Projects Screen Opening projects 2 Tap the type of batteries Setting Explanation Alkaline Alkali...

Страница 177: ...of the touchscreen The brightness of the touchscreen can be adjusted 1 Tap on the Projects Screen Opening projects 2 Slide the LCD Brightness slider or tap and This adjusts the brightness HINT This ca...

Страница 178: ...Opening projects 2 Tap the desired LCD Backlight setting Setting Explanation O The touchscreen backlight will always stay o On The touchscreen backlight will always stay on 30sec 1min 3min 5min The t...

Страница 179: ...rds Checking microSD card information The size and open space of microSD cards can be checked 1 Tap on the Projects Screen Opening projects 2 Tap SD Card 3 Check the open space and size shown by Size...

Страница 180: ...u can test whether a microSD card can be used with the R12 A Quick Test can be done in a short amount of time while a Full Test examines the entire microSD card 1 Tap on the Projects Screen Opening pr...

Страница 181: ...ount of time required for the full test will be shown The result of the test will be shown when it completes During a full test if the access rate MAX reaches 100 the card will fail NG NOTE Even if a...

Страница 182: ...Formatting microSD cards To maximize the performance of a microSD card use the R12 to format it 1 Tap on the Projects Screen Opening projects 2 Tap SD Card 3 Tap Format 182...

Страница 183: ...ncel formatting NOTE Before using microSD cards that have just been purchased or that have been formatted on a computer they must be formatted by the R12 Be aware that all data previously saved on a m...

Страница 184: ...checked and copied Use this to back up projects on a computer and to load audio data and MIDI les from a computer for example Connecting to a computer 1 Tap on the Projects Screen Opening projects 2...

Страница 185: ...4 Use a USB Type C cable to connect the R12 and the computer USB Type C NOTE Use a USB Type C cable that supports data transfer The R12 can be operated using USB bus power 185...

Страница 186: ...on to the Trash and drop it NOTE Always conduct computer ejection procedures before disconnecting the USB cable 2 Disconnect the USB cable connecting the R12 with the computer and tap 3 Tap Execute Th...

Страница 187: ...factory default settings 1 Tap on the Projects Screen Opening projects 2 Tap Factory Reset 3 Tap Execute This executes the reset Tap Cancel to cancel resetting and return to the previous screen 4 When...

Страница 188: ...to their factory defaults Be certain before using this function After resetting the R12 to its factory default state initial settings will be necessary the next time the power is turned on Setting th...

Страница 189: ...Firmware Version This shows the rmware and preset versions Updating The R12 rmware can be updated to the latest versions The latest update le can be downloaded from the ZOOM website zoomcorp com http...

Страница 190: ...ling tracks for recording Con rm that the microSD card has open space Checking microSD card information Con rm that a microSD card is loaded properly in the card slot If SD card protected appears on t...

Страница 191: ...E AUDIO SYNTH RHYTHM MUTE MUTE MUTE MUTE MUTE MUTE MUTE TRACK TYPE CLICK OUTPUT ROUTING To MASTER CLICK OUTPUT R OUTPUT D A REC DATA MASTER L REC DATA MASTER R MASTER FADER D A PHONES OUTPUT VOLUME US...

Страница 192: ...124 Velocity Note ON Note OFF x x o x After Touch Key s Ch s x x x x Pitch Bend x x Control Change x x Program Change True Number x x System Exclusive x x Common Song Position Song Select Tune Reques...

Страница 193: ...s 2 TRS phone jacks balanced Maximum output level 14 dBu MASTER OUT Output impedance 200 Connectors 1 stereo 3 5mm mini jack Maximum output level 45 mW 45 mW into 32 load Outputs PHONES Output impedan...

Страница 194: ...olor touchscreen LCD Connector USB Type C Note Use a USB cable that supports data transfer USB bus power is supported 2 in 2 out or 2 in 2 out iPad USB 2 0 Full Speed 44 1 kHz 16 24 bit Audio interfac...

Страница 195: ...1900 mAh about 5 hours Lithium batteries about 11 hours The above values are approximate Continuous battery operation times were determined using in house testing methods They will vary greatly accor...

Страница 196: ...ZOOM CORPORATION 4 4 3 Kanda surugadai Chiyoda ku Tokyo 101 0062 Japan zoomcorp com Z2I 4584 01...

Отзывы: