background image

Other set

tings

Set

ting the r

ecor

ding f

or
mat

83

H6

 Handy Recorder

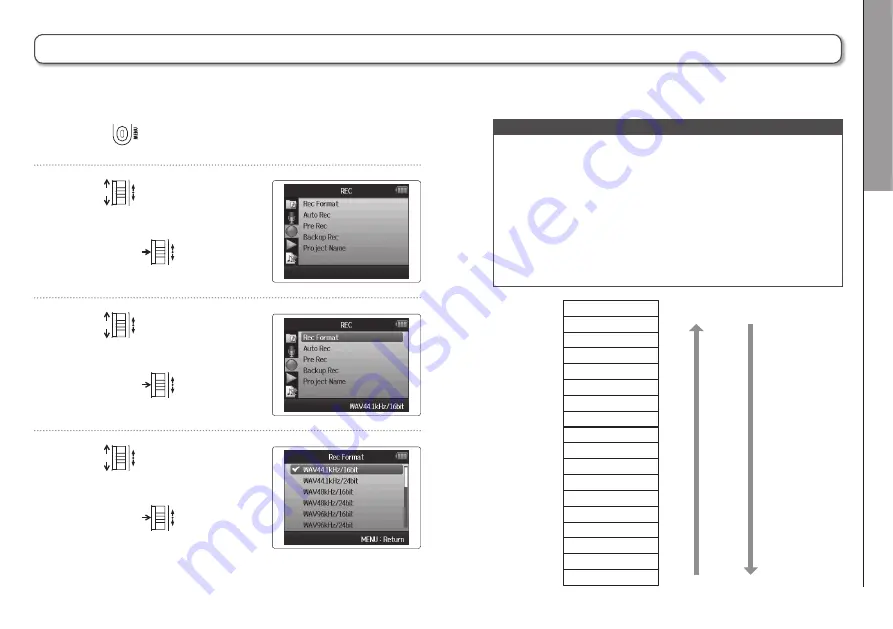
Setting the recording format

1.

  Press 

.

2.

  Use 

 to select  

“REC”,  

and press 

.

3.

  Use 

 to select  

“Rec Format”,  

and press 

.

4.

  Use 

 to select the 

desired format,  

and press 

.

Set the format according to the desired audio quality and file size.

WAV96kHz/24bit

WAV96kHz/16bit

WAV48kHz/24bit

WAV44.1kHz/24bit

WAV48kHz/16bit

WAV44.1kHz/16bit

MP3 320kbps

MP3 256kbps

MP3 224kbps

MP3 192kbps

MP3 160kbps

MP3 128kbps

MP3 112kbps

MP3 96kbps

MP3 80kbps

MP3 64kbps

MP3 56kbps

MP3 48kbps

Audio quality  File size

 High

 Low

 Large

 Small

NOTE

• Use the WAV format for recording high-quality audio.
• The MP3 format reduces file size through compression, 

which also reduces the audio quality. Use this format if 
you need to conserve space on the SD card to store many 
recordings, for example.

•  When recording in MP3 format, a single stereo MP3 file 

will be created regardless of the number of tracks selected. 
You can use the monitoring mixer to adjust the balance of 
all the tracks in the stereo mix. (

s"

P.80) 

Содержание H6 Handy Recorder

Страница 1: ... 2013 ZOOM CORPORATION La reproduction de ce manuel en totalité ou partie par quelque moyen que ce soit est interdite Mode d emploi ...

Страница 2: ...de force excessive pour brancher une unité Lorsqu un micro reste inutilisé de façon prolongée remettez lui son capuchon de protection Connexion des câbles et prises d entrée sortie Éteignez toujours tous les appareils avant de connecter des câbles Débranchez toujours tous les câbles de connexion et l adaptateur secteur avant de déplacer l unité Volume N utilisez pas le produit à fort volume durant...

Страница 3: ...rmal Les entrées 1 4 ont un gain maximal accru par rapport aux modèles antérieurs En réponse à une demande des utilisateurs elles disposent de commutateurs d atténuation PAD qui leur permettent de facilement gérer des entrées à 4 dB Elles peuvent également fournir une alimentation fantôme 12 V 24 V 48 V Tous les niveaux de volume d entrée gain peuvent se régler rapidement à la main à l aide de mol...

Страница 4: ... des informations sur le projet 48 Contrôle édition de projets fichiers Contrôle des marqueurs de piste 49 Changement de nom de projet 50 Mixage d un projet 52 Normalisation de pistes 54 Fractionnement de projets 56 Coupure des débuts et ins de projet 58 Suppression d un projet 60 Suppression de tous les projets d un dossier 61 Reconstruction d un projet 62 Enregistrement d un mémo vocal de projet...

Страница 5: ...Veuillez vériier qu ils sont bien tous présents 4 piles AA pour tester l unité Mallette de l unité centrale Carte SD Câble USB Unité principale Micro MS Micro XY DVD d installation de Cubase LE Bonnette éponge 2013 ZOOM CORPORATION 本マニュアルの一部または全部を 無断で複製 転載することを禁じます オペレーション マニュアル Mode d emploi ce document ...

Страница 6: ...rte SD Touches de VOLUME Prise casque Sélecteur d alimentation HOLD Volume de l entrée 2 Touches et voyants de piste L R 1 4 Volume de l entrée 3 Micro XY interchangeable Micro MS Commutateurs PAD 1 4 Volume de l entrée 4 Touche Stop Écran Touche et voyant de lecture pause Touche de retour rapide Touche d avance rapide Touche et voyant d enregistrement ...

Страница 7: ...eur arrière Bouton de défilement Vers le haut bas sélectionne les paramètres de menu Pression confirme la sélection de menu Prise LINE OUT Orifices pour dragonne peuvent aussi servir avec des dragonnes d appareil photo Prise REMOTE télécommande vendue séparément Touche MENU Pression ouvre le menu retour au dernier écran Prise USB 1 Masse 2 Point froid 3 Point chaud Pointe point froid Bague point c...

Страница 8: ... associe un micro central unidirectionnel capturant le son du centre à un micro latéral bidirectionnel capturant le son sur la gauche et la droite En réglant le niveau du micro latéral vous pouvez changer la largeur stéréo Si vous enregistrez en mode MS RAW sans recombinaison vous pouvez régler le niveau du micro latéral après coup pour changer la largeur de la stéréo Caractéristiques Ce micro peu...

Страница 9: ...ectez ce dernier à l unité centrale en insérant le connecteur à fond Déconnexion du micro 1 En maintenant pressés les boutons sur les côtés du micro retirez le de l unité centrale NOTE Lors de la déconnexion d un micro ne forcez pas trop Cela endommagerait le micro ou l unité centrale L enregistrement s arrêtera si un micro est retiré en cours d enregistrement Si un micro doit rester longtemps non...

Страница 10: ...unité d effets Réglez l atténuateur PAD sur 20 lorsque vous branchez une table de mixage ou un autre appareil dont le niveau de sor tie standard est de 4 dB Entrées stéréo En couplant les pistes 1 et 2 ou les pistes 3 et 4 sous forme de piste stéréo les entrées 1 2 ou entrées 3 4 peuvent servir d entrées stéréo P 26 Dans ce cas votre entrée 1 entrée 3 devient le canal gauche et votre entrée 2 entr...

Страница 11: ... Micros canon cravate connectés aux entrées 1 2 interprète Micros connectés aux entrées 3 4 son ambiant Micro d ambiance Micro cravate Micro canon Micro cravate G D 3 4 1 2 Micro d ambiance Enregistrement de concert Micro d entrée G D prestation sur scène Entrées 1 2 sorties ligne de la table de mixage Micros connectés aux entrées 3 4 son du public Micro d ambiance Table de mixage Micro d ambiance...

Страница 12: ...able pour capturer un son monophonique venant d un emplacement spéciique Utilisez le à la place d un micro stéréo du Ce micro enregistre sur la piste G D en mono Entrée XLR jack 3 points TRS externe EXH 6 Utilisez la à la place d un micro stéréo pour doter le de deux prises d entrée XLR jack 3 points TRS supplémentaires entrées L R Ces prises ne fournissent pas d alimentation fantôme ...

Страница 13: ...aptateur secteur Télécommande RCH 6 C est une télécommande ilaire pour l emploi avec le Branchez la à la prise REMOTE Bonnette anti vent à fourrure Cette bonnette peut être utilisée aussi bien avec les micros XY que MS Adaptateur secteur AD 17 Cet adaptateur secteur est conçu pour l emploi avec le Branchez le à la prise USB à l aide d un câble USB et de l autre côté à une prise secteur ...

Страница 14: ...enregistrement en emploi comme interface audio le réglage de l ordinateur ou de l iPad est affiché Enregistrement automatique P 29 À l arrêt Icône de statut En enregistrement Durée d enregistrement Indicateur de charge des piles Curseurs de panoramique mélangeur d écoute P 80 Pleine Vide Indicateur de niveau niveau d entrée d enregistrement Pistes 1 4 En pause Volume d écoute mélangeur d écoute P ...

Страница 15: ...e Pistes 1 4 Vitesse de lecture P 41 Format de lecture Indicateur de charge des piles Icône de statut Commande de hauteur Volume de lecture Curseurs de panoramique Nom du dossier En pause Lecture en boucle A B P 42 s affiche quand les points A et B sont définis Piste G D L R le nom de l unité de micros est affiché Écran de lecture ...

Страница 16: ...le capot des piles 2 Installez les piles 3 Replacez le capot des piles Ouvrir en poussant vers le haut NOTE Utilisez des piles alcalines ou des batteries nickel hydrure de métal Si le témoin de charge se vide coupez immédiatement l alimentation et installez de nouvelles piles Indiquez le type des piles batteries utilisées P 23 ...

Страница 17: ...Préparations Fourniture de l alimentation 17 H6 Handy Recorder Emploi d un adaptateur secteur vendu séparément 1 Branchez un câble USB à la prise USB 2 Branchez l adaptateur à une prise secteur ...

Страница 18: ...d une carte SD NOTE Coupez toujours l alimentation avant d insérer ou de retirer une carte SD Insérer ou retirer une carte avec l appareil sous tension peut entraîner la perte de données Quand vous insérez une carte SD veillez à insérer la bonne extrémité avec la face supérieure comme représenté S il n y a pas de carte SD chargée il n est pas possible d enregistrer ni de lire Voir Formatage de car...

Страница 19: ...D est correctement insérée Si Card Protected carte protégée s afiche c est que la protection de la carte SD contre l écriture est activée Faites glisser le commutateur de protection de la carte SD pour désactiver la protection contre l écriture Si Invalid Card carte non valable s afiche c est que la carte n est pas correctement formatée pour l emploi avec cet enregistreur Formatez la carte ou util...

Страница 20: ...as la télécommande vendue séparément Même quand le verrouillage est activé la télécommande reste fonctionnelle Déverrouillage Faites coulisser au centre Le a une fonction de verrouillage qui peut servir à désactiver les touches ain d éviter une manipulation accidentelle durant l enregistrement Emploi de la fonction de verrouillage de commandes Hold ...

Страница 21: ...angue 1 Pressez 2 Avec sélectionnez LANGUAGE langue et pressez 3 Avec sélectionnez la langue et pressez La langue d afichage peut être l anglais English ou le japonais À la première mise sous tension après l achat vous devez choisir la langue et régler la date et l heure ...

Страница 22: ...et l heure Changement des réglages Déplacer le curseur bougez vers le haut le bas Sélectionner une valeur pressez et bougez vers le haut le bas Conirmer le changement pressez 5 Pressez pour terminer le réglage Une fois la date et l heure réglées l enregistreur peut horodater de façon précise les ichiers À la première mise sous tension après l achat vous devez choisir la langue et régler la date et...

Страница 23: ... 3 Avec sélectionnez Battery pile et pressez 4 Avec sélectionnez le type et pressez Réglage du type des piles batteries utilisées 1 Pressez 2 Avec sélectionnez SYSTEM système et pressez Indiquez le type de pile batterie utilisé pour obtenir un afichage idèle de la charge restante ...

Страница 24: ...e pistes Vous pouvez aussi faire par exemple les réglages d enregistrement automatique P 29 pré enregistrement P 31 enregistrement de secours P 34 iltre coupe bas P 78 compresseur limiteur P 79 et métronome P 76 2 Sélectionnez les pistes d enregistrement P 26 Sélectionnez les à l aide des touches de piste Quand le voyant de la piste sélectionnée s allume en rouge le signal y entrant peut être écou...

Страница 25: ...ent dépasse 2 Go Le fichier des réglages a le même nom que le projet Fichier de projet quand le nom de projet est réglé sur Date P 50 ZOOM0003_LR 0002 WAV ZOOM0002_Tr34 WAV ZOOM0002 hprj ZOOM0002_LR WAV ZOOM0002 Fichier stéréo des signaux d entrée G D enregistrés Premier fichier stéréo enregistré sur les pistes G D L R Fichier mono du signal de l entrée 1 enregistré Fichier d enregist de secours d...

Страница 26: ...alement se défaire de la même façon Le couplage de la piste stéréo G D L R ne peut par contre pas être défait CONSEIL Durant l enregistrement des ichiers sont créés comme suit pour chaque touche de piste sélectionnée Pistes enregistrées Nom du ichier Contenu Piste G D L R ZOOMnnnn LR Fichier stéréo Piste mono ZOOMnnnn_Tr1 pour la piste 1 Fichier mono Piste stéréo ZOOMnnnn_Tr34 pour les pistes 3 4 ...

Страница 27: ... Pressez pour ajouter un marqueur 5 Pressez pour mettre en pause NOTE Quand l enregistrement est mis en pause un marqueur est ajouté à cet endroit 6 Pressez pour arrêter l enregistrement NOTE Un même projet peut contenir un maximum de 99 marqueurs Durant l enregistrement si la taille du ichier vient à dépasser 2 Go un nouveau ichier est automatiquement créé dans le même projet et l enregistrement ...

Страница 28: ... et pressez 3 Avec sélectionnez le dossier FOLDER où sauvegarder les nouveaux projets et pressez Sélection du dossier de sauvegarde des projets Choisissez un des dix dossiers comme étant celui où seront sauvegardés les nouveaux projets enregistrés 4 Pressez pour conirmer la sélection du dossier et revenir à l écran d accueil ...

Страница 29: ...omatique 1 Pressez 2 Avec sélectionnez REC enregistrement et pressez 3 Avec sélectionnez Auto Rec enregistrement automatique et pressez 4 Avec sélectionnez On Off et pressez SUITE L enregistrement peut être automatiquement lancé et arrêté en réponse à la variation du niveau d entrée ...

Страница 30: ... mettre l enregistreur en attente CONSEIL Quand le niveau d entrée dépasse le seuil réglé afiché sur l indicateur de niveau l enregistrement démarre automatiquement Vous pouvez aussi régler l enregistrement pour qu il s arrête automatiquement quand le niveau d entrée descend en dessous d un seuil déterminé P 85 7 Pressez pour mettre in à l attente ou arrêter l enregistrement Enregistrement automat...

Страница 31: ...n même temps que cette fonction Pré enregistrement 1 Pressez 2 Avec sélectionnez REC enregistrement et pressez 3 Avec sélectionnez Pre Rec pré enregistrement et pressez En réglant l enregistreur pour qu il capture constamment le signal entrant vous pouvez faire démarrer l enregistrement deux secondes avant d avoir pressé la touche C est utile quand par exemple une prestation démarre soudainement ...

Страница 32: ...nctions Auto Rec enregistrement automatique et Pre Rec pré enregistrement ne peuvent pas être employées en même temps que cette fonction Décompte avant l enregistrement 1 Pressez 2 Avec sélectionnez TOOL outil et pressez 3 Avec sélectionnez Metronome métronome et pressez Le métronome de l enregistreur peut être employé pour un décompte avant le début de l enregistrement ...

Страница 33: ...MS pour enregistrer vous pouvez régler le niveau du micro latéral micro Side déterminant la largeur stéréo Faites le quand l écran d accueil est ouvert NOTE Réglez le sur Off désactivé 24 à 6 dB ou RAW enregistrement brut Quand vous enregistrez en mode RAW durant la lecture bougez vers le haut ou le bas pour régler le niveau du micro latéral Le mode RAW ne peut être sélectionné que si vous enregis...

Страница 34: ...ez 2 Avec sélectionnez REC enregistrement et pressez 3 Avec sélectionnez Backup Rec enregistrement de secours et pressez Quand vous utilisez l entrée G D L R en plus de l enregistrement effectué au niveau d entrée réglé l appareil peut également enregistrer un autre ichier à un niveau inférieur de 12 dB Cette copie de secours peut être utilisée si le niveau d enregistrement a été réglé trop haut e...

Страница 35: ... voyant de la piste à superposer s allume en rouge 5 Tournez pour régler le niveau d entrée CONSEIL Vous pouvez aussi régler le mélangeur volume panoramique P 46 le iltre coupe bas P 78 et le compresseur limiteur P 79 en fonction de vos besoins 6 Pour écouter des pistes déjà enregistrées pressez leur touche de piste ain d allumer leur voyant en vert SUITE Vous pouvez ajouter des enregistrements à ...

Страница 36: ...ises Si vous voulez écouter le son entrant dans la piste pendant la lecture d une piste déjà enregistrée pressez la touche de la piste que vous voulez écouter pour que son voyant s allume en orange puis pressez Si la vitesse de lecture d un projet est réglée sur toute autre valeur que 100 les pistes ne peuvent pas faire l objet d une superposition leur voyant ne s allumera pas en rouge 9 Pressez p...

Страница 37: ...Enregistrement Superposition Overdub 37 H6 Handy Recorder ...

Страница 38: ... et maintenez Pause reprise de lecture pressez Réglage du volume pressez Ajout de marqueurs pressez Changement de niveau du micro latéral bougez vers le haut bas mode RAW uniquement CONSEIL Plus longtemps vous maintenez pressée ou plus rapide devient la recherche arrière avant Durant la lecture vous pouvez presser les touches de piste pour les rétablir allumées en vert et les couper éteintes ...

Страница 39: ...Lecture Lecture de base 39 H6 Handy Recorder 2 Pressez ou pour revenir à l écran d accueil ...

Страница 40: ...vec sélectionnez PROJECT LIST liste de projets et pressez 3 Avec sélectionnez la dossier et pressez 4 Avec sélectionnez le projet que vous voulez lire et pressez Le projet sélectionné commencera sa lecture NOTE Une fois la lecture du titre terminée la lecture peut se poursuivre en fonction du mode de lecture P 44 ...

Страница 41: ...JECT MENU menu projet et pressez 3 Avec sélectionnez Playback Speed vitesse de lecture et pressez 4 Avec réglez la vitesse de lecture et pressez La lecture se fera à la vitesse choisie NOTE Ce réglage est sauvegardé séparément pour chaque projet Vous pouvez régler la vitesse de lecture dans une plage de 50 à 150 de la vitesse normale ...

Страница 42: ...cture 6 Avec sélectionnez l icône du point B Ensuite choisissez le point de in de la lecture en boucle Lecture en boucle d un intervalle AB Repeat 1 Pressez 2 Avec sélectionnez PLAY lecture et pressez 3 Avec sélectionnez AB Repeat lecture en boucle et pressez 4 Avec sélectionnez l icône du point A et pressez Vous pouvez lire en boucle un segment compris entre deux points de votre choix ...

Страница 43: ...ir l écran de lecture La lecture en boucle démarrera entre les points ixés NOTE Pour mettre in à la lecture en boucle suivez les instructions de la P 42 ain de sélectionner AB Repeat et pressez Durant la lecture en boucle celle ci cesse si vous pressez ou en vue de sélectionner un autre projet ...

Страница 44: ...ec sélectionnez Play Mode mode de lecture et pressez 4 Avec sélectionnez le mode et pressez NOTE Play All lit tous les projets du dossier ouvert Play One ne lit que le projet sélectionné Repeat One lit en boucle le projet sélectionné Repeat All lit en boucle tous les projets du dossier ouvert Vous pouvez régler le mode de lecture ...

Страница 45: ...t et pressez 4 Avec sélectionnez la piste dont vous désirez changer la hauteur tonalité et pressez 5 Avec réglez la hauteur tonalité de lecture et pressez NOTE Cette hauteur peut se régler entre 6 et 6 La lecture se fera à la hauteur ainsi modiiée CONSEIL Ce réglage de hauteur est sauvegardé séparément pour chaque projet La hauteur peut être changée par demi ton séparément pour chaque piste tout e...

Страница 46: ...Sélection du paramètre à changer pressez Paramètre Plage de réglage Explication Volume Coupure du son Mute 48 0 12 dB par paliers de 0 5 dB Règle le volume de piste Panoramique L100 extrême gauche CENTER centre R100 extrême droite Règle la position gauche droite du son Hauteur tonalité 6 6 Règle la hauteur de lecture sans changer la vitesse de lecture Mixage Vous pouvez utiliser le mélangeur de pr...

Страница 47: ...lages de mélangeur Presser cette touche met les réglages de mélangeur en et hors service NOTE Les réglages de mixage sont sauvegardés séparément avec chaque projet et appliqués durant la lecture Utilisez le mélangeur d écoute pour régler la balance lors de l écoute des entrées P 80 ...

Страница 48: ...r le projet 1 Pressez 2 Avec sélectionnez PROJECT MENU menu projet et pressez 3 Avec sélectionnez Information et pressez pour voir des informations sur le projet Avec faites déiler pour voir les informations masquées plus bas que l écran Vous pouvez contrôler les informations concernant le projet sélectionné ...

Страница 49: ...enu projet et pressez 3 Avec sélectionnez Mark List liste des marqueurs et pressez pour ouvrir la liste des marqueurs Contrôle des marqueurs de piste Une liste des marqueurs présents dans le projet enregistré peut être afichée Marqueur ajouté par l utilisateur Marqueur ajouté quand un blanc survient dans le son durant l enregistrement ...

Страница 50: ...enommer et pressez 5 Changez le nom Commandes pour changer un nom Déplacement du curseur changement de caractère bougez vers le haut bas Sélection de caractère conirmation de changement pressez 6 Pressez pour terminer le réglage NOTE Les caractères suivants peuvent être utilisés dans les noms de projet espace 0123456789 ABCDEFGHIJKLMNO PQRSTUVWXYZ _ abcdefghijklmnopqrstuvwxyz Un nom de projet ne p...

Страница 51: ...Contrôle édition de projets fichiers Changement de nom de projet 51 H6 Handy Recorder ...

Страница 52: ...ssez NOTE Vous ne pouvez sélectionner que des formats WAV ayant la même fréquence d échantillonnage et la même résolution en bits que le projet sélectionné 1 Pressez 2 Avec sélectionnez PROJECT MENU menu projet et pressez 3 Avec sélectionnez Mixdown mixage de réduction et pressez Mixage d un projet Vous pouvez faire un mixage d un projet enregistré au format WAV pour obtenir un ichier stéréo WAV o...

Страница 53: ...re l enregistreur reviendra à l écran de mixage Mixdown Le ichier créé par le mixage sera nommé d après le projet d origine avec un nombre à trois chiffres ajouté à la in comme dans ZOOM0001_ST001 Si vous remixez le même projet ce numéro augmentera d une unité Durant le mixage les réglages de volume panoramique et statut de piste touche de piste effectués à l aide du mélangeur de projet P 46 ainsi...

Страница 54: ...ctionnez Normalize normaliser et pressez 5 Avec sélectionnez la piste que vous désirez normaliser NOTE Vous ne pouvez pas sélectionner une piste ne contenant pas de ichier enregistré Si vous sélectionnez All toutes toutes les pistes possédant des ichiers seront normalisées Si le volume d un projet enregistré au format WAV est trop faible vous pouvez augmenter le niveau général du ichier Format WAV...

Страница 55: ...alisation de pistes 55 H6 Handy Recorder 6 Avec sélectionnez Yes oui et pressez pour lancer la normalisation NOTE Après normalisation le niveau de la totalité du ichier est augmenté uniformément de façon à ce que le niveau crête atteigne 0 dB ...

Страница 56: ... division Commandes pour la division Déplacement du point utilisez et Lecture pause pressez Conirmation du point pressez 1 Pressez 2 Avec sélectionnez PROJECT MENU menu projet et pressez 3 Avec sélectionnez Edit modiier et pressez Fractionnement de projets Vous pouvez diviser un projet en deux nouveaux projets à n importe quel endroit ...

Страница 57: ...ivision portera le même nom que le projet d origine avec A ajouté à la in La partie postérieure au point de division portera la lettre B ajoutée à la in de son nom Si vous avez fait des enregistrements supplémentaires et disposez de plusieurs prises c est la prise actuelle qui sera divisée Toutes les autres prises seront sauvegardées avec le projet d origine La prise d origine est supprimée ...

Страница 58: ...ône de point de début 6 Avec et cherchez le point de début Vous pouvez aussi presser pour faire la recherche durant la lecture 7 Avec sélectionnez l icône de point de in Ensuite déinissez le point de in de la même façon Coupure des débuts et ins de projet Vous pouvez supprimer couper les parties inutiles au début et à la in des projets enregistrés Pour cela vous devrez ixer les points que vous sou...

Страница 59: ...uts et ins de projet 59 H6 Handy Recorder 8 Pressez 9 Avec sélectionnez Yes oui et pressez pour recadrer le projet NOTE Si vous avez effectué des enregistrements supplémentaires et si le projet a plusieurs prises c est la prise actuelle qui sera recadrée ...

Страница 60: ...Pressez 2 Avec sélectionnez PROJECT MENU menu projet et pressez 3 Avec sélectionnez Trash jeter et pressez 4 Avec sélectionnez Delete supprimer et pressez 5 Avec sélectionnez Yes oui et pressez NOTE La suppression de projet ne peut pas être annulée Vous pouvez supprimer des projets inutiles ...

Страница 61: ...r 1 Pressez 2 Avec sélectionnez PROJECT MENU menu projet et pressez 3 Avec sélectionnez Trash jeter et pressez 4 Avec sélectionnez Delete All Projects supprimer tous les projets et pressez 5 Avec sélectionnez Yes oui et pressez NOTE La suppression de projet ne peut pas être annulée Vous pouvez supprimer tous les projets d un dossier en même temps ...

Страница 62: ...t ou avez utilisé un ordinateur pour supprimer un ichier de réglage nécessaire au projet Dans de tels cas la reconstruction du projet peut permettre de le réparer ain de pouvoir de nouveau l utiliser Reconstruction d un projet 1 Pressez 2 Avec sélectionnez PROJECT MENU menu projet et pressez 3 Avec sélectionnez Rebuild reconstruire et pressez S il manque des ichiers nécessaires à un projet ou si c...

Страница 63: ...enregistrement pressez Arrêter l enregistrement pressez 5 Lisez le mémo Lancer la lecture pressez Arrêter la lecture pressez CONSEIL Chaque fois que vous pressez le mémo vocal est remplacé Les mémos vocaux sont enregistrés au moyen du micro stéréo branché à l entrée G D L R Il n est pas possible d en enregistrer au moyen des entrées 1 4 Le nom du ichier de mémo vocal aura le format ZOOM0001_VM Le ...

Страница 64: ...sez 3 Avec sélectionnez Backup File ichier de secours et pressez Si vous avez effectué un enregistrement de secours vous pouvez lire le ichier de secours à la place du ichier normal 4 Avec sélectionnez On et pressez Dans ces conditions quand vous pressez c est le ichier de secours qui est lu à la place du ichier normal pour la piste G D L R Format WAV uniquement ...

Страница 65: ...Contrôle édition de projets fichiers Lecture de ichiers de secours 65 H6 Handy Recorder ...

Страница 66: ...nateur à l aide d un câble USB NOTE Si vous voulez alimenter l unité par le bus USB de l or dinateur branchez le câble avec l alimentation du désactivée puis allumez l unité Les systèmes d exploitation suivants sont pris en charge Windows XP ou ultérieur Mac OS X 10 6 ou ultérieur Échange de données avec un ordinateur lecteur de carte En vous connectant à un ordinateur vous pouvez vériier et copie...

Страница 67: ...les procédures propres à votre ordinateur pour la déconnexion Windows Utilisez Retirer le périphérique en toute sécurité pour sélectionner le Macintosh Faites glisser l icône du sur la corbeille NOTE Suivez toujours ces procédures avant de débrancher le câble USB 6 Débranchez le câble entre l ordinateur et le puis pressez ...

Страница 68: ...n iPad utilisez le mode Stereo Mix Celui ci ne fonctionnera pas en mode MultiTrack Lorsque vous utilisez le mode Stereo Mix vous pouvez employer le mélangeur de l enregistreur pour mixer toutes les entrées de piste en stéréo P 72 Si vous utilisez Windows un pilote est nécessaire pour employer le mode MultiTrack Vous pouvez télécharger ce pilote sur le site web ZOOM www zoom co jp 5 Avec sélectionn...

Страница 69: ... USB NOTE Un kit de connexion d appareil photo pour iPad est néces saire ain de brancher un iPad CONSEIL Voir Réglages de l interface audio P 70 7 Pressez pour déconnecter 8 Avec sélectionnez EXIT quitter et pressez 9 Avec sélectionnez Yes oui et pressez 10 Débranchez le câble entre l ordinateur ou l iPad et le puis pressez ...

Страница 70: ...avant de passer par l ordinateur ou l iPad connecté Cela permet une écoute sans latence 1 Pressez 2 Avec sélectionnez INPUT OUTPUT entrée et sortie et pressez 3 Avec sélectionnez Direct Monitor écoute directe et pressez 4 Avec sélectionnez On et pressez Réglages d entrée Filtre coupe bas P 78 Compresseur limiteur P 79 Écoute directe P 70 Écoute MS RAW P 82 Alimentation fantôme P 87 Alimentation de...

Страница 71: ...r à l ordinateur ou à l iPad renvoi ou Loop Back Cela peut servir par exemple à ajouter un commentaire à une piste d accompagnement musical lue sur l ordinateur et à enregistrer le tout à l aide d un logiciel sur l ordinateur ou de le diffuser en live par Internet 1 Pressez 2 Avec sélectionnez INPUT OUTPUT entrée et sortie et pressez 3 Avec sélectionnez Loop Back renvoi et pressez 4 Avec sélection...

Страница 72: ...entrée et sortie et pressez 3 Avec sélectionnez Mixer mélangeur et pressez 4 Changez les réglages de paramètres comme vous le souhaitez Commandes de mixage Déplacement du curseur changement de valeur bougez vers le haut bas Sélection du paramètre à changer pressez 5 Pressez pour écouter le projet sans les réglages de mélangeur Presser cette touche active et désactive les réglages de mélangeur CONS...

Страница 73: ...Fonctions USB Réglages de l interface audio 73 H6 Handy Recorder ...

Страница 74: ...électionnez Tuner accordeur et pressez Emploi de l accordeur Le signal entrant peut servir à accorder un instrument 4 Avec sélectionnez le type d accordage et pressez 5 Avec changez la hauteur du diapason CONSEIL La hauteur du diapason peut être réglée dans une plage allant de 435 Hz à 445 Hz ...

Страница 75: ...t l écart de hauteur sont afichés Accordeur de guitare basse Le numéro de la corde que vous accordez est automatiquement détecté vous permettant d ac corder les cordes une à une Type d accordeur Numéro de corde nom de note 1 2 3 4 5 6 7 Guitar E mi B si G sol D ré A la E mi B si Bass G sol D ré A la E mi B si Open A E mi C do A la E mi A la E mi Open D D ré A la F fa D ré A la D ré Open E E mi B s...

Страница 76: ... du métronome et pressez Sélectionnez Pre Count décompte P 32 Sélectionnez Tempo Avec réglez la vitesse et pressez Emploi du métronome 1 Pressez 2 Avec sélectionnez TOOL outil et pressez 3 Avec sélectionnez Metronome métronome et pressez Utilisez le métronome pour produire un décompte avant l enregistrement ou comme piste de clic ...

Страница 77: ...u métronome 77 H6 Handy Recorder Sélectionnez Sound son Avec réglez le son et pressez Sélectionnez Pattern motif Avec réglez le motif et pressez Sélectionnez Level niveau Avec réglez le volume du métronome et pressez ...

Страница 78: ...ressez 5 Avec sélectionnez la fréquence de coupure du iltre coupe bas et pressez Réduction du bruit iltre coupe bas 1 Pressez 2 Avec sélectionnez INPUT OUTPUT entrée et sortie et pressez 3 Avec sélectionnez Lo Cut iltre coupe bas et pressez Utilisez le iltre coupe bas Lo Cut pour réduire le bruit du vent et les plosives vocales par exemple ...

Страница 79: ...aibles et abaisser le niveau des signaux d en trée forts 5 Avec sélectionnez le type de compresseur limiteur et pressez Réglage Explication Off Compresseur limiteur désactivé Comp1 General Compresseur standard Les compresseurs abaissent les hauts niveaux et rehaussent les bas niveaux Comp2 Vocal Compresseur pour les voix Comp3 Drum Compresseur pour batterie et percussions Limiter1 General Limiteur...

Страница 80: ...ur changement de valeur bougez vers le haut bas Sélection du paramètre à changer pressez Paramètre Plage de réglage Explication Volume Coupure du son Mute 48 0 12 dB par paliers de 0 5 dB Règle le volume de piste Panoramique L100 extrême gauche CENTER centre R100 extrême droite Règle la position gauche droite du son NOTE L emploi des réglages de volume et de panoramique n af fecte que le signal d ...

Страница 81: ...ressez pour écouter le projet sans les réglages de mélangeur Presser cette touche active et désactive les réglages de mélangeur NOTE Ces réglages de mixage sont sauvegardés séparément avec chaque projet enregistré Les réglages de mixage peuvent également s appliquer durant la lecture P 46 ...

Страница 82: ...sez 3 Avec sélectionnez MS RAW Monitor écoute du signal MS RAW et pressez Quand vous enregistrez en mode MS RAW vous pouvez écouter l entrée du micro central par le canal gauche et l entrée du micro latéral par le canal droit 4 Avec sélectionnez RAW et pressez NOTE Sélectionnez Stereo si vous voulez écouter avec un mixage stéréo ordinaire Mode MS RAW uniquement ...

Страница 83: ... 224 kb s MP3 192 kb s MP3 160 kb s MP3 128 kb s MP3 112 kb s MP3 96 kb s MP3 80 kb s MP3 64 kb s MP3 56 kb s MP3 48 kb s Qualité audio Taille de fichier Haute Basse Grande Petite NOTE Utilisez le format WAV pour enregistrer de l audio de haute qualité Le format MP3 réduit la taille du ichier par compression ce qui réduit également la qualité audio Utilisez ce format si vous devez économiser de l ...

Страница 84: ...pour sélectionner Set Start Stop Level ixer le niveau seuil de lancement et d arrêt et pressez Vous pouvez régler les niveaux seuil d entrée qui feront se déclencher automatiquement le démarrage et l arrêt de l enregistrement 5 Avec sélectionnez Start Level niveau seuil de lancement et pressez 6 Avec réglez le niveau seuil de lancement et pressez L enregistrement démarrera automatiquement quand le...

Страница 85: ... à l arrêt automatique sélectionnez Auto Stop avec et pressez 2 Avec réglez le temps nécessaire à l arrêt et pressez 3 Réglez le niveau seuil d arrêt de la même façon que le niveau seuil de lancement P 84 Quand le niveau d entrée chute sous le niveau seuil d arrêt ixé l enregistrement s arrête automatiquement après le temps sélectionné à l étape 2 ci dessus ...

Страница 86: ... 3 Avec sélectionnez Project Name nom de projet et pressez 4 Avec sélectionnez le type voulu et pressez Vous pouvez changer le type de nom qui est automatiquement donné à un projet NOTE Les noms de projet sont créés aux formats suivants Par défaut ZOOM0001 ZOOM9999 Date AAMMJJ HHMMSS exemple 130331 123016 Le format Date utilise l heure de début d enregistrement ...

Страница 87: ...tie et pressez 3 Avec sélectionnez Phantom alimentation fantôme et pressez 4 Avec sélectionnez un élément de menu et pressez Sélectionnez ON OFF Avec sélectionnez l entrée que vous voulez régler et pressez Avec sélectionnez On et pressez Sélectionnez Voltage Avec sélectionnez la tension désirée et pressez Les entrées 1 4 peuvent fournir une alimentation fantôme de 12 V 24 V ou 48 V ...

Страница 88: ...sélectionnez INPUT OUTPUT entrée et sortie et pressez 3 Avec sélectionnez Plugin Power alimentation de type plug in et pressez 4 Avec sélectionnez On et pressez Quand vous employez un micro utilisant une alimentation de type plug in faites le réglage suivant avant de le brancher à la prise d entrée MIC LINE du micro XY ...

Страница 89: ...ssez 3 Avec sélectionnez VU Meter VU mètres et pressez 4 Avec réglez les niveaux d entrée et vériiez les ici 5 Avec réglez la référence employée pour 0VU CONSEIL Le niveau de référence peut être réglé entre 20 dBFS et 10 dBFs L unité dBFS représente la force du signal en dB 0 dBFS étant la valeur maximale enregistrable pour les données numériques Les VU mètres virtuels peuvent servir à contrôler l...

Страница 90: ... 3 Avec sélectionnez Backlight rétro éclairage et pressez 4 Avec sélectionnez Power Saving économie d énergie et pressez Vous pouvez régler le rétro éclairage de l écran pour l atténuer ou le couper après 30 secondes sans action ain d économiser l énergie 5 Avec sélectionnez le réglage voulu et pressez NOTE Quand vous utilisez un adaptateur secteur ce réglage n a pas d effet ...

Страница 91: ... Recorder Réglage de la luminosité de l écran 1 Pressez 2 Avec sélectionnez SYSTEM système et pressez 3 Avec sélectionnez Backlight rétro éclai rage et pressez 4 Avec sélectionnez Brightness luminosité et pressez 5 Avec sélectionnez la luminosité désirée et pressez ...

Страница 92: ...ons de irmware 1 Pressez 2 Avec sélectionnez SYSTEM système et pressez 3 Avec sélectionnez Software Version version de logiciel et pressez pour ouvrir un écran dans lequel vous pouvez voir les versions des logiciels Vous pouvez vériier les versions des logiciels utilisés par le ...

Страница 93: ...SYSTEM système et pressez 3 Avec sélectionnez Factory Reset réinitialisation d usine et pressez Vous pouvez restaurer les réglages d usine par défaut de l unité 4 Avec sélectionnez Yes oui et pressez pour restaurer les réglages par défaut L alimentation se coupera automatiquement NOTE Les réglages de niveau d entrée ne sont pas réinitialisés ...

Страница 94: ...la carte SD 94 Contrôle de l espace libre sur la carte SD 1 Pressez 2 Avec sélectionnez SD CARD carte SD et pressez 3 Avec sélectionnez SD Card Remain espace restant sur la carte SD et pressez pour voir la quantité d espace encore libre sur la carte ...

Страница 95: ...oui et pressez pour formater la carte SD Les cartes SD doivent être formatées par le pour que celui ci puisse les employer NOTE Si vous utilisez une carte SD qui a été formatée par un ordinateur ou que vous venez d acheter vous devez la formater au moyen du avant qu elle ne puisse être utilisée par l unité Sachez que toutes les données qui étaient sauvegardées sur la carte SD seront supprimées lor...

Страница 96: ... performance et pressez 4 Pressez pour lancer le test de performance 5 Une fois le test terminé le résultat s afiche Si le taux d accès Access Rate Max est de 100 le résultat sera considéré comme mauvais NG pour No Good 6 Pour annuler le test pressez NOTE Même si une carte SD obtient un résultat OK au test de performance cela ne garantit pas qu il n y aura jamais d erreurs d écriture Veuillez ne c...

Страница 97: ...Autres fonctions Test des performances d une carte SD 97 H6 Handy Recorder ...

Страница 98: ...e SD 2 Insérez la carte SD dans le Ensuite mettez sous tension en maintenant pressée la touche 3 Avec sélectionnez Yes oui et pressez pour mettre à jour le irmware 4 Une fois la mise à jour du irmware terminée éteignez l unité NOTE La mise à jour du irmware n est pas possible lorsque les piles ne sont plus assez chargées Dans ce cas installez des piles neuves ou utilisez l adapta teur secteur vend...

Страница 99: ...ers NOTE Si un ichier portant le même nom existe déjà dans un emplacement de destination le déplacement ne sera pas possible tant que le nom du ichier n aura pas été changé Une fois les ichiers déplacés ils ne seront plus reconnus par les anciens enregistreurs de la série H Une carte SD ayant été utilisée dans un enregistreur plus ancien de la série H ZOOM peut être lue et utilisée par le Les ichi...

Страница 100: ...En utilisant une télécommande vendue séparément vous pouvez piloter le à distance Branchez la télécommande à la prise REMOTE du Les touches de la télécommande correspondent aux touches de l unité centrale CONSEIL Les touches de la télécommande fonctionnent même quand la fonction de verrouillage du est activée ...

Страница 101: ...re appareil est branché à une prise d entrée montez le niveau de sortie de cet appareil Si vous trouvez que le ne fonctionne pas normalement veuillez d abord vériier les points suivants L enregistrement n est pas possible Vériiez que la carte SD a de l espace libre P 94 Si Hold is On s afiche à l écran c est que les commandes sont verrouillées Déverrouillez les commandes P 20 Autres problèmes Le n...

Страница 102: ...che 2 jackTRS point chaud sur la pointe Gain d entrée atténuateur PAD désactivé à 55 5 dB Gain d entrée atténuateur PAD activé à 35 5 dB Impédance d entrée 1 8kΩ ou plus Niveau d entrée maximal admissible 22 dBu atténuateur PAD activé Alimentation fantôme 12 24 48 V peut être commutée On Off indépendamment pour les entrées 1 4 Bruit rapporté en entrée 120 dBu ou moins Sorties Prise de sortie Mini ...

Страница 103: ...le bus USB Durées d enregistrement approximatives en continu avec alimentation par piles en heures et minutes Mode d enregistrement Micro XY 44 1 kHz 16 bits stéréo x 1 21h00m Micro XY et entrées 1 2 3 et 4 utilisées 96 kHz 24 bits stéréo x 3 9h45m Note les durées ci dessus sont des estimations Note les durées d enregistrement approximatives en continu avec alimentation par piles ont été calculées...

Страница 104: ...us débarrasser correctement de ce produit vous contribuerez à la prévention de potentiels effets négatifs sur la santé humaine et l environnement qui pourraient sinon découler d une mise au rebut inappropriée de ce produit Le recyclage des matériaux contribuera à la préservation des ressources naturelles Pour des informations plus détaillées sur le recyclage de ce produit veuillez contacter votre ...

Страница 105: ... 2013 ZOOM CORPORATION Reproduction of this manual in whole or in part by any means without permission is prohibited Operation Manual ...

Страница 106: ...ng time put the protective cap on Connection cables and input output jacks Always turn the power OFF for all equip ment before connecting any cables Always disconnect all connection cables and the AC adapter before moving the unit Volume Do not use at a loud volume for a long time Usage Precautions Interference with other electrical equipment In consideration of safety the has been designed to min...

Страница 107: ...r record ing to distort for example Inputs 1 4 have increased maximum gain compared to previous models In response to popular demand they have independent PAD switches that allow them to easily handle 4dB input They can also provide phantom power 12V 24V 48V All input volume gain levels can be adjusted quickly by hand using dedicated knobs Useful operation features High capacity SDXC cards can be ...

Страница 108: ...ack mode 44 Changing the playback pitch key 45 Mixing 46 Checking editing projects files Checking project information 48 Checking track marks 49 Changing project names 50 Mixing down a project 52 Normalizing tracks 54 Dividing projects 56 Trimming project beginnings and ends 58 Deleting one project 60 Deleting all projects in a folder 61 Rebuilding a project 62 Recording a project voice memo 63 Pl...

Страница 109: ...g items Please confirm that they have all been included 4 AA batteries for unit testing Main unit case SD card USB cable main unit MS mic XY mic Cubase LE installation DVD Wind screen sponge 2013 ZOOM CORPORATION 本マニュアルの一部または全部を 無断で複製 転載することを禁じます オペレーション マニュアル Operation manual this document ...

Страница 110: ...Input 2 SD card slot VOLUME button PHONE jack POWER HOLD switch Input volume 2 Track buttons and indicators L R 1 4 Input volume 3 XY mic Swappable MS mic PAD switches 1 4 Input volume 4 Stop button Display Play pause button indicator Back button Forward button Record button indicator ...

Страница 111: ...Battery cover back Speaker back Scroll button Up and down Select menu items Press Confirm menu selection LINE OUT jack Strap holes can also be used with camera straps REMOTE jack remote control sold separately MENU button Press Open menu Return to last screen USB jack 1 GND 2 HOT 3 COLD TIP HOT RING COLD SLEEVE GND 1 2 3 ...

Страница 112: ...8 MS mic This mic combines a unidirectional mid mic that captures sound from the center with a bidirectional side mic that cap tures sound from the left and right By adjusting the side mic level you can change the stereo width as you like If you record in MS RAW mode you can adjust the side mic level after recording to change the stereo width Features This mic can capture a wide and detailed stere...

Страница 113: ... of the mic connect it to the main unit inserting the connector completely Mic disconnection 1 While pressing the buttons on the sides of the mic pull it out of the main unit NOTE When disconnecting a mic do not use too much force Doing so could damage the mic or the main unit Recording will stop if a mic is removed during recording If a mic will not be attached for a long time put on the protecti...

Страница 114: ...evice for example Set the PAD switch to 20 when connecting a mixer or other device with a standard output level of 4dB Stereo inputs By linking tracks 1 and 2 or tracks 3 and 4 as a stereo tracks Inputs 1 2 or Inputs 3 4 can be used for stereo input s P 26 In this case Input 1 Input 3 becomes the left channel and Input 2 Input 4 becomes the right channel Input 1 PAD switch Input 2 Input 3 Input 4 ...

Страница 115: ...nput mic Main subject Shotgun lapel mics connected to Inputs 1 2 Performer Mics connected to Inputs 3 4 Ambient sound Ambient mic Lapel mic Shotgun mic Lapel mic L R 3 4 1 2 Ambient mic Concert recording L R input mic Performance on stage Inputs 1 2 Line outputs from mixer Mics connected to Inputs 3 4 Audience sound Ambient mic PA mixer Ambient mic 3 4 1 2 L R ...

Страница 116: ...tachment SGH 6 This highly directional mic is great for capturing mono phonic sound from a specific location Use it in place of an stereo mic This mic records to the L R track in mono External XLR TRS input EXH 6 Use instead of a stereo mic to give the two more XLR TRS input jacks L R input This does not support phantom power ...

Страница 117: ...y windscreen and an AC adapter Remote control RCH 6 This is a wired remote control for use with the Connect it to the REMOTE jack Hairy windscreen This windscreen can be used with both the XY and MS mics AC adapter AD 17 This AC adapter is designed for use with the Con nect it to the USB jack using a USB cable and plug it into an outlet ...

Страница 118: ...lder name Recording format When using as an audio interface computer or iPad setting shown Auto record s P 29 Stopped Status icon Recording Recording time Battery charge indicator Pan sliders Monitoring mixer s P 80 Full Empty Level meter Recording input level Tracks 1 4 Paused Monitoring volume Monitoring mixer s P 80 Name of project that will play when the button is pressed when recording name o...

Страница 119: ...ng back Level meter playback level Tracks 1 4 Playback speed s P 41 Playback format Battery charge indicator Status icon Pitch control L R track Name of connected mic unit shown Playback volume Pan sliders Folder name Paused A B repeat s P 42 Shown when A and B points set Playback Screen ...

Страница 120: ...move the battery cover 2 Install the batteries 3 Replace the battery cover Open while pushing up NOTE Use alkaline batteries or nickel metal hydride batteries If the battery indicator becomes empty turn the power off imme diately and install new batteries Set the type of battery being used s P 23 ...

Страница 121: ...Preparations Supplying power 17 H6 Handy Recorder Using an AC adapter sold separately 1 Connect a USB cable to the USB jack 2 Plug the adapter into an outlet ...

Страница 122: ...out Loading an SD card NOTE Always turn the power off before inserting or removing an SD card Inserting or removing a card while the power is on could result in data loss When inserting an SD card be sure to insert the correct end with the top side up as shown When an SD card is not loaded recording and playback are not possible See Formatting SD cards s P 95 SD card slot in center of left side ...

Страница 123: ... appears on the display confirm that the SD card is inserted properly If Card Protected appears on the display the SD card write protection is enabled Slide the lock switch on the SD card to disable write protection If Invalid Card appears on the display the card is not correctly formatted for use with this recorder Format the card or use a different card See Formatting SD cards s P 95 Turning the...

Страница 124: ...tion does not affect the remote control sold separately Even when hold is active the remote can still be used Deactivating the hold function ミ Slide to the center The has a hold function that can be used to disable the buttons in order to prevent accidental operation during recording Using the hold function ...

Страница 125: ...ting the language 1 Press 2 Use to select LANGUAGE and press 3 Use to select the language and press The language shown on the display can be set to English or Japanese The first time you turn the power on after purchase you must set the language and date time ...

Страница 126: ... the date and time ミ Changing settings Move cursor Move up down Select item Press then move up down Confirm change Press 5 Press to complete the setting When the date and time are set the recorder can store accurate recording date and time information in files The first time you turn the power on after purchase you must set the language and date time ...

Страница 127: ...ndy Recorder 3 Use to select Battery and press 4 Use to select the type and press Setting the type of battery used 1 Press 2 Use to select SYSTEM and press Set the type of battery used so that the amount of remaining battery charge can be shown accurately ...

Страница 128: ...the number of tracks You can also make automatic recording s P 29 pre recording s P 31 backup recording s P 34 low cut s P 78 compressor limiter s P 79 and metronome s P 76 settings for example 2 Select recording tracks s P 26 Use the track buttons to select When the selected track indicator lights red the input signal can be monitored Press two track buttons at the same time to use them as a ster...

Страница 129: ... First file when recording exceeded 2GB Second file when recording exceeded 2GB The settings file has the same name as the project name Project file when project name is set to Date s P 50 ZOOM0003_LR 0002 WAV ZOOM0002_Tr34 WAV ZOOM0002 hprj ZOOM0002_LR WAV ZOOM0002 Stereo file of recorded L R input signals Mono file of recorded Input 1 signal L R input backup recording file s P 34 Stereo file of ...

Страница 130: ...o links can also be deactivated in the same way The L R track stereo link however cannot be deactivated HINT When recording files are created for each selected track button as follows Tracks recorded File name Contents L R track ZOOMnnnn LR Stereo file Mono track ZOOMnnnn_Tr1 for track 1 Mono file Stereo track ZOOMnnnn_Tr34 for tracks 3 4 Stereo file Note nnnn in the file name is the project numbe...

Страница 131: ... start recording 4 Press to add a mark 5 Press to pause NOTE When recording is paused a mark is added at that point 6 Press to stop recording NOTE A maximum of 99 marks can be added to a single project During recording if the file size exceeds 2 GB a new file will be created automatically in the same project and recording will continue without pause When this hap pens numbers will be added to the ...

Страница 132: ...ECT LIST and press 3 Use to select the folder where you want to save new projects and press Selecting the folder where projects are saved Choose one of ten folders as the folder where new recorded projects will be saved 4 Press to confirm the folder selection and return to the Home Screen ...

Страница 133: ...9 H6 Handy Recorder Recording automatically 1 Press 2 Use to select REC and press 3 Use to select Auto Rec and press 4 Use to select On Off and press NEXT Recording can be started and stopped automatically in response to the input level ...

Страница 134: ...6 Return to the Home Screen and press to put the recorder into standby HINT When the input exceeds the set level shown on the level meters recording starts automatically You can also set the recording to stop automatically when the input goes below a set level s P 85 7 Press to exit standby or stop recording Recording automatically continued ...

Страница 135: ...nnot be used at the same time as this function Pre recording 1 Press 2 Use to select REC and press 3 Use to select Pre Rec and press By setting the recorder to constantly capture the input signal you can start recording two seconds before pressing the button This is useful when for example a performance starts suddenly ...

Страница 136: ...t the count number and press NOTE The Auto Rec and Pre Rec functions cannot be used at the same time as this function Counting in before recording 1 Press 2 Use to select TOOL and press 3 Use to select Metronome and press The recorder metronome can be used to count in before starting recording ...

Страница 137: ...with the value Narrow Before using the MS mic to record you can adjust the side mic level stereo width Do this when the Home Screen is open NOTE Set to Off 24 to 6 dB or RAW When recording in RAW mode during playback move up and down to adjust the side mic level RAW mode can be selected only when the WAV format is used for recording MS mic only ...

Страница 138: ...n play backup files s P 64 Backup recording 1 Press 2 Use to select REC and press 3 Use to select Backup Rec and press When using the L R input in addition to the recording at the set input level the recorder can also record a separate file at a level 12dB below This backup can be used if the recording level was set too high causing distortion for example L R input and WAV format only ...

Страница 139: ...e indicator lights red for the track to be overdubbed 5 Turn to adjust the input level HINT You can also adjust the mixer volume pan s P 46 low cut filter s P 78 and compressor limiter as needed s P 79 6 To monitor already recorded tracks press their track buttons so their indicators light green NEXT You can add recordings to an already recorded project WAV format only ...

Страница 140: ... to monitor the input sound of the track while playing back an already recorded track press the button for the track that you want to monitor so that its indicator lights orange and then press If the playback speed of a project is set to any value other than 100 tracks cannot be overdubbed their indicators will not light red 9 Press to stop overdubbing When you play back or edit an overdubbed proj...

Страница 141: ...Recording Overdubbing 37 H6 Handy Recorder ...

Страница 142: ...se and Search forward backward Press and hold Pause resume playback Press Adjust volume Press Add marks Press Change side mic level Move up and down RAW mode only HINT The longer you press and hold or the faster searching backward forward becomes During playback you can press track buttons to unmute lit green and mute unlit tracks ...

Страница 143: ...Playback Basic playback 39 H6 Handy Recorder 2 Press or to return to the Home Screen ...

Страница 144: ...the list 1 Press 2 Use to select PROJECT LIST and press 3 Use to select the folder and press 4 Use to select the project you want to play back and press The selected project will start playing back NOTE After playback completes playback might continue depending on the playback mode s P 44 ...

Страница 145: ...s 2 Use to select PROJECT MENU and press 3 Use to select Playback Speed and press 4 Use to adjust the playback speed and press Playback will occur at the adjusted speed NOTE This setting is saved separately for each project You can adjust the playback speed in a range from 50 to 150 of normal ...

Страница 146: ...also press to search while playing back 6 Use to select the B point icon Then set the repeat playback ending point Repeat playback of a set interval AB repeat 1 Press 2 Use to select PLAY and press 3 Use to select AB Repeat and press 4 Use to select the A point icon and press You can repeat playback between two set points ...

Страница 147: ...r 7 Press to open the playback screen Repeat playback will start between the set points NOTE To end AB repeat playback follow the instructions on P 42 to select AB Repeat and then press During repeat playback AB repeat will end if you press or to select a different project ...

Страница 148: ...se to select Play mode and press 4 Use to select the mode and press NOTE Play All Play all the projects in the current folder Play One Play only the selected project Repeat One Play the selected project repeatedly Repeat All Play all the projects in the current folder repeatedly You can set the playback mode ...

Страница 149: ...press 4 Use to select the track for which you want to change the pitch key and press 5 Use to set the play back pitch key and press NOTE This can be set between 郷6 and 響6 Playback will occur with the changed pitch HINT This pitch setting is saved separately for each project The pitch can be changed in semitones for each track separately while keeping the same playback speed ...

Страница 150: ...ue Move up down Select parameter to change Press Parameter Setting range Explanation Volume Mute 48 0 12dB in 0 5dB increments Adjusts track volume Panning L100 CENTER R100 Adjusts left right position of sound Pitch key 郷6 響6 Adjusts playback pitch without changing playback speed Mixing You can use the Project Mixer to adjust the balance of the playback tracks WAV format only ...

Страница 151: ...to the project without mixer adjustments Pressing this button turns the mixer settings on and off NOTE Mix settings are saved with each project separately and applied during playback Use the Monitor Mixer to adjust the balance when moni toring inputs s P 80 ...

Страница 152: ...g project information 1 Press 2 Use to select PROJECT MENU and press 3 Use to select Information and press to view information about the project Use to scroll down to see information hidden below the bottom of the screen You can check information about the selected project ...

Страница 153: ... Recorder 1 Press 2 Use to select PROJECT MENU and press 3 Use to select Mark List and press to open the mark list Checking track marks A list of marks in the recorded project can be shown Mark user added Mark added when a gap occurred in the sound during recording ...

Страница 154: ... Use to select Rename and press 5 Change the name ミ Controls when changing names Move cursor change character Move up down Select character confirm change Press 6 Press to complete the setting NOTE The following characters can be used in project names space 0123456789 ABCDEFGHIJKLM NOPQRSTUVWXYZ _ abcdefghijklmnopqrstuvwxyz A project name cannot be only spaces ...

Страница 155: ...Checking editing projects files Changing project names 51 H6 Handy Recorder ...

Страница 156: ...e to select the format and press NOTE You can only select WAV formats that have the same sam pling frequency and bit rate as the selected project 1 Press 2 Use to select PROJECT MENU and press 3 Use to select Mixdown and press Mixing down a project You can mix down a project that has been recorded using WAV format into a stereo file WAV or MP3 WAV format only ...

Страница 157: ...city the recorder will return to the Mixdown screen The file created by the mixdown will be named after the original project with a three digit number added to the end as in ZOOM0001_ST001 If you mix down the same project again this number will increase by one During mixdown the volume pan and track status button settings made using the project mixer s P 46 as well as the playback speed s P 41 wil...

Страница 158: ...d press 4 Use to select Normalize and press 5 Use to select the track that you want to normalize NOTE You cannot select a track that has no recorded file If you select All all tracks that have files will be normalized If the volume of a project recorded using WAV format is too low you can increase the overall level of the file WAV format only ...

Страница 159: ...jects files Normalizing tracks 55 H6 Handy Recorder 6 Use to select Yes and press to start normalization NOTE When normalized the level of the entire file will be increased by the same amount so that the peak level is 0 dB ...

Страница 160: ...de and press 5 Set the division point ミ Controls when dividing Move point Use and PLAY pause Press Confirm point Press 1 Press 2 Use to select PROJECT MENU and press 3 Use to select Edit and press Dividing projects You can divide a project into two new projects at any point ...

Страница 161: ...ore the division point will be given the same name as the original project with A added to the end The part after the point will have B added to the end of its name If you have made additional recordings and have multiple takes the current take will be divided All other takes will be saved with the original project The original take is deleted ...

Страница 162: ... select the starting point icon 6 Use and to find the starting point You can also press to search while playing back 7 Use to select the ending point icon Then set the ending point in the same manner Trimming project beginnings and ends You can delete trim unnecessary beginnings and endings of recorded projects To do so you will set the beginning and end ing points of the part to be kept ...

Страница 163: ...es Trimming project beginnings and ends 59 H6 Handy Recorder 8 Press 9 Use to select Yes and press to trim the project NOTE If you have made additional recordings and the project has multiple takes the current take will be trimmed ...

Страница 164: ...project 60 Deleting one project 1 Press 2 Use to select PROJECT MENU and press 3 Use to select Trash and press 4 Use to select Delete and press 5 Use to select Yes and press NOTE Deleting projects cannot be undone You can delete unneeded projects ...

Страница 165: ...eleting all projects in a folder 1 Press 2 Use to select PROJECT MENU and press 3 Use to select Trash and press 4 Use to select Delete All Projects and press 5 Use to select Yes and press NOTE Deleting projects cannot be undone You can delete all the projects in one folder at the same time ...

Страница 166: ... disconnect the adapter while recording or use a computer to delete a setting file that is necessary for the project In such cases rebuilding the project might repair it so it can be used again Rebuilding a project 1 Press 2 Use to select PROJECT MENU and press 3 Use to select Rebuild and press If a project is missing necessary files or is damaged you can try rebuilding it ...

Страница 167: ... Start recording Press Stop recording Press 5 Play the memo Start playback Press Stop playback Press HINT Each time you press the voice memo is overwritten Voice memos are recorded using the stereo mic con nected to the L R input It cannot be recorded using Inputs 1 4 The file name of the voice memo will be in the format of ZOOM0001_VM The voice memo file format is 128kbps MP3 You can add a voice ...

Страница 168: ...t PROJECT MENU and press 3 Use to select Backup File and press If you have made a backup recording you can play the backup file instead of the normal file 4 Use to select On and press In this state when you press the backup file will play back instead of the normal file for track L R WAV format only ...

Страница 169: ...Checking editing projects files Playing backup files 65 H6 Handy Recorder ...

Страница 170: ...he computer using a USB cable NOTE If you want to power the unit using the computer s USB bus connect the cable while the power is off and then turn it on The following operating systems are supported Windows XP or later Mac OS X 10 6 or later Data exchange with computers card reader By connecting with a computer you can check and copy data on the SD card ...

Страница 171: ... procedures for your computer when you want to disconnect Windows Use Safely Remove Hardware to select the Macintosh Drag and drop the icon into the trash NOTE Always follow these procedures before disconnecting the USB cable 6 Disconnect the cable from the computer and the and then press ...

Страница 172: ...t interface With an iPad use Stereo Mix mode It will not work with MultiTrack mode When using Stereo Mix mode you can use the recorder s mixer to mix all track inputs to stereo s P 72 When using Windows a driver is necessary to use Multi Track mode You can download this driver from the ZOOM website www zoom co jp 5 Use to select PC Mac PC MAC using battery power or iPad using battery power and pre...

Страница 173: ...er or iPad using a USB cable NOTE An iPad Camera Connection Kit is necessary to connect an iPad HINT See Audio interface settings s P 70 7 Press to disconnect 8 Use to select EXIT and press 9 Use to select Yes and press 10 Disconnect the cable from the computer or iPad and the and then press ...

Страница 174: ...directly before it passes through the connected computer or iPad This enables monitoring without latency 1 Press 2 Use to select INPUT OUTPUT and press 3 Use to select Direct Monitor and press 4 Use to select On and press Input settings Low cut filter s P 78 Compressor limiter s P 79 Direct monitoring s P 70 MS RAW monitoring s P 82 Phantom power s P 87 Plug in power s P 88 Loop Back function s P ...

Страница 175: ...h the sound input in the and send it back to the computer or iPad again loop back This can be used for example to add narration to a musical backing track playing on the computer and then record using software on the computer or stream it live via the Internet 1 Press 2 Use to select INPUT OUTPUT and press 3 Use to select Loop Back and press 4 Use to select On and press ...

Страница 176: ...reo mix is sent 1 Press 2 Use to select INPUT OUTPUT and press 3 Use to select Mixer and press 4 Change the parameter settings as desired ミ Mixing controls Move cursor change value Move up down Select parameter to change Press 5 Press to listen to the project without mixer adjustments Pressing this button turns the mixer settings on and off HINT The same mix settings are saved and used for both st...

Страница 177: ...USB functions Audio interface settings 73 H6 Handy Recorder ...

Страница 178: ...L and press 3 Use to select Tuner and press Using the tuner The input signal can be used to tune an instrument 4 Use to select the tuning type and press 5 Use to change the standard pitch HINT The standard pitch can be set in a range between 435Hz 445Hz ...

Страница 179: ...is detected automati cally and the name of the near est note and the pitch inaccuracy are shown ミ Guitar bass tuner The number of the string you are tuning is automatically detected allowing you to tune them one at a time Tuner type String number note name 1 2 3 4 5 6 7 Guitar E B G D A E B Bass G D A E B Open A E C A E A E Open D D A F D A D Open E E B G E B E Open G D B G D G D DADGAD D A G D A ...

Страница 180: ...Use to set when the metronome is active and press ミ Select Pre Count s P 32 ミ Select Tempo Use to set the speed and press Using the metronome 1 Press 2 Use to select TOOL and press 3 Use to select Metronome and press Use the metronome to count in before recording or as a click track ...

Страница 181: ...Tools Using the metronome 77 H6 Handy Recorder ミ Select Sound Use to set the sound and press ミ Select Pattern Use to set the pattern and press ミ Select Level Use to set the metronome volume and press ...

Страница 182: ...apply the low cut filter to and press 5 Use to select the cutoff frequency of the low cut filter and press Reducing noise low cut filter 1 Press 2 Use to select INPUT OUTPUT and press 3 Use to select Lo Cut and press Use the low cut filter to reduce wind noise and vocal pops for example ...

Страница 183: ...gnals and lower high level input signals 5 Use to select the type of compressor limiter and press Setting Explanation Off Compressor limiter OFF Comp1 General Standard compressor Compressors reduce high lev els and raise low levels Comp2 Vocal Compressor for vocals Comp3 Drum Compressor for drums and percussion Limiter1 General Standard limiter Limiters reduce the level when input signals exceed a...

Страница 184: ...g controls Move cursor change value Move up down Select parameter to change Press Parameter Setting range Explanation Volume Mute 48 0 12dB in 0 5dB increments Adjusts track volume Panning L100 CENTER R100 Adjusts left right position of sound NOTE The use of volume and panning settings only affect the monitoring signal They do not affect the recorded data Use the Project Mixer to adjust the balanc...

Страница 185: ...H6 Handy Recorder 5 Press to listen to the project without mixer adjustments Pressing this button turns the mixer settings on and off NOTE These mix settings are saved with each recorded project separately Mix settings can also be applied during play back s P 46 ...

Страница 186: ...T and press 3 Use to select MS RAW Monitor and press When recording in MS RAW mode you can monitor the mid mic input through the left channel and the side mic input through the right channel 4 Use to select RAW and press NOTE Select Stereo if you want to monitor with an ordinary stereo mix MS RAW mode only ...

Страница 187: ...kbps MP3 192kbps MP3 160kbps MP3 128kbps MP3 112kbps MP3 96kbps MP3 80kbps MP3 64kbps MP3 56kbps MP3 48kbps Audio quality File size High Low Large Small NOTE Use the WAV format for recording high quality audio The MP3 format reduces file size through compression which also reduces the audio quality Use this format if you need to conserve space on the SD card to store many recordings for example Wh...

Страница 188: ...ss 4 To set the recording start ing level use to select Set Start Stop Level and press You can set the input levels that cause automatic recording to start and stop 5 Use to select Start Level and press 6 Use to set the start level and press Recording will start automatically when the input level exceeds the set level NOTE In step 5 you can also choose Stop Level ...

Страница 189: ...g 1 To set the automatic stop ping time use to select Auto Stop and press 2 Use to set the stop time and press 3 Set the stop level in the same manner as the start level s P 84 When the input level goes below the set level recording will stop automatically after the amount of time set in step 2 above ...

Страница 190: ... 3 Use to select Project Name and press 4 Use to select the type and press You can change the type of name that is automatically given to a project NOTE Project names are created in the following formats Default ZOOM0001 ZOOM9999 Date YYMMDD HHMMSS Example 130331 123016 The Date format uses the recording starting time ...

Страница 191: ... Use to select INPUT OUTPUT and press 3 Use to select Phantom and press 4 Use to select a menu item and press ミ Select ON OFF Use to select the input you want to set and press Use to select On and press ミ Select Voltage Use to select the desired voltage and press Inputs1 4 can provide phantom power of 12V 24V or 48V ...

Страница 192: ...n power 1 Press 2 Use to select INPUT OUTPUT and press 3 Use to select Plugin Power and press 4 Use to select On and press When using a mic that uses plug in power make the following setting before connecting it to the MIC LINE input jack of the XY mic ...

Страница 193: ... select VU Meter and press 4 Use to adjust input levels and check them here 5 Use to adjust the reference that is used for 0VU HINT The reference level can be set between 20dBFS and 10dBFs The dBFS unit represents the loudness of the signal in dB with 0dBFS being the maximum recordable value for the digital data The virtual VU meters can be used to check input levels ...

Страница 194: ...STEM and press 3 Use to select Backlight and press 4 Use to select Power Saving and press You can set the display backlight to dim or turn off when no operation is conducted for 30 seconds in order to save power 5 Use to select the desired setting and press NOTE When using an AC adapter this setting has no effect ...

Страница 195: ...splay brightness 91 H6 Handy Recorder Adjusting the display brightness 1 Press 2 Use to select SYSTEM and press 3 Use to select Backlight and press 4 Use to select Brightness and press 5 Use to select the desired brightness and press ...

Страница 196: ...re versions 92 Checking the firmware versions 1 Press 2 Use to select SYSTEM and press 3 Use to select Software Version and press to open a screen where you can view the firmware versions You can check the software versions used by the ...

Страница 197: ...t settings 1 Press 2 Use to select SYSTEM and press 3 Use to select Factory Reset and press You can restore the unit to its factory default settings 4 Use to select Yes and press to restore the default settings The power will automatically turn off NOTE Input level settings are not reset ...

Страница 198: ... functions Checking SD card open space 94 Checking SD card open space 1 Press 2 Use to select SD CARD and press 3 Use to select SD Card Remain and press to see the amount of remaining open space on the card ...

Страница 199: ...s 4 Use to select Yes and press to format the SD card SD cards must be formatted by the for use with it NOTE If you use an SD card that has been formatted by a computer or that you have purchased you must format it using the before it can be used with the unit Be aware that all data previously saved on the SD card will be deleted when it is formatted ...

Страница 200: ...t Performance Test and press 4 Press to start the performance test 5 When the test completes the result will be shown If the MAX access rate is 100 the result will be NG no good 6 To cancel testing press NOTE Even if an SD card is evaluated as OK by the performance test this does not guarantee that write errors will never occur Please use this test just as a guide Test progress Card access rate ...

Страница 201: ...Other functions Testing SD card performance 97 H6 Handy Recorder ...

Страница 202: ...tory of the SD card 2 Insert the SD card into the Then turn the power on while pressing 3 Use to select Yes and press to update the firmware 4 After the firmware update completes turn the power off NOTE Updating the firmware is not possible when the remaining battery power is too low If this is the case install new batteries or use an AC adapter sold separately ...

Страница 203: ... and press to move the files NOTE If a file with the same name already exists in a destination location movement will not be possible until the file name is changed After files are moved they will not be recognized by older H series recorders An SD card that has been used in an older ZOOM H series recorder can be read and used by the The files will be moved on the card so that the can use them ...

Страница 204: ...parately By using a remote control sold separately you can operate the from a distance ミ Connect the remote control to the REMOTE jack The buttons on the remote control correspond to the buttons on the main unit HINT The remote control buttons function even when the hold function is active ...

Страница 205: ...he input level settings s P 24 If a CD player or other device is connected to an input jack raise the output level of that device If you think that the is not operating properly please check the following first 虚 Recording is not possible Confirm that the SD card has open space s P 94 If Hold is On appears on the display the hold function is enabled Disable the hold function s P 20 Other trouble 虚...

Страница 206: ... combo jacks XLR 2 hot TRS TIP hot Input gain PAD OFF to 55 5 dB Input gain PAD ON to 35 5 dB Input impedance 1 8kΩ or more Maximum allowable input level 22 dBu PAD ON Phantom power 12 24 48V can be turned ON OFF independently for INPUTS 1 4 Equivalent input noise EIN 120 dBu or less Outputs Output jack LINE OUT stereo mini jack rated output level 10 dBu when output load impedance is 10 kΩ or more...

Страница 207: ...us recording times when using battery power in hours and minutes Recording mode XY mic 44 1kHz 16 bit stereo x 1 21h00m XY mic and Inputs 1 2 3 and 4 used 96kHz 24 bit stereo x 3 9h45m Note The above times are estimates Note Approximate continuous recording times when using battery power were calculated using our own testing method They may differ greatly depending on operating conditions Power Op...

Страница 208: ...sion reception which can be determined by turning the equipment off and on the user is encouraged to try to correct the interference by one or more of the following measures Disposal of Old Electrical Electronic Equipment Applicable in European countries with separate collection systems This symbol on the product or on its packaging indicates that this product shall not be treated as household was...

Страница 209: ... 2014 ZOOM CORPORATION Reproduction of this manual in whole or in part by any means without permission is prohibited Version 2 0 Supplementary Manual ...

Страница 210: ... time required for it 6 For a full test press to select Yes and press to start it The full test checks the entire writable area of the card NOTE After conducting the full test see P96 of the operation manual for details Even if the performance test result is OK this does not guarantee that write errors will not occur Please consider it to be just a performance estimate Testing SD card performance ...

Страница 211: ...o set the output level of the LINE OUT jack and press NOTE This setting does not affect the output level of the PHONE jack Lowering the line output level You can lower the output level of the LINE OUT jack Use this when the output signal of the LINE OUT jack is input to the external mic input jack of an SLR camera or another connector with high input gain ...

Страница 212: ...t through Inputs 1 2 or Inputs 3 4 can be converted to an ordinary stereo signal 1 Press 2 Use to select INPUT OUTPUT and press 3 Use to select MS Matrix and press 4 Use to select the tracks to convert and press 5 Use to select an item and press Turn On Off Use to select On and press NOTE When set to On the selected tracks will be converted into stereo tracks ...

Страница 213: ...und and press HINT Mid Level can be set to mute and in a range from 48 0 to 12 0 dB Set Side Level Use to set the level of the side mic which captures the sound to the left and right and press HINT Side Level can be set to mute and in a range from 48 0 to 12 0 dB Selecting the Track Setting Use to select Mid and Side assignments for Inputs 1 2 or 3 4 and press ...

Страница 214: ...s that have names shown in red on the display are being recorded HINT When monitoring press and hold another track button to add that track to the signals monitored Even when monitoring in SOLO mode the automatic recording function will operate in response to the input levels of all tracks 2 Press the button of a track being monitored to end SOLO mode The indicators for all tracks being input will...

Страница 215: ...TE Markers will not be output when the overdubbing or voice memo functions is in use Setting the Sound Use to select the type of sound marker and press Setting the Level Use to set the sound marker level and press Outputting tone signals when starting and stopping recording sound marker function When starting and stopping recording the can output tone signals sound markers When recording audio for...

Страница 216: ...Z2I 2214 01 ZOOM CORPORATION 4 4 3 Kanda Surugadai Chiyoda ku Tokyo 101 0062 Japan http www zoom co jp ...

Отзывы: