background image

13

INTEGRATED DOOR PANEL INSTALLATION

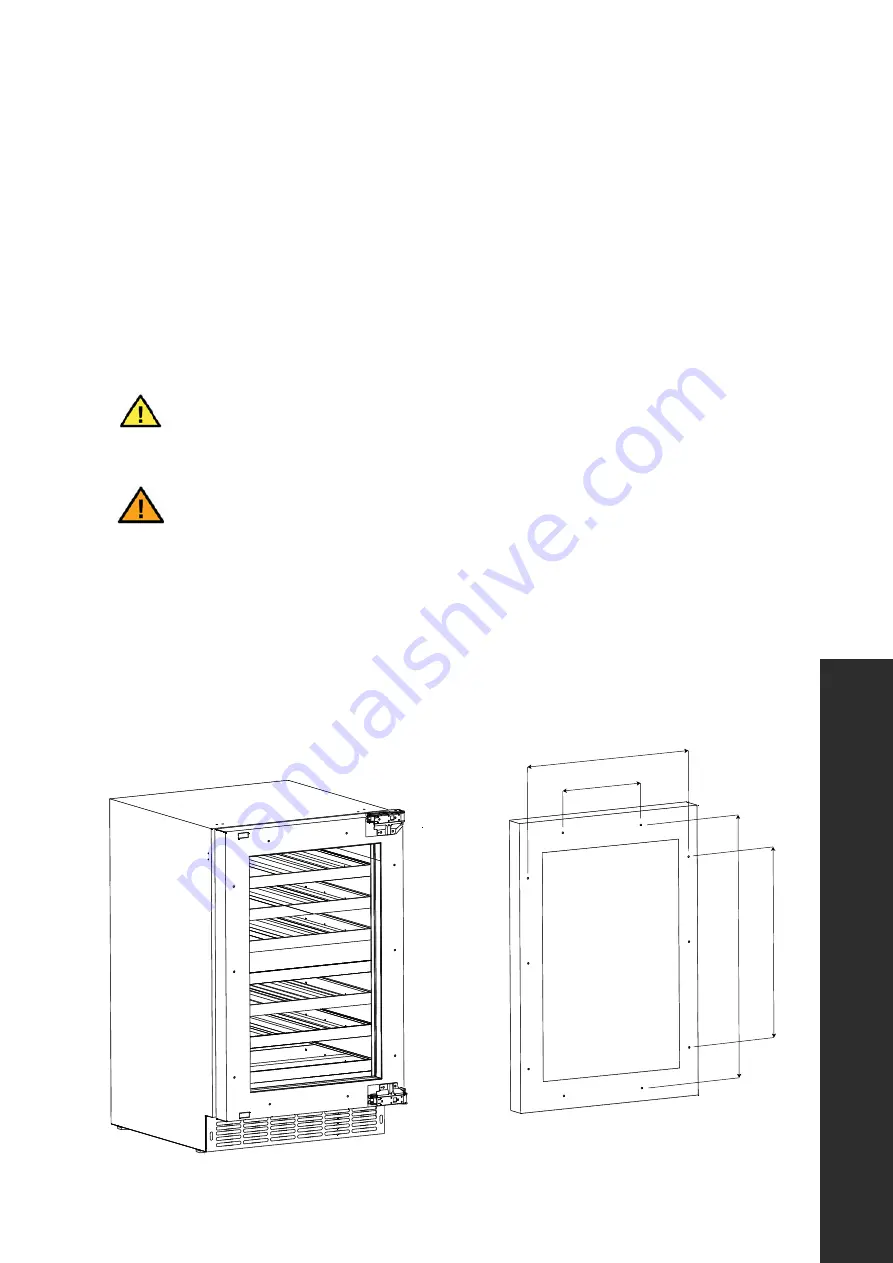
RWDPO-24 and RBSPO-24 models are manufactured without door panels and handles. 
To install a custom integrated panel around the glass door, follow the instructions and 
dimensions below and on the next page. 

NOTE: 

Custom handles need to be affixed to the 

panel prior to installing the panel onto the appliance (see page 15). Finish all sides of th
custom panel. They may be visible when the door is open.

WARNING

Make sure the appliance is fully disconnected from power before installing a 
door panel to avoid risk of electric shock.

CAUTION

We recommend consulting a professional installer/carpenter when fabricating 
a custom panel in wood or another material, as the dimensions provided must 
be precisely followed to achieve optimal integration and appliance operation.

PREPARING THE INTEGRATED PANEL

The dimensions in the figure below represent precise distances between the middle of the 
corresponding screw holes. When cutting/fabricating the panel, use these measurements so 
the screw holes align to ensure a flush installation onto the panel-ready door.

23 5/8" (600 mm)

18 5/8" (472 mm)

Depth of unit behind door:

20 11/16" (526 mm)

Depth of door: 1 3/4" (44 mm)

Recommended depth of
integrated door panel:
3/4" (20 mm)

30"31"

(762787 mm)

2 3/4" (70 mm)

2 3/4" (70 mm)

Full product height:

34"35"

(864889 mm)

3 3/4"

(95 mm)

30" (762 mm)

6 7/8" (175 mm)

21 1/4" (539 mm)

20 1/2

" (5

20 mm)

27

" (68

5 mm)

INSTALLATION

Integr

ated P

anel Installation

Содержание Touchstone RBSPO-24

Страница 1: ...Installation and User Manual...

Страница 2: ...en and bath of your dreams is never out of reach Through our unique designs and unparalleled quality we re dedicated to providing you an elevated experience in the heart of your home With an endless s...

Страница 3: ...l features into everyone s homes Because we continually strive to improve our products we may change specifications and designs without prior notice WARNING This product can expose you to chemicals in...

Страница 4: ...net Instructions 10 Installing The Anti Tip System 1 1 Reversing The Door Swing 12 Integrated Door Panel Installation 13 Handle Installation 15 Electrical Connection 16 OPERATION 17 Control Panel Layo...

Страница 5: ...efrigerator Do not puncture refrigerant tubing This appliance is to be repaired only by trained service personnel Consult the appliance s user and installation manuals before attempting service All sa...

Страница 6: ...flammable substances near the unit Sparks from electrical switches could result in an explosion and or fire If a combustible gas is present near the appliance turn off the source of the gas then open...

Страница 7: ...ed at the bottom front of the refrigerator To ensure proper service access and ventilation all units should not have the grill openings covered There are no additional requirements for venting at the...

Страница 8: ...ong its lifespan Leave disassembly and disposal of the unit to qualified experts The manufacturer will not be responsible for any damage to property or to persons caused by incorrect installation impr...

Страница 9: ...lf Configuration 5 Full Depth Stainless Steel Wire Rack 1 Half Depth Stainless Steel Wire Rack at bottom Interior Capacity 4 8 cu ft Wine Storage Capacity 44 Bordeaux style bottles 750 ml PRODUCT DIME...

Страница 10: ...iguration 1 Full Depth Stainless Steel Wire Rack Glass Shelves 2 Full Depth and 1 Half Depth Interior Capacity 5 2 cu ft Can Bottle Storage Capacity 151 cans or 79 bottles 12 oz Wine Storage Capacity...

Страница 11: ...Range 50 F 1 10 F 10 C 43 C Operating Temperature Range 34 F 65 F 1 C 18 C Shelf Configuration 3 Full Depth Glass Shelves 1 Half Depth Glass Shelf at bottom Interior Capacity 5 2 cu ft Can Bottle Sto...

Страница 12: ...crews for anti tip brackets 6 Door limiting pins 2 Screws for custom panel installation 10 Decorative plugs 4 Allen key 1 Not needed for stainless steel door models see page 13 for panel ready informa...

Страница 13: ...iance in a location away from direct sunlight and sources of heat stove heater radiator etc Direct sunlight may affect the acrylic coating and heat sources may increase electrical consumption Extreme...

Страница 14: ...9 mm depending on the legs being at their lowest and highest setting Since kitchen cabinet layouts vary consult a professional installation technician when considering a built in cabinet installation...

Страница 15: ...ng up and out as outlined in the image above 3 Plug the power cord into the wall and push the unit into the cutout using care to not tangle or damage the power cord 4 Once the appliance is in the cuto...

Страница 16: ...the right side hinges Do not fully remove these screws to avoid the door falling and creating risk for injury 3 Next completely remove the inner top and bottom screws on the right side hinges 4 Initia...

Страница 17: ...panel to avoid risk of electric shock CAUTION We recommend consulting a professional installer carpenter when fabricating a custom panel in wood or another material as the dimensions provided must be...

Страница 18: ...ned in the steps on page 12 INTEGRATED DOOR PANEL DIMENSIONS Reference the dimensions below when fabricating your custom integrated panel Figure 1 is a side view of the unit showing how the panel in g...

Страница 19: ...22 1 2 572 mm 30 762 mm 2 3 4 70 mm 22 1 2 572 mm 1 3 8 35 mm 23 5 8 600 mm 3 4 20 mm 1 2 12 mm 1 4 6 mm 1 4 1 3 6 9 mm 2 3 4 70 mm DOOR HINGE TIGHTENING The appliance s door hinges may loosen over ti...

Страница 20: ...circumstances cut or otherwise remove the third ground prong from the power cord Doing so increases the risk of electric shock injury and or death WARNING We do not recommend using an extension cord b...

Страница 21: ...s to fluctuate This means the desired interior temperature ranges may not be reached See more on page 22 CONTROL PANEL LAYOUT AND OPERATION Up Down Power Light Fast cooling Screen lock Maintenance Lig...

Страница 22: ...Lighting Defrosting Temp unit DUAL ZONE WINE COOLER TEMPERATURE SETTINGS For models RWDO GS 24 and RWDPO 24 this symbol Lighting Defrosting Temp unit in front of the temperature indicates the upper or...

Страница 23: ...old UP and DOWN for 3 seconds to toggle the temperature unit to Celsius or Fahrenheit Press and hold again to revert Upper Zone Lower Zone FAST COOLING Press and hold UP and POWER for 6 seconds to ent...

Страница 24: ...e will shut off the screen display operating sounds and light while the unit still runs automatically according to the previous temperature setting SCREEN LOCK Press and hold POWER and LIGHT for over...

Страница 25: ...Troubleshooting on page 25 WINE STORAGE TEMPERATURES While certain wines store best at temperatures between 56 F 58 F 13 C 14 C your unit also allows you to store wine at drinking temperatures Genera...

Страница 26: ...mperature product the unit will operate continuously for as long as 24 hours to reduce the temperature inside the cabinet to the desired point Under normal conditions when the unit has been on for 6 h...

Страница 27: ...rap near the compressor and possibly overflow DEFROSTING THE UNIT The unit uses an automatic defrost system in which the refrigerated surfaces of the unit defrost automatically Defrost water drains in...

Страница 28: ...nit Thoroughly clean the toe kick and re install on the unit 7 Remove the screws securing the rear access cover and use a brush and vacuum to clean dirt and debris from the machine compartment 8 Check...

Страница 29: ...rease Temperature window displays This error code indicates the thermostatic sensor has malfunctioned Contact ZLINE Customer Service at 1 614 777 5004 for assistance Temperature window displays This e...

Страница 30: ...arranty is non transferable and will not be extended based on the date of installation The warranty applies only to products installed in the continental United States and the District of Columbia War...

Страница 31: ...permanently affixed labels warnings or plates from the product This will void the warranty You may also consider attaching your receipt or proof of purchase to this manual SERVICE For warranty service...

Страница 32: ...1 614 777 5004 www zlinekitchen com contact zlinekitchen com 1 6 1...

Отзывы: