background image

Technology yields progression. Electromagnetic heating technology 
emits heat into the cookware itself rather than atop the surface burner. 
This design uses premium glass which distributes and retains heat more 
efficiently than other cooktop types. 

Содержание RCIND-36

Страница 1: ...1 Induction Cooktop Manual Installation Guide and Users Manual ...

Страница 2: ......

Страница 3: ...gression Electromagnetic heating technology emits heat into the cookware itself rather than atop the surface burner This design uses premium glass which distributes and retains heat more efficiently than other cooktop types ...

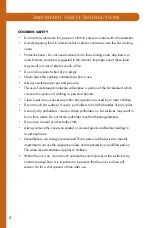
Страница 4: ...CONTENTS Installation Guide Important Safety Instructions 1 Product Dimensions 6 ...

Страница 5: ...CONTENTS Users Manual Users Manual 7 Room Ventilation 8 Surface Burner Layout 9 Using the Cooktop 12 Cookware Uses 17 Cleaning your Cooktop 18 Troubleshooting 19 Installation Instructions 21 ...

Страница 6: ... factory after thorough quality inspection and testing Our distributors and our service partners are ready to answer any questions you may have regarding installation of your ZLINE product This manual will help you learn to use the product in the safest most efficient manner and care for it so that it may give you the highest satisfaction for years to come This manual also includes directions for ...

Страница 7: ...than indirectly through heating the glass surface The glass becomes hot only because the cookware warms it up The rating tag shows the model and serial number of your range The tag is located under the front edge of the induction cooktop The tag is visible when the oven door is open Important Appliance Information Dealer Model Date Installed Installer Location of Appliance Tags ...

Страница 8: ...on Do not remove permanently affixed labels warnings or plates from the product This may void the warranty Please observe all local state and national codes and ordinances INTENDED USE This appliance is designed for in household use only Do not use outdoors Do not use the appliance to heat a room CLEANING SAFETY Do not use steam cleaners or high pressure cleaners to clean the cooktop as this may r...

Страница 9: ...or pointed objects over the cooktop as they can damage the unit if they fall on top Do not put detergents or flammable materials in the equipment installed under the cooktop While cooking any overflowed fat or oil on the cooktop may ignite There is a risk of burning and fire therefore control the cooking process at all times The use of accessory attachments not recommended by the appliance manufac...

Страница 10: ...g or personal burners Close supervision is necessary when any appliance is used by or near children Do not touch hot surfaces Use dry pot holders to hold the handles of pots pans Use only dry potholders moist or damp potholders on hot surfaces may result in burns from steam Do not let the potholder touch hot heating elements Do not use a towel or other bulky cloth Always remove the covers on seale...

Страница 11: ...ND REPAIR SAFETY Do not repair or replace any part of the appliance unless specifically recommended in the manual All other services should be referred to a qualified technician There are no user serviceable parts on this appliance Only an authorized service representative should attempt to service your cooktop This product may not be treated as household waste Instead it should be handed over to ...

Страница 12: ...t by factory trained professionals only For warranty service please call customer service REPLACEMENT PARTS Only authorized replacement parts may be used in performing service on this appliance Replacement parts are available from ZLINE 1 614 777 5004 Warranty and Service PRODUCT SPECIFICATIONS RCIND 30 RCIND 36 ...

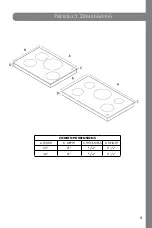
Страница 13: ...6 Product Dimensions COOKTOP DIMENSIONS A WIDTH B DEPTH C THICKNESS D HEIGHT 30 21 2 36 21 2 ...

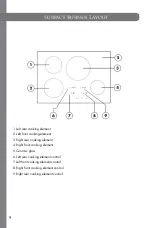
Страница 14: ...7 Users Manual ...

Страница 15: ...ntilation in the room is needed Make sure the kitchen is equipped with a range hood of appropriate power 400 CFM minimum Activate the exhaust fan range hood when possible Intensive and continuous use of the appliance may require additional ventilation for example by opening a window Room Ventilation ...

Страница 16: ... 2 Left front cooking element 3 Right rear cooking element 4 Right front cooking element 5 Ceramic glass 6 Left rear cooking element control 7 Left front cooking element control 8 Right front cooking element control 9 Right rear cooking element control ...

Страница 17: ...nt 4 Right rear cooking element 5 Right front cooking element 6 Ceramic glass 7 Left rear cooking element control 8 Left front cooking element control 9 Middle cooking element control 10 Right front cooking element control 1 1 Right rear cooking element control Surface Burner Layout ...

Страница 18: ...1 1 Surface Burner Layout 10 Main Power On Off 1 1 Control Lock 12 Decrease Timer minute 13 Minute Timer 14 Increase Timer minute 15 Decrease Power 16 Increase Power 17 Power Boost ...

Страница 19: ...icator light will turn off above the button TO TURN ON THE COOKTOP To turn on the cooktop touch the POWER button The indicator light above the button will light up If no further action is made the cooktop will return to STANDBY mode after a few seconds for safety reasons SELECTING CHANGING THE POWER LEVEL To turn one or more cooking zone place an appropriate pot or pan on the desired cooking zone ...

Страница 20: ...iod of time maximum 10 minutes This is best recommended for boiling water The power is reduced to level 9 at the end of the maximum time Use the B BUTTON to boost the power level to the highest level for 10 minutes The screen will show a P indicating the POWER BOOST To turn off POWER BOOST touch the key to switch from P to level 9 KEEP WARM MODE While in a power level touch the to enter into KEEP ...

Страница 21: ...e power automatically for POWER SHARING This power sharing is administered by the unit s microprocessors which will alternate power in one area TIPS Remember to select the power setting last for the cooking element you want to maintain at full setting heat To maintain full setting heat for two items place one item on an area and place the second item on another area TO TURN OFF THE COOKTOP To turn...

Страница 22: ...om 1 minute 99 minutes This is used to automatically turn off the cooktop NOTE Seconds are not used in the timer settings The red dot next to the time symbol indicator will illuminate indicating that the cooking elements is selected TO SET While cooking touch the timer key pad until the time light of the desired cooking element is on Time digital displays read 00 and blinking Use or key to adjust ...

Страница 23: ...r for the desired cooking element blinks If more than one switch off time is programmed the shortest time remaining will show in the digital display TO CANCEL TIMER Touch the Timer until the time symbol indicator for the desired cooking element blinks then touch the or to set the timer to 00 The Time digital display will blink for 5 seconds and then turn off indicating that the timer of selected c...

Страница 24: ... on cookware typically when rivets are used can vibrate Cracking noise occurs if the cookware base is made of a different material Low Humming noise occurs when cooking which is normal particularly at high power settings A whistling noise occurs if both elements are being used at the same time at high settings and the cookware base is made of a different material COMPATIBLE COOKWARE DO NOT USE hea...

Страница 25: ...NED RESIDUE Use a ceramic glass cleaner when the cooktop is cool Use a single edge razor blade scraper approximately at a 45 angle against the glass surface and scrape off the residue After scraping the residue spread a few drops on the burned residue area and finish off with a ceramic glass cleaner and paper towel METAL MARKS AND SCRATCHES For preventative measures be careful not to slide pots or...

Страница 26: ...rrect cooking element selected No power to cooktop Make sure that the cookware is centered on the cooking element and that cookware is also the correct type for induction cooking The bottom of the cookware must be large enough to cover cooking element completely Cookware must be flat and centered on the cooking element Make sure the correct control is turned ON for the cooking element being used C...

Страница 27: ...re is centered on the cooking element and that it is also induction compatible See COMPATIBLE COOKWARE on page 17 E2 Supplied voltage to cooktop is too low This may be caused by reduced voltage supply to the house circuit Be sure that the connections are correct and the supplied voltage E3 Supplied voltage to cooktop is too high This may be caused by increased voltage supply to the house circuit B...

Страница 28: ...the wall coverings countertop and cabinets around the cooktop can withstand heat up to 200 F generated by the cooktop 5 Gently lower the cooktop into the countertop cutout 6 NOTE Do not seal the cooktop to the countertop The cooktop must be removable if service is necessary Instead use foam tape to ensure that the cooktop is secure IMPORTANT SAFETY INFORMATION WARNING Installation and service must...

Страница 29: ...se 3 WIRE CABLE FROM HOME POWER SUPPLY IMPORTANT Use the 3 wire cable from Home Power Supply where local codes permit a 3 wire connection 4 WIRE CABLE FROM HOME POWER SUPPLY IMPORTANT Use the 3 wire cable from Home Power Supply where local codes permit a 3 wire connection The cooktop conduit wiring is approved for copper wire connection only if you have aluminum house wiring use only special conne...

Страница 30: ...NOT obstruct these areas IMPORTANT For proper ventilation provide a vent under the countertop in front of the cabinet and in the back of the cabinet The ventilation opening is to extend the full length of the cooktop cutout Junction box approximate location minimum 4 below the cooktop ...

Страница 31: ...3 Read USING THE COOKTOP 4 Turn on the power to the cooktop 5 Verify all function operation properly NOTE If the cooktop does not work or you meet any problem in your operation please check that the circuit breaker has not tripped or the house has not blown For more information please See TROUBLESHOOTING If the problem cannot be resolved call ZLINE at 1 614 777 5004 installation instructions ...

Страница 32: ...rovide a vent under the countertop in front of the cabinet and in the back of the cabinet The ventilation opening is to extend the full length of the cooktop cutout Junction box approximate location minimum 4 below the cooktop Air exhaust Air exhaust Air exhaust Junction Box Min 19 Max 20 7 1 8 16 Min 35 Max 35 7 7 32 16 4 1 2 Vent FRONT Vent ...

Страница 33: ...3 Read USING THE COOKTOP 4 Turn on the power to the cooktop 5 Verify all function operation properly NOTE If the cooktop does not work or you meet any problem in your operation please check that the circuit breaker has not tripped or the house has not blown For more information please See TROUBLESHOOTING If the problem cannot be resolved call ZLINE at 1 614 777 5004 installation instructions ...

Страница 34: ...ance between the cooktop and the oven 3 4 Note Do not put a divider between the oven and cooktop NOTE The cooktops include spacers on both sides to ensure proper airflow once installed Do not remove the spacers Do not remove spacer Countertop Spacer Graphic Profile ...

Страница 35: ......

Страница 36: ...Kitchen and Bath Three Locations 350 Parr Circle Reno NV 89512 916 Delaware Avenue Marysville OH 43040 319 Rowland Mill Road Bruceton TN 38317 www zlinekitchen com 1 614 777 5004 ...

Отзывы: