background image

COVERAGE

ZLINE Kitchen and Bath range products will be warrantied for one year from the 
original purchase date for the original purchaser of the product. This warranty covers 
all parts and labor for necessary repairs if any part of the product proves to be 
defective in materials or workmanship. The product must be deemed serviceable via 
troubleshooting with the ZLINE Kitchen and Bath service team. All service on ZLINE 
Kitchen and Bath range products under the above warranty must be performed by 
ZLINE approved and certified service, unless otherwise specified by ZLINE Kitchen 
and Bath. Service will be provided during normal business hours.

TERMS

This warranty applies only to the original purchaser of a range product installed for 
normal residential use. This is defined as a single-family, residential dwelling in a 
non-commercial setting. Commercial settings include but are not limited to: schools, 
churches, hotels, restaurants, vacation rentals such as Airbnb, day care centers, 
private clubs, fire stations, common areas in multi-family dwellings, nursing homes, 
food service locations, and institutional food service locations such as hospitals or 
correction facilities. This warranty is non-transferable and will not be extended based 
on the date of installation. The warranty applies only to products installed in the 
continental United States and the District of Columbia.  

Failure to secure certified warranty service per these terms will result in a forfeiture 
of the remaining warranty. Out of pocket payments will not be reimbursed unless 
prior approval is received from ZLINE Kitchen and Bath and/or our service contract 
partner. Unapproved out of pocket payments for service will not be reimbursed. All 
warranty procedures must be followed to maintain warranty coverage.

Warranty shall not apply and ZLINE Kitchen and Bath is not responsible for damage 
resulting from negligence, improper maintenance, misuse, abuse, alteration of or 
tampering with the appliance, accident, natural disaster, improper electric supply, 
flare-up fires, unauthorized service or repair, improper installation, or installation not 
in accordance with the instructions contained in the manual, or the local codes. 

WHAT IS NOT COVERED

1.  Installation or start-up, damages or problems caused by improper installation or 

use.

2.  Service by an unauthorized service providers or damage related to unauthorized 

service or unauthorized parts. 

3.  Installation in any commercial or non-residential application. 
4.  Removal or re-installation cost.
5.  Aesthetic damage, scratches, or natural wear caused by normal use. 
6.  Second-hand, open box products or products purchased from an unauthorized 

retailer.

NOTE: 

In the event that service is dispatched, and it is discovered that the reported 

issue is not covered under warranty based on the disclaimers above, the customer 
will be responsible for all service fees. Failure to pay these fees will result in the 
forfeiture of remaining warranty coverage.

WARRANTY

WARRANTY

Содержание RCIND-24

Страница 1: ...Induction Cooktop Installation Guide and Users Manual...

Страница 2: ...nd professional features into everyone s homes Because we continually strive to improve our products we may change specifications and designs without prior notice REGISTERING YOUR PRODUCT Please regis...

Страница 3: ...e to secure certified warranty service per these terms will result in a forfeiture of the remaining warranty Out of pocket payments will not be reimbursed unless prior approval is received from ZLINE...

Страница 4: ...ENTS IMPORTANT SAFETY INSTRUCTIONS 1 PRODUCT SPECIFICATIONS 7 ROOM VENTILATION 10 INSTALLATION INSTRUCTIONS 1 1 SURFACE BURNER LAYOUT 18 OPERATION 21 COOKWARE USES 27 MAINTENANCE AND CLEANING 28 TROUB...

Страница 5: ...ity for examination repair or adjustment Do not cook on broken cooktop If cooktop breaks cleaning solutions and spillovers may penetrate the broken cooktop and create a risk of electric shock Do not s...

Страница 6: ...o not use a towel or other bulky cloth Always remove the covers on sealed or canned goods and before heating to avoid explosion When the unit is on do not touch outside the control panel as the surfac...

Страница 7: ...ervice must be performed by a qualified installer or service technician WARNING Always read and obey all safety information failure to follow these instructions can be killed or seriously injured BEFO...

Страница 8: ...ELECTRIC POWER RATING Voltage 240 volts Frequency 60 Hz Amperage 40 amps Model RCIND 24 RCIND 30 Amperage 50 amps Model RCIND 36 1600W 3200W 3700W 2400W 2400W 2000W 3200W 2100W 1600W 2100W 3700W 2600W...

Страница 9: ...MPORTANT Use the 3 wire cable from Home Power Supply where local codes permit a 3 wire connection The cooktop conduit wiring is approved for copper wire connection only if you have aluminum house wiri...

Страница 10: ...WIDTH B DEPTH C HEIGHT 24 20 2 DO NOT obstruct these areas IMPORTANT For proper ventilation provide a vent under the countertop in front of the cabinet and in the back of the cabinet The ventilation o...

Страница 11: ...H C HEIGHT 30 21 2 DO NOT obstruct these areas IMPORTANT For proper ventilation provide a vent under the countertop in front of the cabinet and in the back of the cabinet The ventilation opening is to...

Страница 12: ...er the countertop in front of the cabinet and in the back of the cabinet The ventilation opening is to extend the full length of the cooktop cutout Junction box approximate location minimum 4 below th...

Страница 13: ...s from the top of the cooktop surface 2 Clean cooktop before use Dry with a soft cloth See Maintenance and Cleaning for reference 3 Read Operation 4 Turn on the power to the cooktop 5 Verify all funct...

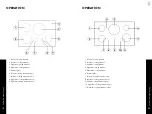
Страница 14: ...front cooking element control 8 Right front cooking element control 9 Right rear cooking element control 1 Left rear cooking element 2 Left front cooking element 3 Middle cooking element 4 Right rear...

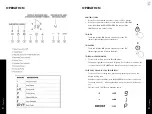
Страница 15: ...n until a beep sounds The indicator light will turn off above the button TO TURN ON THE COOKTOP To turn on the cooktop touch the POWER button The indicator light above the button will light up If no f...

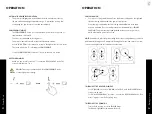
Страница 16: ...er into KEEP WARM mode Then press again to turn off the cooking zone TO TURN OFF THE COOKTOP To turn off the cooktop touch the POWER button The indicator light above the button will turn off AUTOMATIC...

Страница 17: ...y press adjusts the time by 1 minute and a long key press by 10 minutes The automatic timer range from 1 minute 99 minutes This is used to automatically turn off the cooktop NOTE Seconds are not used...

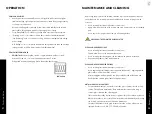
Страница 18: ...ic glass cleaner when the cooktop is cool Apply a few drops directly to the cooktop and use a paper tower or a soft cleaning pad Use a dry cloth or paper towel to remove all cleaning residue NEVER RUN...

Страница 19: ...inuously for 2 hours The cooktop control panel may register liquids or objects obstructing the panel which can cause the cooktop to shut off Clean up spills or remove objects and restart the unit Liqu...

Страница 20: ...cooktop might be loose The connections in the cooktop might be damaged Noise Noises with humming crackling and buzzing This is a normal occurrence See cookware noise on page 27 Need additional inform...

Отзывы: