8 Clearance
Timely clean the print head if one of the below conditions occurred:
Unclear printing.
Unclear vertical column in printing paper.
Noisy feeding.
1.
2.
3.
9 Cleaning
Clean the printer as follow:
Turn off the printer and open the roll paper cover. Remove the roll
paper if any.
The thermal head may become extremely hot after printing. Allow
it to cool before cleaning.
The thermal elements of the thermal head should be cleaned with
wrung-out cotton that has been moistened with an alcohol
solvent.
Close the cover after the ethanol has been completely volatilized.
After that, print the self-test page.
1.
2.
3.
4.
6
7
4
12 Specifications
Item
Color
Printing Method
Paper Width
Print Width
Print Resolution
Printing Speed
Interface
Line Spacing
Column Number
Character Size
Extension
Character Sheet
1D Barcode Types
Auto Cutter
Print Command
Power Adapter
Printer Input
Cash Drawer
Cutter Life
Printer Head Life
Dimensions
Net Weight
Packing Weight
Operation Temp.
Storage Temp.
Operation
Humidity
Storage Humidity
Certificates
Parameter
Black
Direct thermal
79.5±0.5mm
72mm
576 dots / line or 512 dots / line (Adjustable by command)
180 mm/s
USB
、
USB+LAN
3.75mm (Adjusted by command)
Font A: 42 columns or 48 columns
ANK
:
Font A: 1.5×3.0mm (12x24 dots)
Font B: 1.1×2.1mm (9x17 dots
)
PC437(Std.Europe) / (Katakana) / PC850(Multilingual) /
PC860(Portugal) / PC863(Canadian) / PC865(Nordic) / (West
Europe) / (Greek) / (Hebrew) / (East Europe) / (Iran) /
(WPC1252) / PC866(Cyrillic#2) / PC852(Latin2) / (PC858) /
(IranII) / (Latvian) / (Arabic) / (PT1511251)
UPC-A / UPC-E / JAN13(EAN13) / JAN8(EAN8) / CODABAR / ITF
/ CODE39 /CODE93 / CODE128
Partial
ESC/POS
Input: AC 100-240V/50-60 Hz; Output: DC24V/2.5A
DC 24V/2.5A
DC 24V/1A
1.5 million cuts
150KM
189*145*140mm(D×W×H)
1.00 Kg
1.85 Kg
0
℃
- 45
℃
-10
℃
- 60
℃
10 - 80%
10 - 90%
CE &FCC &RoHS
5 Printer Connection
Connect the adopter cable to the printer power interface.
Connect the data cable to the printer port.
Connect the cash drawer to the printer.
1.
2.
3.
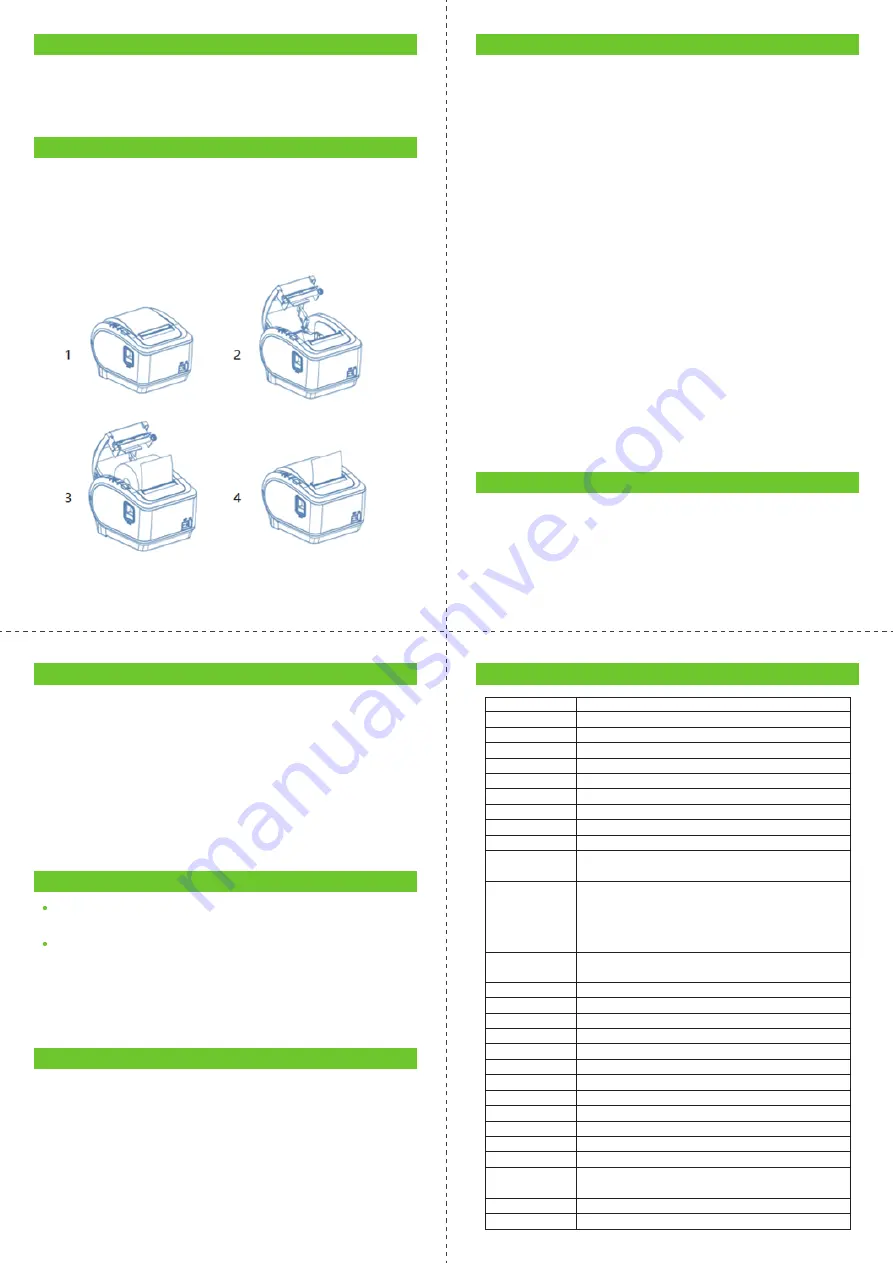
6 Paper Roll Loading
To install the paper roll, follow the steps below
:
Open the paper roll cover.
Insert the paper roll as shown in the illustration.
Pull out a small roll of paper and close the paper roll cover.
Tear up the spare paper roll.
1.
2.
3.
4.
7 Button Name, Indicator Light and Function
FEED Button
Press to FEED paper manually.
Paper Indicator (LED Light)
The flashing blue and red lights indicate a paper shortage and the
absence of an alarm means everything is going well.
Power Indicator
The Power indicator light will be on if the connections are made
properly.
Error Button
The Error indicator twinkles when there is a paper shortage, a
cutter error, or a printing head overheating.
Self Test
Turn off the printer while it is powered up, press the “
FEED
” button
and then turn it back on. The finished self-test will print out to
display printer settings after two seconds.
Method to Enter Hexadecimal Mode
When the printer is powered on, press and hold the “
FEED
” button
while turning it on for around 10 seconds, then release the button
to enter data hex dump mode. “Hexadecimal Dump” will be
printed on the paper.
Reset
When the printer is powered on, press and hold the “
FEED
” button
while turning it on for around 20 seconds. Reset succeeds if the
beeper sounds.
1.
2.
3.
4.
5.
6.
7.
11 Failure Analysis
Printer command light is off.
Replace the power adapter
.
Check outlet power.
Print no content.
Check that the paper is installed in the correct orientation.
Check whether the power supply uses the original power
supply.
If there is nothing on the printed self-check page after verifying
the above, the machine has a hardware issue.
A.
B.
1.
2.
3.
1.
2.
10 How to Solve Paper Jam
Method 1
Re-start printer.
Method 2
Open the battery cover near the paper exit. Turn the white gear on
the cutter. Only if the cutter gets back to its initial position, the
cover can be opened.
Caution: Do not damage the print head and the auto-cutter by
opening the cover forcibly.
5


