background image

Installation Guide

Version: 1.0

Model: TL700

Содержание TL700

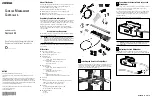
Страница 1: ...Installation Guide Version 1 0 Model TL700 ...

Страница 2: ...se the contents of this Installation Guide and update our products to enhance quality and performance without prior notice 1 2 3 You must perform the initialization process on each installation immediately after installing this lock on any door as described in the initialization procedure on page 8 4 Do not install the batteries until the lock is installed 5 What s in the Box 1 Installation Diagra...

Страница 3: ...ew C Metal Pin Cards Stud Outdoor Unit 70mm 60mm 45mm The spindles and screws are designed to fit doors with a thickness of 45mm to 60mm and one of screws C need to be cut how to cut it just like the below diagram Screws Length Cutting Comparison Table Screw C at battery compartments Screw C at bottom 13mm Cutting Length 45mm ...

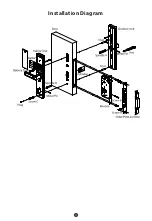
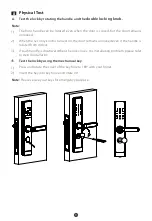
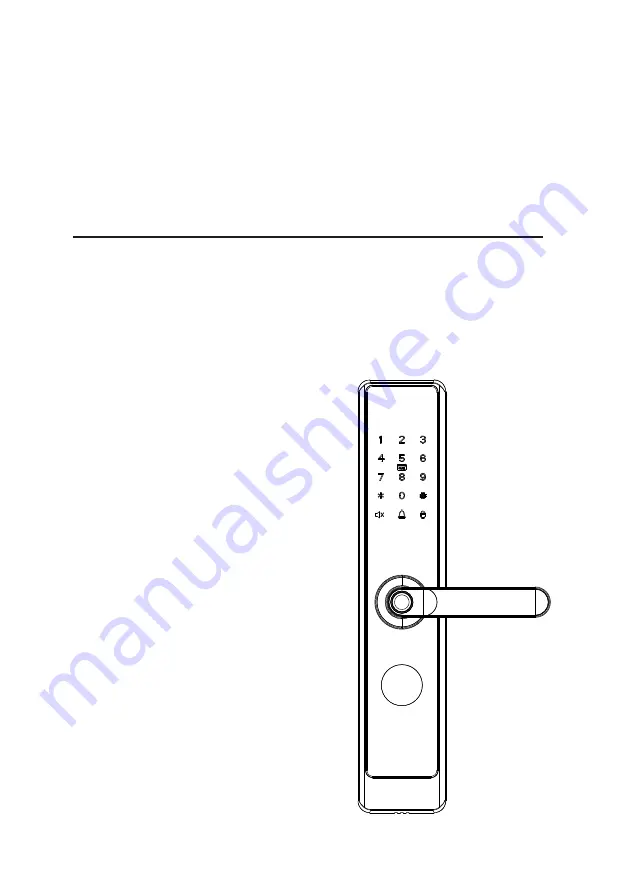
Страница 4: ...Installation Diagram 2 ...

Страница 5: ... the latch bolt to 180 inside the mortise and release it 3 Installation Procedure 1 Door Properties Measure the Door Thickness A Measure the thickness of the door and cut the Spindle and Screws to proper length For further details please refer the table on Page 1 Check the Door Opening Direction B The position of the handle is determined by the opening direction of the door Below is the graphical ...

Страница 6: ... line of handle 60mm Change the Handle Direction if needed C Remove the directional screw of the handle rotate the handles of the outdoor and indoor units to 180 degrees in the left or right direction depending on the door 1 Secure the handle again with the directional screw 2 Door thickness 45 to 60mm Note Before changing direction please make sure the Security Knob is at the right side ...

Страница 7: ...w A Screw B Outdoor Outdoor 4 Install Spindle and Studs Insert the Spindle A into the clutch then insert the Metal Pin from the bottom of the clutch forcing the pin apart and bending it to hold the Spindle A Then install the studs 1 2 Metal Pin Stud Note After installing the spindle please turn the clutch direction in the door open direction the lock in the picture is right open so the clutch was ...

Страница 8: ...h and the outdoor unit must be close to the entrance 1 2 6 Install Indoor Unit Insert the Metal pin on Spindle B and uninstall the battery cover 1 Connect the cable to the Indoor Unit port 2 Metal Pin Place the Indoor Unit appropriately on the Mounting Plate and use Screw C to protect the Indoor Unit 3 4 Then install the batteries and plug ...

Страница 9: ...ke Box is aligned with the latch bolt Then use the installation template to drill the holes 1 Align the Strike Plate and Box with the holes drilled and protect them with Screw A 2 7 Install Strike Plate and Box Screw A Screw C ...

Страница 10: ... turned on the door remains unlocked even if the handle is rotated from indoor 2 Note Test the lock by using the mechanical key Press and rotate the cover of the key hole to 180 with your finger 1 Insert the Key into key hole and rotate 90 2 Note Please secure your keys for emergency purpose If push handle is downward then the lock closes It is installation problem please refer to step 4 installati...

Страница 11: ...onfidential 4 Please keep the mechanical keys in a separate place to avoid any criticality 5 To use the lock more efficiently please refer the User Manual before using the lock If you have any queries please feel free to contact the Company s Client Service Center from any place or contact the Service Center headquarters 6 Please visit our company s website at anytime for our service information and ...

Страница 12: ... with random digits before or after the actual password The maximum number of entered digits must be less than or equal to 30 For example If the correct password is 123456 then the random password can be 89123456807 1234562363 389123456 etc Backup Enrollment After the first registration users can change the registered password and card or continue to register the remaining fingerprints Always Open M...

Страница 13: ... audio prompt please press key to confirm 1 Reset the Lock 2 Activate the Lock Touch the keypad with the back of your hand or fingers to activate the lock Press and hold the Reset button for 5 seconds The lock will beep for 5 times Keep holding the Reset button until you hear the audio prompt please press key to confirm 3 Register the First Administrator Touch the keypad to activate the lock 1 Press ...

Страница 14: ...ctivate the lock 1 Press key to access the menu 2 Verify the administrator s identity with his her fingerprint or card or by entering the password then press the key to confirm 3 Enter the digit corresponding to the function to be performed by following the audio guide 4 ...

Страница 15: ...oor with Password Touch the keypad to activate the lock Press the registered fingerprint on the fingerprint sensor Rotate the handle down to open Enter the registered password and press the key to confirm Note Users may enter random password to prevent any person from observing the password The maximum length of random password is 30 digits Unlock the Door with Card Swipe the registered card on the d...

Страница 16: ...l not occur in a particular installation If this equipment does cause harmful interference to radio or television reception which can be determined by turning the equipment off and on the user is encouraged to try to correct the interference by one or more of the following measures IMPORTANT Any changes or modifications not expressly approved by the party responsible for compliance could void the us...

Отзывы: