background image

www.zkteco.

eu


Copyright © 2020 ZKTECO CO., LTD. All Rights Reserved. 

Содержание TL300B

Страница 1: ...del TL300 Version 1 0 Installation Guide Due to regular upgrades of systems and products ZKTeco could not guarantee exact consistency between the actual product and the written information in this manual ...

Страница 2: ...tents of this Installation Guide and update our products to improve the quality and performance without any prior notice 4 Do not insert batteries before installing the lock Table of Contents What s in the Box 1 Installation Diagram 2 Installation Procedure 2 1 Door Properties 2 2 Drilling Holes on the Door 4 3 Installing Mortise 4 4 Installing Outdoor Unit 5 5 Installing Mounting Plate and Gasket...

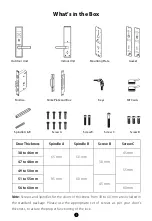
Страница 3: ... to 60 mm 60 mm Note Screws and Spindles for the doors of thickness from 38 to 60 mm are included in the standard package Please use the appropriate set of screws as per your door s thickness to assure the proper functioning of the lock Outdoor Unit Indoor Unit Mounting Plate Gasket Mortise Strike Plate and Box Keys MF Cards Spindle A B Screw A Screw B Screw C Screw D ...

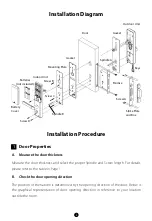
Страница 4: ...e 1 B Check the door opening direction The position of the handle is determined by the opening direction of the door Below is the graphical representation of door opening direction in reference to your location outside the room Outdoor Unit Indoor Unit Gasket Gasket Mounting Plate Mortise Strike Plate and Box Spindle A Spindle B Keys Batteries not included Battery Cover Screw B Screw C Screw A Scr...

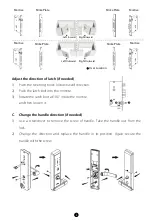
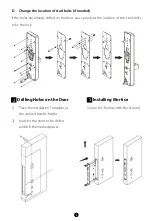
Страница 5: ...en loosen it C Change the handle direction if needed 1 Use a screwdriver to remove the screw of handle Take the handle out from the lock 2 Change the direction and replace the handle in its position Again secure the handle with the screw Left Inward Right Inward Left Outward Right Outward Mortise Strike Plate Mortise Strike Plate Mortise Strike Plate Mortise Strike Plate User Location ...

Страница 6: ...n the door you can adjust the location of two stud bolts to fix the lock Drilling Holes on the Door Installing Mortise 1 Place the Installation Template at the desired handle height 2 Mark for the holes to be drilled and drill the marked places 2 3 Secure the Mortise with the Screw A ...

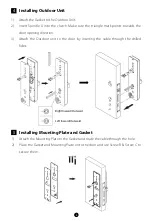
Страница 7: ...Gasket and Mounting Plate on to the door and use Screw B Screw C to secure them 4 5 1 Attach the Gasket to the Outdoor Unit 2 Insert Spindle A into the clutch Make sure the triangle mark points towards the door opening direction 3 Attach the Outdoor unit to the door by inserting the cable through the drilled holes Right Inward Outward Left Inward Outward ...

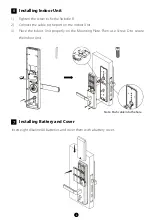
Страница 8: ...ne AA batteries and cover them with a battery cover 6 Note Push cable into the hole 7 1 Tighten the screw to fix the Spindle B 2 Connect the cable to the port on the Indoor Unit 3 Place the Indoor Unit properly on the Mounting Plate Then use Screw D to secure the Indoor Unit ...

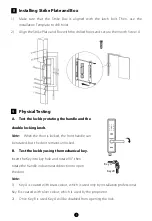
Страница 9: ...rd direction to open the door Note 1 Key A is coated with brass colour which is used only by installation professional Key B is coated with silver colour which is used by the proprietor 2 Once Key B is used Key A will be disabled from opening the lock 8 9 Installing Strike Plate and Box 1 Make sure that the Strike Box is aligned with the latch bolt Then use the Installation Template to drill holes...

Страница 10: ...with the instructions may cause harmful interference to radio communications However there is no guarantee that interference will not occur in a particular installation If this equipment does cause harmful interference to radio or television reception which can be determined by turning the equipment off and on the user is encouraged to try to correct the interference by one or more of the followin...

Страница 11: ...www zkteco eu Copyright 2020 ZKTECO CO LTD All Rights Reserved ...

Отзывы: